🔷 Elevate your DIY game with crystal-clear OLED precision!
The DSD TECH 0.91 inch OLED Display features a sharp 128x32 blue-on-black screen driven by the SSD1306 chip. Its I2C interface simplifies wiring with only 4 pins, making it ideal for Arduino, ARM, and AVR projects. Backed by comprehensive sample code, quick setup, and a 1-year warranty with lifetime support, this compact display is engineered for seamless integration and reliable performance in diverse DIY electronics applications.
Standing screen display size | 0.91 Inches |
Screen Resolution | 128 x 32 |
Max Screen Resolution | 128x32 |
Hard Drive | HDD |
Chipset Brand | arm |
Card Description | Integrated |
Brand | DSD TECH |
Series | SH-S091 |
Item model number | 8541612462 |
Item Weight | 0.704 ounces |
Product Dimensions | 1.2 x 1 x 0.2 inches |
Item Dimensions LxWxH | 1.2 x 1 x 0.2 inches |
Color | Black |
Processor Brand | ARM |
Number of Processors | 1 |
Computer Memory Type | DDR SDRAM |
Power Source | DC |
V**O
Great little OLED display
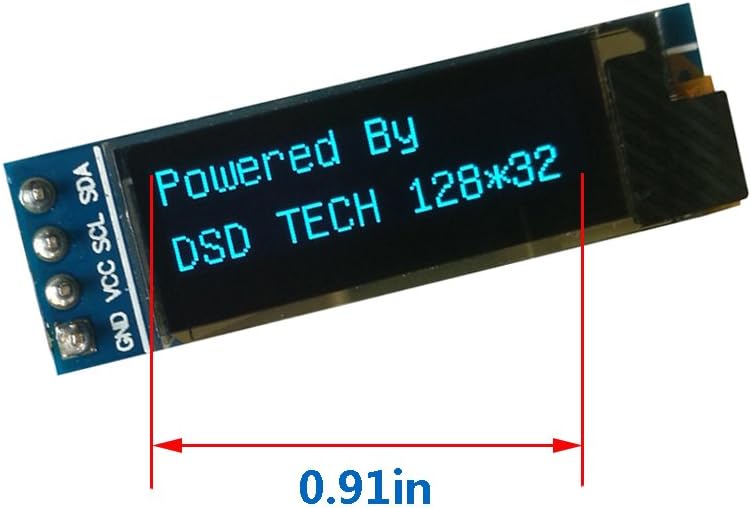
If you are looking for a small, bright, 2-line OLED display to use in your Arduino, etc. projects, you have found it. This 0.91" OLED display from DSD Tech is well made, has only 4 pins to connect (GRD, VCC, SCL and SDA), and is very easy to incorporate into your Arduino, etc. projects. There is a library in the Arduino repo for this (and other DSD Tech displays), and DSD Tech has a sketch on their website that you can download, enter the info you want to show on the two-line display, then upload it to your Arduino. This is my first time using a DSD Tech product, but with the look, performance and low price of this 0.91" OLED display, I'll be looking to them in the future for more of this and other products they offer. I highly recommend this product.
J**.
Cheap, useful, great view
I've used this as part of my smart car project, connected to Arduino through I2C. It works beautifully! It offers a crisp easy to read display, even under the Texas Sun! You can find ready made libraries for Arduino too for several different boards, including original arduino and ESP32 boards. For the price, I would not mind having a few of these in my drawer just for future projects. Beware though, this is a "small" screen (which is why bought this one in the first place) so don't expect a large screen. But let me tell you this, it fits really nicely inside my dashboard button cluster! This thing can fit into very small places! Strongly recommended!
R**R
Easy! All you need is some Python, C++, or Arduino experience.
The device was safely packaged and arrived intact. I had a Yahboom! RGB cooling hat for my Raspberry Pi 4 whose I2C display WASN'T packaged as well as the DSD Tech displays were and arrived DOA, so I ordered these as a replacement. I already had the software installed on the RPi4, and the display worked immediately upon installation. I am very pleased with the purchase, and intend to use the additional I2C display on one of my Arduino projects!
F**R
Quick and easy to install, does its job and very cost-effective.
I use them on a raspberry pi cluster to run some quick system monitor info. Does the job its meant for, and it was quite easy to install. There are way too many of these same OLED displays, and it gets hard to decide which one to buy, they all look the same. Glad to say my random picking of this item turned out to be a safe decision.
P**M
Nice display, hard to mount
I bought this for use with a Particle Photon controller. The recommended libraries don't work for the Photon, but I was able to use the Adafruit libraries and it worked beautifully. The only problem I have is the physical install. With just the pins on one side of the board, its a big cantilever and doesn't seal against an enclosure well. I really need to print some sort of flange mount, but its tough since there is so little room between the top pixels on the display and the edge of the display. The included cut sheet doesn't provide adequate mechanical drawings either. I wish these companies would think about how this will be installed in a project box. The electronics are good, but the mechanics are a pain to work out.Here is the sample code in case anyone wants a quick start:#include <Adafruit_GFX_RK.h>#include <Adafruit_SSD1306_RK.h>Adafruit_SSD1306 display = Adafruit_SSD1306(128, 32);void setup(){// SSD1306_SWITCHCAPVCC = generate display voltage from 3.3V internallydisplay.begin(SSD1306_SWITCHCAPVCC, 0x3C); // Address 0x3C for 128x32// Show image buffer on the display hardware.// Since the buffer is intialized with an Adafruit splashscreen// internally, this will display the splashscreen.display.display();delay(1000);display.clearDisplay();display.display();txtsize=3;display.setTextSize(3);display.setTextColor(WHITE);display.setCursor(0,7);display.print("Working");display.setCursor(0,0);display.display(); // actually display all of the above}
D**N
Nano 33 iot
Got it to work with my board using the adafruit library . This display does not like 3.3 V use 5 V.
A**R
High refresh rate, great product
Although the documentation is not immediate, there are directions to the git library which is easy to work with. In fact, there is even a wiki for this library.One key feature for my project was the refresh rate (i.e. characters change quickly without previously one fading slowly) and can push up to about 1200 wpm. However, the display is small but this was advertised as such.
A**W
Surprised!
I've been buying a bunch cheap electronics lately and its usually a mad dash to find source material once it gets here. I was pleasantly surprised to see a sensibly sized package including a small user guide and it also included jumpers. Worth every dollar when you are trying to get up and running. Good job guys.
Trustpilot
1 day ago
2 months ago