
DOWNLOAD THE APP


Customer Services
Copyright © 2025 Desertcart Holdings Limited
DOWNLOAD THE APP
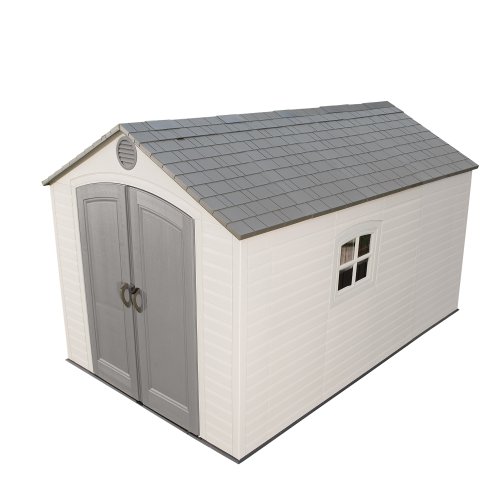


Get a Lifetime shed and Life gets a lot easier! At Lifetime, we design attractive outdoor plastic sheds to help you get your act together. With one of our outdoor plastic sheds, you’ll be able to find what you need, when you need it. Our outdoor plastic sheds come with handy shelving units so your garden supplies at right at your fingertips. These Lifetime resin sheds are built and designed for style and quality. You’ll appreciate the spacious head room, windows, and skylights, as well as the no paint, no rust, low-maintenance of Lifetime’s resin sheds. Stain-resistant floor included. Constructed with high-density polyethylene plastic (HDPE) with steel reinforcements, Lifetime resin sheds are built to weather many storms. Make it easy on yourself; invest in one of our outdoor plastic sheds. Made in the USA. The Lifetime 8' by 12.5' Outdoor Storage Shed features: (5) small skylights, (2) shatter proof polycarbonate windows, (2) screened vents,(1) 90 by 9-Inch shelf, (2) 30 by 10-Inch shelves, (2) corner shelves, and a 10-year limited warranty. Floor and installation hardware included.
A**R
Make sure you start with a level base!
I was torn between buying or building a wooden shed, but the reviews seemed so good for this product I decided to give it a try.I built a wood frame with 2x4 studs, filled it with leveling sand, and laid a 9'x13' base with 12" pavers from the local hardware store (just over a dollar each.) Its extremely important to have a suitable base, either concrete, pavers, or at a push a wood frame with plywood sheeting. If you simply set up on grass or dirt it will be almost impossible to assemble correctly and the parts won't line up.The shed arrived on a flat bed truck in 2 large boxes and the delivery guy was very helpful. When I began to unpack the shed I got the feeling that the panels weren't going to be tough enough for my liking, but I decided to put it up anyway and see how it turned out.Despite what you may read on other reviews, this is definitely a 2 person job, especially if there is any wind. The side panels click into slots in the floor and take some force to make sure they connect properly, especially the corner pieces.The instructions are relatively straight forward but I suggest laying all the parts out on the ground and reading through the entire instruction book while identifying the parts before you start.The side panels lock into the floor at the bottom, click into the adjacent panel, and are also screwed into place. Its very important not to over tighten these screws or the coarse thread will strip the plastic. This annoyed me at first but I later realized that these screws really only hold the panels in position and don't make any difference to the structural integrity of the shed itself.Once all the panels were up the shed still had a bit of a flimsy feel to it, but once the steel roof trusses went into place it became solid. Much like a car, this thing depends on the roof to keep the frame rigid and strong and I was very impressed with the way it became solid when the roof went on. The doors have nice latch and locking mechanism and serve their purpose. I won't be storing gold bars in there any time soon but its certainly adequate to keep kids out if you plan on storing pool or garden chemicals in there.The windows and the in roof skylights let plenty of light in and the windows slide up in the frame to open. The shed came with several wall and corner shelves and there are other accessories available for this shed. I bought the window shutters for around $30. They look great and break up the otherwise bland looking sides on the 12.5' shed.Overall I'm please with this product. Once assembled its sturdy and it looks great. My only complaint is the risk of stripping the plastic when screwing the panels. I wish the manufacturer could set metal threads in the panels and use a fine thread machine type screw, or make the plastic thicker where the screws attach.If you're torn between buying a wooden shed or taking a chance on this one, keep in mind, no painting, no wood rot, no termites, no splinters. Just remember to start with a flat surface, allow 2 people about 4-6 hours to assemble, and don't over tighten the plastic screws.Overall a good product and worth the money.
A**R
Lifetime Shed 6402
Just put up the shed. I really like it. My wife and I are in our sixties. When putting up there were times when muscle is needed, like putting on the door hardware and snapping in wall panels. Also, beware of wind, even a good breeze will make it a little difficult. You will need three people when you have a good breeze; I would not try putting up on a windy day. My wife and I took our time and spent about 14 hours to do everything needed. The videos were very good but you need to know that the video may be somewhat outdated to the newer units or one model does not work exactly like the model your putting together. Having a level foundation is a plus. A problem was with the shipping company. A truck shows up with one driver. There was no lift on the truck. One box is over 200 lbs. and the other box is over 300 pounds. I had to get a neighbor (younger than I) to help me and the driver slide the boxes some five feet to the ground onto a cart. A little much for this sixty+ year old. Also, if you have panels that slide in, start on the rear left of the shed, as I learned, if you don't last panel does not slide in.Additional (5-30-16): The door hardware has much to be desired. Having a very hard time making things line up. May be a leveling issue. I do not like the door hardware at all. (6-20-16) We have had the shed for three weeks and I do like it. The door hardware is growing on me and seems to be doing just fine.
C**K
One man assembly not a problem.
I have a house on stilts near the beach. I ordered this product to store things under the house and protect things from wind blow rain. The area under the house is concrete, so I built the shed on that base.Since my wife is somewhat frail, I knew I would need to assemble the unit alone with only minor help not involving physical strength. Surprisingly, I had no real problem building the entire unit single handed. However there are a couple of hints I will offer.1) When attaching the sides to the base, you need to place the supplied board directly under each hole in the base. Then push in one tab at a time. The supplied board will raise the base so that the tab will be the only one under force. Once I got that, the sides go in quickly. You might think it should go between tabs. NO! You can't push two tabs in at once. One at a time. I spent a lot of effort before I realized this.2) When adding the roof, line up just one hole and get a screw started in that hole, don't tighten it. This holds the roof panel in place as you get the rest of the panel to line up without needing someone to hold it from sliding off. I found that the hole nearest the wall on the open side was the easiest to get lined up.3) When inserting the skylights, I used vise grips to grab on a to a tab on the underside of the skylight from the inside and pull the screw holes down into the roof panel holes. Then screw them in. The alternative is to have some method to push the skylight down from the outside, i.e. someone on the roof.4) The only two man operation was installing the header over the door. I needed someone to hold the doors vertical, while I threaded the header onto the door axles.5) If the base is not perfectly flat, the door will likely not line up. So use the supplied shims to adjust the door as the instructions indicate.6) When I got to installing the last two roof panels, the roof and back wall would not line up. I had to use a wedge between one of the support columns of the house and the roof panel to push the panel into alignment. It was 2 inches off. I later realized that most likely I could have used the shims to adjust the base to achieve the same end.Now that its up. It looks fine. I am not worried about rain or snow falling on it, since its under the house so can't comment on those properties.Over all the instructions are pretty clear. I would say that I wish there was more information about how to differentiate the various screws. The only way is to count how many of a type there are in a bag and compare that to the contents of the bag as stated in the instructions. This works, but sometimes there are more screws than listed so its takes some sorting.
L**E
The shed is ok and may need to be improved
The main purpose of purchasing this shed is that this shed will not rot and no painting is needed. This shed was delivered in two very heavy boxes.
G**A
Two Stars
it is not as sturdy as a rubbermaid one that I have and it doesn't go together easily have a inch overlay in final two pieces call help number and you wait forever emailed...
J**T
Sturdy Shed
Recently had a tree fall on the shed. One of the plastic vent/light pieces on the roof broke but everything else was fine.
S**E
Great shed! Large enough for everything we neeed to store...
I'm a fan of Lifetime brands, this shed is well built, plenty of room inside. I paid a fair price for it.
P**M
Four Stars
we like the shed but has missing parts
L**S
Five Stars
Great shed for the price
Y**
... didn't give this five stars because the instructions are horrible I would of thrown them away put a sharp ...
So I didn't give this five stars because the instructions are horrible I would of thrown them away put a sharp object in my eyes and broken both my thumbs I would of gotten this...
R**Z
I plan on building a wooden shelf inside and attaching a bracket from it to the wall to make it more sturdy.
Arrived in 2 large heavy boxes. I think 400 and 550 lbs. the delivery guy helped me load them on my truck and I took my time unboxing them in my back yard.
E**E
Don’t waste your money
Absolute piece of crap. Sides would not lock into the bottom, doors close worth a darn, and the shelves don’t line up with any of the holes. What a waste of money
J**A
Perfect
Love the shed, it's huge. Floors are beautiful. My husband loves it. It's perfect. Very spacious.
Trustpilot
1 month ago
1 day ago