


🏡 Elevate Your Outdoor Experience!
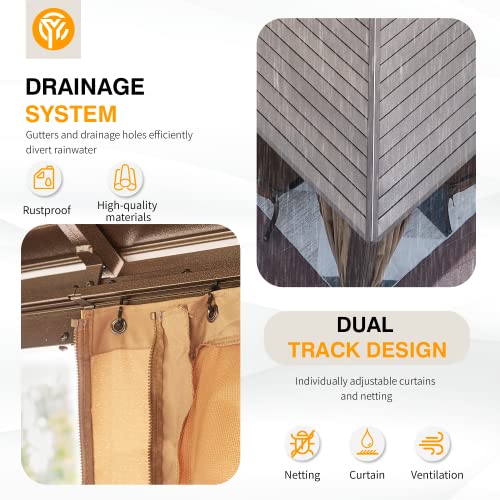
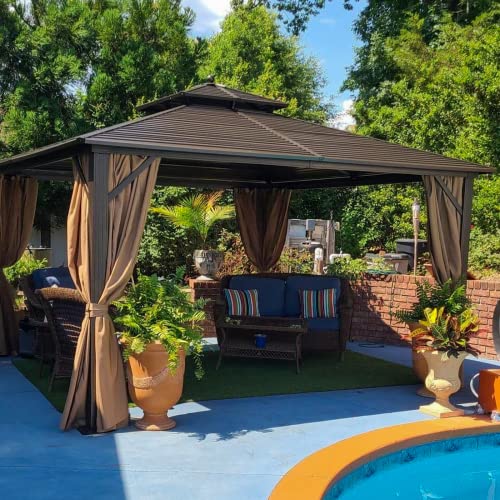
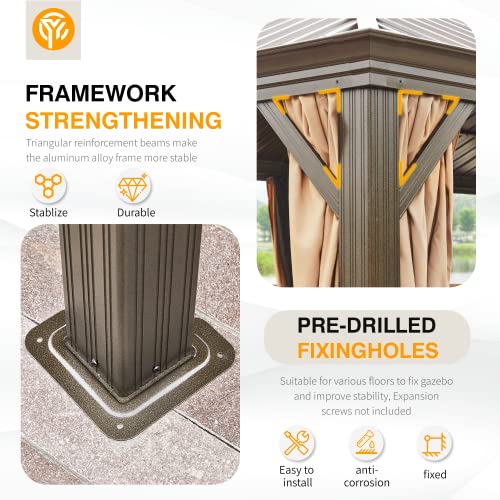
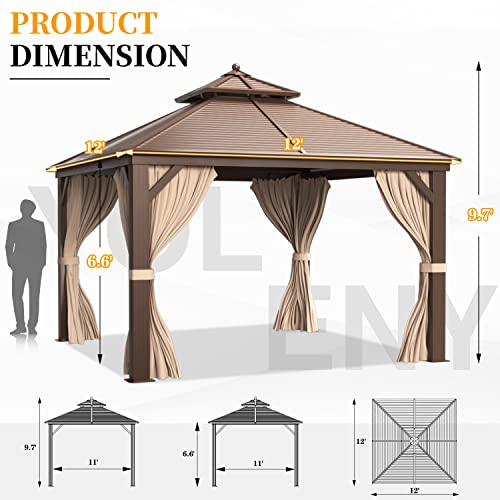
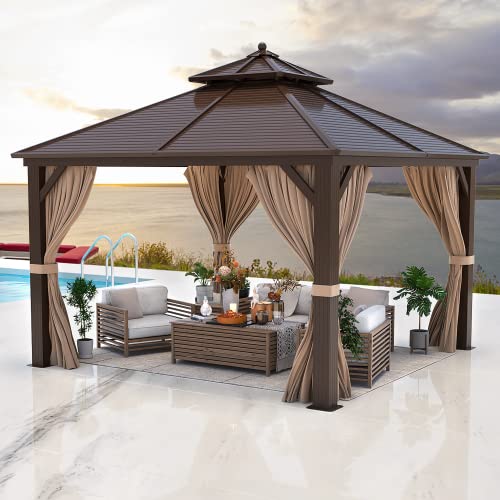
The YOLENY 12'x12' Hardtop Gazebo is a robust outdoor structure designed for all seasons. Featuring a galvanized steel double roof, rustproof aluminum frame, and fully enclosed netting and curtains, this gazebo offers unmatched durability, comfort, and privacy. Its innovative drainage system ensures longevity, making it the perfect addition to your garden, patio, or lawn for parties and relaxation.


| ASIN | B09DYL8P1V |
| Assembly Required | Yes |
| Best Sellers Rank | #134,901 in Patio, Lawn & Garden ( See Top 100 in Patio, Lawn & Garden ) #258 in Gazebos |
| Brand | YOLENY |
| Color | 12'x 12', Double Roof |
| Customer Reviews | 4.1 4.1 out of 5 stars (1,352) |
| Floor Area | 144 Square Feet |
| Frame Material | Alloy Steel, Aluminum, Metal |
| Item Weight | 291 pounds |
| Manufacturer | YOLENY |
| Material | Horizontal Stripe Galvanized Steel Top |
| Product Dimensions | 144 x 144 x 116.4 inches |
| Shape | Rectangular |
| Style | Traditional,Unique,Garden |
| Ultraviolet Light Protection | UV Protection |
| Water Resistance Level | Waterproof |
F**Z
Great product but seller lacks customer service
absolutely love the unit. Looks great. Not to difficult to put together - it took two of us about 15 hours total. Hardest part was installing the roof slats. After numerous tries we ended getting aluminum squares and inserting them into the slot before putting the slat in. This helped to guide them in place. Everything else went pretty smooth. Negatives to be aware of: We checked the boxes for to make sure all parts were shipped and received as mentioned by other reviewers. So glad we did. We were missing one roof support beam and had to ask the seller for it. Asking the seller was a trip…. We provided pictures the number of the item and several messages went back and forth because they had no idea what it was. Couldn’t understand why they would not grab the manual to see the exact piece. Once that was figured out they kept claiming it would ship but never did. I finally had to request a return for missing parts - while refusing to pay shipping back due to the defect. Only then did I get a tracking number - a fake tracking number. I had to inquire again about a shipping label before they gave me a real tracking number that actually showed the part shipped. It was definitely harder than it should have been to get the part but glad they finally followed through.
A**R
Absolute beast!!!!
This gazebo has been amazing! We have had it 5 years now and I just want to say that it has withstood 60-70 mph wind gusts on more than one occasion! We have it secured to our patio but it still has not come apart!!! Would HIGHLY recommend. Only downfall was the squirrels ate the screen material!!
T**S
Take Your Time, It Is Worth It!
We finally found time to set up this pergola a month later, purchased the end of May. We have yet to truly use and enjoy it due to our extreme heat wave (101-113 in Spokane, WA) but we are very happy with the final product now that it is built. Be sure to allow yourself time, definitely examine the instructions, and lay out the parts, and check each page before assembling.....follow the best you can and review if unclear. You have read in previous posts and I will concur, you have a diagram page to follow, NOT WELL WRITTEN INSTRUCTIONS. First, we laid all the pieces and parts out in alphabetical order keeping in mind, right and left sides. We had one manufacturing issue. Two 6mm nuts were missing from the end of one of the four main roof support beams, the other three were fine. Hubby was able to fix the issue without us having to call customer support. **Be watchful after placement and securing of the top, external brackets that need to be placed before moving forward with panels (see marked yellow picture). We unfortunately missed this step and didn't realize until we thought we were done. I said leave it but my over achiever brother had a challenge and would not be defeated. He has long skinny monkey arms that fit through the opening between the top and panels. He unscrewed and added each of the brackets. It does finish off the ends nicely and secures the panels and brackets tightly (no one would have known otherwise). Note: Using power with a 5-metrix hex (standard Allen Wrench) chucked up works very well!!! Also, keep the panels in a cool place until you are ready to remove the films (too hot, the film melted and was very difficult to remove). Once cooled, I removed the inside panel film and left the reflective sun side on for directional placement to help speed up the install process. I was fortunate to have my brother on hand, who has put together several of these DIY pergola projects. DO NOT have too many foremen on the job site (how our error occurred) and be sure to have plenty of food and water then finished beverages on hand! We purchased the 12'x16' pergola and are happy with the size, fits our deck well, and is definitely sturdy. I am not generally fond of curtains and not sure about these (personal preference). They are quite heavy and thick; perhaps nice during inclement weather but I prefer open sides, I am debating on the mesh drape still. We are happy with our purchase, glad it is assembled, aesthetically pleasing (quite beautiful) and ready to enjoy with family and friends.
J**R
Assembly
Well let me tell you a little about what I did and maybe help someone else out. First I read a lot of the reviews and the things they said and did to assemble this gazebo especially the roof panels. I wasn’t sure what some people were talking about until I started the panels then oh yeah I found out. First the frame was definitely a breeze to put together. I mounted my gazebo on my deck over top of my garage so I wanted it to be able to withstand the wind and storms so I pulled up some deck boards and put in a few 2x6 in between my existing ones where the holes are on the mounting bracket on the bottom of the four posts and drove 6 inch lag screws into the new 2x6s then I thought the small screws that hold the posts on to the mounts weren’t enough to hold it so before I screwed those in I got a tube of loctite PL Max premium and put a nice thick bead on top of the mounting bracket and slid the post into the loctite then put my screws in. Just for extra support. Now the panels. Yes the clips they provide blow!! I saw one guy used two sided tape. Great idea. Those clips go on the angle of the panels then into the corner track on the roof. If you don’t use something to hold them in place you will definitely need therapy during this process. I’ll tell you what I used on the clips. JB Weld Super weld UV light activated glue. I put glue on panel where the clip goes on then when I got the clip on I ran a bead of that glue along the two parts of the clip that clip onto the panel then turned glue pen around and used the UV light on the JB weld to cure it in seconds. That stuff is strong!! Those clips will not move when installing the panels into the corner tracks. The clips are no doubt a design flaw and they could’ve done something better. It looks like they are used to channel rain water but if you don’t use something to hold them in place it will drive you nuts. The guy with the two sided tape comment prevented my insanity before I even started the panels. You will need two people for sure and make sure you get those clips the whole way in the corner tracks or the holes will not line up. Now other than that I do think it is a beautiful gazebo. I got the 12x14 that fit perfectly on my deck. It’s worth the money in my opinion. It took me longer to set it up since I worked during the day then come home and worked a little on it. Next day after finished it rained pretty hard. No leaks. Bonus!! Well hopefully my review helped out on assembly. I would read other reviews and get ideas for the panels. That was a huge help before I even started them.
Trustpilot
1 month ago
3 days ago


