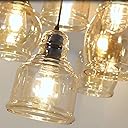
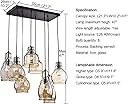
Full description not available
Brand | Rapidly Boy |
Color | Glass |
Material | Glass |
Light fixture form | Ceiling |
Room Type | Dining Room |
Product Dimensions | 24.6"L x 13.4"W x 45"H |
Indoor/Outdoor Usage | Indoor |
Power Source | Corded Electric |
Installation Type | Semi Flush Mount |
Control Method | Touch |
Light Source Type | LED |
Finish Type | Black Finish |
Shade Material | Glass |
Number of Light Sources | 8 |
Voltage | 110 Volts |
Light Color | clear |
Included Components | Mounting Hardware, Wiring, Bulb |
Embellishment | Crystal |
Lighting Method | Remote |
Item Weight | 17.6 Pounds |
Number of Items | 8 |
Wattage | 36 watts |
Bulb Base | E26 Medium |
Controller Type | Push Button |
Switch Type | Push Button |
Unit Count | 1.0 Count |
Water Resistance Level | Not Water Resistant |
Brightness | 3600 lumen |
Efficiency | Highly Efficient |
Mounting Type | Ceiling Mount |
Shade Color | black |
Fixture Type | Non Removable |
Assembly Required | Yes |
Manufacturer | Rapidly Boy |
Item Weight | 17.64 pounds |
Item model number | Antique |
Finish types | Black Finish |
Plug Format | A- US style |
Batteries Required? | No |
G**H
Gorgeous light--installation huge pain
UPDATE--March 2021, Just hooked this up with an Alexa dimmer switch (already had dimmable bulbs) and it's better than before. From the kitchen, we can tell Alexa to turn on the light and dim several times if necessary. The dimmer switches can be purchased from Costco (on sale, a two-pack was $20). Can't beat that! Everyone loves the light, but with Alexa, there were many Wows!This light is absolutely gorgeous in my son's dining room.Installation is not for the impatient individual. Instructions were useless. Go to YouTube and search "FM-24 Vintage 8-Bulbs Island Cognac Glass Cluster" to watch an excellent video on installation.Be prepared for 2 people with 2 ladders and several hours of time to install the light. The globes do NOT detach so plan on wrapping each one in bubble wrap. You will need to determine the length of each light strand BEFORE you install.We set up 2 step ladders with a 2x4 board across the ladders and straddled the light over the 2x4 and started the process of determining the length of each light. Still a little difficult to determine with each globe bubble wrapped and trying to gauge how far above the dining table this would hang.Let me pause at this point to say that my son is totally remodeling this home. We've ripped out ceilings for new duct work, tore out bathrooms and kitchen, replaced outlets, switches and recently hung 3 bathroom vanity lights in this home. Over the years, we've even hung ceiling fans so as DIYs, we've had some experience. (You know by now this isn't going to go well.)The previous day we had hung the same light, but with only 3-light strands in his foyer, again with bubble wrapped globes. This didn't go well. This required a trip to Home Depot to get longer screws as the ceiling bracket wasn't lining up with the metal plate that conceals the wires. Back up the step ladder he goes and several hours later, the light finally works and he is thrilled. Of course, my ears are burning from all the language that flowed from his mouth.Now with a little practice under our belt with this type of light, let's get back to the 8-strand light in the dining room, which I'm dreading because of the previous day. But at least we have the longer screws. So we wrap the 8 lines with painter's tape to keep the bunch together and be more manageable. Now we go up TWO step ladders. I'm now straining to hold up the bulk of this 18 pound light while he wires the ceiling electrical to the light.Finally, finished and we're ready for the fantastic light show. Remove the painter's tape and all the bubble wrap and hit the switch....and you guessed it, nothing! (Chill a bottle of wine.)So we check the wall switch that we'd installed. Everything looked fine, let's install another wall switch. Still nothing. Get out the electrical tester. Switch is working, put the tester to the globes. Yep, it's getting power, but the lights aren't lighting up. Maybe it's the type of bulbs (Edison). Back to Home Depot to get regular 40 watt bulbs. Try again. Still, none of the lights are working. Makes no sense. Give up after several hours and go home to sleep on it. (Have a bottle of wine!)Next weekend--(Chill another bottle of wine!) I'm now reconciled that the light is coming down and going back for an exchange. Such dread that the process will have to start over when the new light arrives.Rewrap the globes, tie up with painter's tape and back up the step ladders to take it down and ship back. I'm ready to call an electrician, but he won't be defeated and is determined that a new one of the same will work. I'm again hoisting most of the weight of the light when he discovers that one wire his slipped loose. Take it down and redo the wire nuts and all the electrical tape again and back up the step ladders we go.Take the bubble wrap off, remove painter's tape and hit the switch.It's a magnificent light show!!!!!!!! It was well worth all the hassle. Toast with a glass of wine!Suggestions: If you have 9-foot ceilings, use real ladders, step ladders aren't quite tall enough, watch the YouTube video I mentioned above and if you don't have unrelenting determination, call an electrician.
M**.
Pro tip.
We got this light beciase it’s a fraction of the cost of the one they used to sell at PB and I think it looks just as good. I installed this by myself and I didn’t think it was incredibly hard. You do need to install at least 2 wing nut anchors on the ends as the fixture is just too heavy to be heal by the vent bracket. I just put one in each end of the bracket and it worked great. I recommend that you set the distance if the main screws that poke through the fixture plate BEFORE you put the bracket in the ceiling. You can set the lights in the fixture to the heights you want before it’s installed if you put the fixture between two dinning chair tops. This is how I did it… then I would pull the bulbs up and set the height and layout I wanted, then locked them in. After that you can easily stand on a ladder or table with the full fixture on your shoulder and set it in place. If you go slow, the bulbs won’t knock together too much. Great product so far!
E**
Zero instruction, insufficient hardware, beautiful light.
For starters, the light comes packed extremely well. No worries about broken globes. The light also looks great once installed. Other reviews have said it’s not very bright, that’s false. It all depends on what bulbs you get. I got the 520 lumen amber Edison led bulbs, and I thought it was almost too bright. It’s 8 bulbs. You can make this thing as bright as the sun if you want.That was the good. Here is the bad. There are zero instructions. The single page of “instruction” it comes with was obviously written in Chinese, then translated to English by someone that doesn’t speak English or Chinese. So you can pretty much throw that page in the trash. The diagrams don’t even show how to put it together, just a list of what parts come in the box is all it’s good for. And actually, that’s pointless because most of the installation hardware is useless.With that being said, this is not simply wiring up a single light fixture. This is wiring up 8 separate light fixtures. The wire nuts supplied are useless. Go get some of the connectors shown in my pictures. Basically you need to be able to connect 8 hot wires, one from each light, and 8 neutrals to whatever you have coming from the ceiling. The connectors I use allow you to connect five wires, so I used two for hot and two for neutral. Then I ran jumpers from each set of two (one hot and one neutral) to another connector (I had four wire connectors, but three wire would have worked) so that to make my final connection I had one neutral, one ground, and one hot. Wire all this up before you hang it except those last three connections, because it’s heavy. You want to make as few connections as possible while it’s in the air. This is by far the most frustrating part. The bolts from the bracket that go down through the base of the light are too short. So you have to align the light perfectly, press it hard on the ceiling, and try to get a thread to engage on each of the four decorative nuts that hold it up. Definitely need two people, or a 2x4 that’s the length of your ceiling to hold it in place.Also, there’s no adjusting once it’s installed. What worked great for me was to put a board between two step ladders to set the base on. Then you can install all the lights and get the length of each cord where you want it. You can wire it all up before lifting it up to the ceiling. You don’t want to cut each wire too short, but you can’t leave them too long or it won’t mount right to the ceiling.Someone else recommends using toggle bolts to mount to the ceiling. I agree. You also need to use the two electrical box screws as well since the box is mounted to your rafters. I wouldn’t want this thing hanging only from drywall (or plaster).Using the two stepladders, setting the globe height and wiring it up is easy. Took maybe 5 minutes to wire after playing with globe height for thirty minutes. Hanging from the ceiling took another good thirty minutes or more because it’s heavy and you have to try to line up the too short bolts in the base holes while trying not to drop it.Long story short, if you can wire up a light, you can do this. But if you are a first timer and think you’re going to follow a set of instructions, that’s not gonna happen. Call an electrician. You’ll need to go buy some better wiring connectors and mounting hardware. It is absolutely impossible to install this with what comes in the box unless you want your house to catch fire or light to fall out of the ceiling.I’d rate this a zero for ease of installation, zero on needed parts included for installation, but a five of five for how it looks once it’s installed.
Trustpilot
2 weeks ago
2 months ago