🔧 Cut with Confidence!
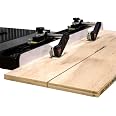
The JessEm07150 Mite-R-Excel II Miter Gauge is engineered for precision, featuring nine miter detents and a spring-loaded indexing pin for accurate cuts. Its adjustable flip stop and extendable fence make it versatile for various projects, while its durable construction ensures reliability in any workshop.

| Material Type | Aluminum |
| Item Weight | 9 Pounds |
| Item Dimensions | 55.1 x 20.1 x 11.2 centimeters |
S**R
Exceptional design and construction.
You don’t need to spend this money if you’re building decks or a shed for the back yard. If you’re doing precision work this is the best miter gauge I have seen out there. It is rigid, tight in the slot, reliably zeroed, capable of very fine adjustment and the build is absolutely bombproof versus any of the high end competitors. It arrived well packaged, in perfect condition, had all of the listed parts and a bit of spare hardware as well. This one also included a micrometer adjustment for the length stop assembly on the fence.It took me just under an hour to assemble it and get it dialed in on my saw (JET Exacta Deluxe). The included manual was well written and walked me through step by step. The mechanisms for adjustment were well thought out and very robust. Once I was finished, I made 6 cuts: (1) at 90, (1) at 45 and (1) at 36.5 then repeated this once again. Accuracy and repeatability were astounding at less than .5 degrees! I build custom furniture, the good stuff. This allows me to make razor tight joints on my main working saw versus transitioning to the miter saw without sacrificing any precision.It’s nice to see that there are still precision toolmakers servicing the woodworking world versus mass producing companies whose main selling point is the elaborate multicolor anodizing they slap on their products. Well done JessEm.
L**Y
Super Teil
Dass Teil ist echt klasse, aber bei meiner Metabo passt es nicht in die Nut. Ich habe die 90°mit dem Woodpecker winkel nach gemessen und der pasteperfeckt. Also wenn ihr eine breitere Nut habt absolute Kaufempfehlung.
L**E
JessEm 07150 Mite-R-Excel II Miter Gauge is Excellent
I have used this miter gauge for over a year now and I am very pleased with it. It is extremely rigid and has eliminated my need for a cross-cut sled. It has sufficient adjustments to enable perpendicularity to the saw blade and table surface to a degree of precision limited only by setup equipment. I highly recommend it.The only possible negative to this miter gauge is that, as delivered, it is designed to be used only on the left side of the blade. It is possible to modify it for right hand side operation and preserve functionality of all original left hand side features, but it requires a bit of work.1. Refer to Photos 1 and 2 for Steps 1 through 8.2. Remove the Extendable Arm from the Main Arm.3. The insert supporting the Extendable Stop must be moved from the left hand side to the right hand side of the Extendable Arm.a. Remove the 5 X 0.8mm set screw.b. Remove the ¼-20 flat head screw and Extendable Stop assembly from the insert.c. Remove the Dowel Pin securing the insert using a punch driving from the small end of the Dowel Pin. Place a socket under the big end of the Dowel Pin to prevent bending the arm. The insert can now be removed.d. Drill a ¼” hole through the top part of the channel on the right hand side of the Extendable Arm in the same relative location as already exists on the left hand side for the big end of the Dowel Pin. This is best accomplished with a drill press. After the ¼” hole is drilled in the top part of the channel, replace the ¼” bit with an 11/64” bit and drill through the bottom end of the channel to accommodate the small end of the Dowel Pin.e. Drill and tap for the 5 X 0.8mm set screw on the right hand side of the Extendable Arm in the same relative location as already exists on the left hand side.4. Flip the Extendable Arm over. Drill and Tap for the 5 X 0.8mm hex head machine screw (which limits Extendable Arm maximum extension) on the left hand side in the same relative location as already exists on the right hand side.5. Install the Extendable Stop insert on the right hand side of the Extendable Arm. Slide the insert into the Extendable Arm until the Dowel Pin holes align. Tap the Dowel Pin inward until it is flush with the top of the Extendable Arm.6. Screw the ¼-20 flat head screw and Extendable Stop assembly into the insert. Tighten the ¼-20 flat head screw until the Extendable Stop is relatively tight but can still be slid back-and-forth along the insert.7. Install the 5 X 0.8mm set screw in the new drilled and tapped hole near the big end of the Dowell Pin and tighten to prevent the ¼-20 flat head screw from moving. Modifications to the Extendable Arm are now completed.8. Drill a ¼” hole in the Main Arm on the right hand side in the same relative location as already exists on the left hand side. This hole is to accommodate the locking assembly for the Extendable Arm.9. A 9/32” X 5-1/8”slot must be machined in the bottom of the channel of the Main Arm on the left hand side to accommodate the Miter Head Indexing Pin Adjustable Slide which is originally located on the right hand side IF it is desired to retain the functionality of the Miter Head Indexing Pin. It may be possible to machine this slot using a drill press fitted with a 9/32” drill bit and drilling multiple holes along the length. Cleanup would be necessary with a file or a (Dremel) rotary tool. The drill must not protrude through the bottom wall of the channel because the set screws securing the location of the slide are tightened against that bottom wall (Photo 1). I had available a Mini Mill and I used it to machine the slot using a ¼” 4 flute end mill (Photos 3 and 4).10. When all modifications are complete the Mite-R-Excel II Miter Gauge can reassembled for right hand side operation (Photo 5) with full functionality of all original features.
A**Z
Super Qualität
Teuer aber jeden Cent wert.
H**K
Jessem quality again
It’s smooth and accurate. The material and workmanship is very nice and just what you would expect to see with the price tag. Setup for mine was minimal. I’m a sucker for Jessem equipment. Sometimes I feel like it is overpriced but when stop and think about it, I realize that quality isn’t cheap.That said, I feel they could have made this one better. They could have beefed up the extendable part and made the whole fence a tad bit longer. The stop on the extension however, is annoying. It is fine if you aren’t using a waste board but, if you are, it only sticks out 1/4”. I kinda shake my head every time. The rule attached to the top is adjustable, durable, and plenty accurate for most things but, the stop is made so you can’t line up the actual stop face with the rule. You have to use the body of the stop to set the length after adjusting the rule accordingly. Works fine but, took awhile to get comfortable with it. Maybe I missed something and don’t understand how to use those parts.No doubt, overall I enjoy using it and any happiness I can find at work adds up to a better day. I don’t regret laying out the money for it at all. I feel it was worth it.
Trustpilot
1 day ago
2 days ago