


🔧 Crimp like a pro, connect like a boss!
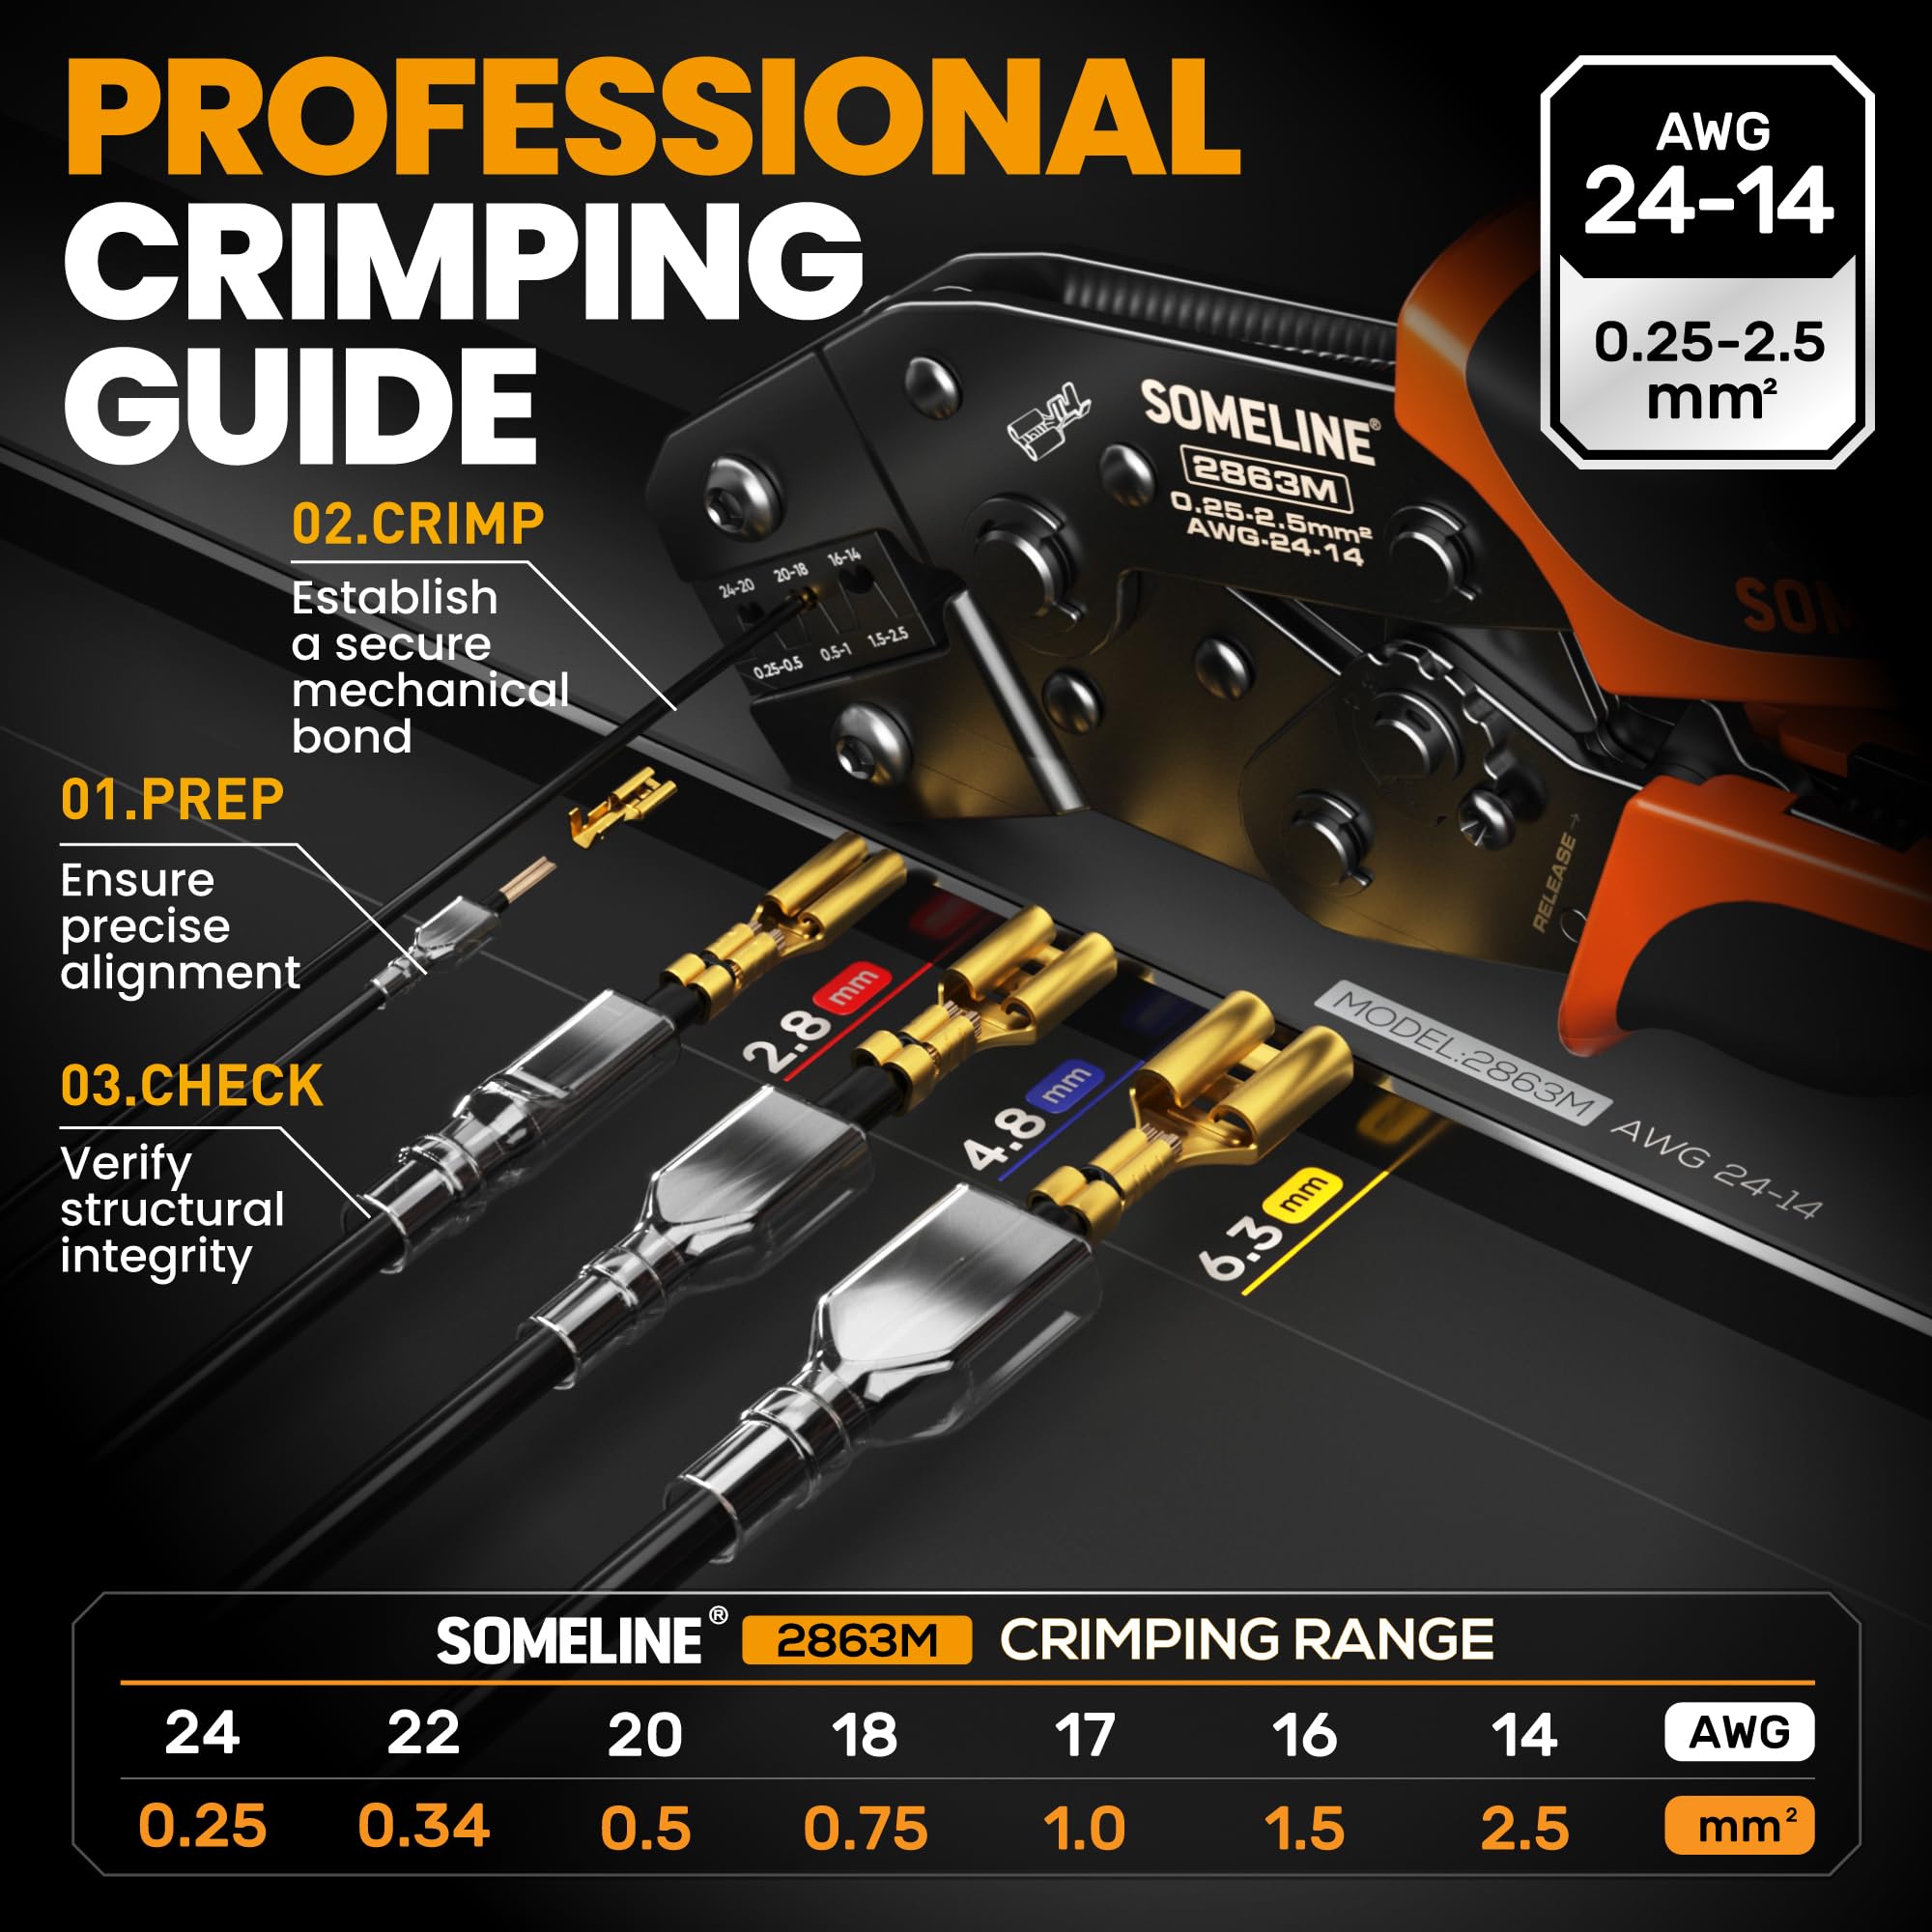
The SOMELINE Wire Terminal Crimping Tool Kit features an automatic ratchet adjustment for precise crimps on 24-14 AWG wires, compatible with Molex and AMP connectors ranging from 2.8mm to 6.3mm. It includes 20 sizes of copper and brass terminals in a portable double-layer storage box, designed for durability and ease of use in automotive, electronics, and DIY projects.
| Brand | SOMELINE |
| Color | Orange |
| Product Dimensions | 7.48"L x 3.07"W |
| Handle Material | Rubber or Plastic |
| Grip Type | Ergonomic |
| Manufacturer | SOMELINE |
| Part Number | CHCP-ZH |
| Item Weight | 2.38 pounds |
| Country of Origin | China |
| Item model number | CHCP-ZH |
| Shape | Dual 20-Style Crimping Tool Set |
| Power Source | NO |
| Included Components | Crimping Tool Kit |
| Batteries Included? | No |
| Batteries Required? | No |
J**K
Great value, no complaints
Works well and makes excellent crimps consistently. I was surprised at how well they perform for the price. Included connectors are also good quality.
T**I
Great kit. Must have for speaker installations
Good quality kit. Really great for the price actually. If you're installing speakers or upgrading speakers, you need these around to do it right the first time.
L**G
Takes practice and experimenting
I needed some ring terminals for a switch project and this set looked promising. I accomplished my project but the lack of real instructions about placing the terminal and the wire properly made this more difficult than necessary. The chart included about which terminal size to use with which wire gauge and the appropriate tooth is helpful, but as far as ‘how to’ - you are pretty much on your own.What worked for me was to place my desired connector on top of the correct crimper tooth and close the crimper enough to hold the terminal in the right position. That allowed me to hold the wire in what I hoped was the right place before fully crimping the terminal onto the wire. I used up a fair amount of scrap wire and terminals before stumbling into my method which at least provided positive results, despite the frustration. My wires are terminated, my switch works and once I unhook and reinstall the switch inside its tiny box, my industrial/steampunk lamp will be back in business.FYI, I did not use any of the insulation sleeves because I simply forgot to, so I can’t comment on those. I used heat shrink tubing as my ‘after the fact’ solution. The terminals are all of good quality and the ones I’ve used work well. The crimper is hard to crimp down and get to release - I tried adjusting the tension per the instructions but discerned no real difference. The release lever and I became reluctant friends. For reference, I’m a woman, almost 60 yo with a keyboard and computer job, so your experience may absolutely vary.
G**N
Love it
It works great, lots of ends, easy to use tool. 😀
B**T
It is a very nice crimper!
The crimpers do a great job, and it comes with a bunch of extra parts!
A**R
I'm happy with this product.
This review is for the B0BZ49GH6D wire terminal crimping tool and terminal set. I bought this kit for home use and found the tool and terminals to be of good quality and, if used properly, it will quickly and easily produce crimped connections that are every bit as good as are the crimped connections made by the professional-grade tools that I routinely use at work costing hundreds of dollars more.Regarding the few complaints found here from people who have found the tool difficult to use, I'll admit that the kit assumes that you have knowledge about how to properly use it as it does not include much in the way of instructions. The information available for the kit on the Amazon website does not help this matter and the manufacturer's website is even worse. Note that the similar B08J3SDJTX crimping tool here on Amazon has better images and a video showing how to use a tool and that may be enough explanation to get people going with this tool. While I'd like to upload a document with lots of embedded annotated pictures of the process, that's not an option within these written reviews, so I will attempt to describe in words the process.1) Get to know the crimp terminal – On the end of the terminal there are two sets of prongs that extend up from the terminal that are used for gripping the wire. At the far back of the terminal is a taller set of prongs that will eventually be folded over the wire to grip its insulation. Forward of that on the terminal, separated by a small gap is a second set of shorter & wider prongs that will eventually be folded over to grip the stripped end (strands) of the copper wire. Note that this tool and these terminals are only made for use with stranded copper wire (the copper wire strands may or may not be silver or tin plated). The “mating portion” of the crimp terminal is the end of the terminal that “mates with” a connector of the opposite gender and is on the opposite end of terminal from the end into which the wire is crimped.For the sake of this discussion, the upper handle of the tool has a flat-backed padded spine while the lower handle of the tool has a bump on its padded spine to separate the user’s index/fore finger from his middle finger. The left and right sides of the tool are from the perspective of a user holding the tool straight out in front of him with the upper handle on top and the lower handle on bottom. When I say “looking into the end of the tool” I mean you have the tool turned around so you are looking from the narrow end of the tool, past the dies and into the hinge point.2) Get to know the crimp tool – Careful examination of the dies (jaws) of the crimp tool will reveal that not only do they have an upper and lower half, but they also have a left and right half. With the dies partially open and looking into the left side of the dies, you can see the left/right sides of the upper/lower dies and will notice that the lower dies on the left side of the tool have slightly deeper openings than do the lower dies on the right side of the tool. When the dies are fully closed, the opening in the left side of the dies is slightly larger than the opening in the right-side of the dies. The larger left side opening is used for folding the longer crimp terminal prongs over the larger diameter wire insulation while the smaller right-side opening is used for folding the shorter crimp terminal prongs over the smaller diameter copper wire strands.The crimp tool is made with a ratcheting mechanism to better guarantee that all crimp connections made by the tool are fully and properly crimped. The downside to this is that once you start crimping, you cannot easily stop and open the tool back up to better reposition the terminal and/or the wire. You need to make a reasonable effort to get the terminal properly positioned within the tool before you start squeezing it closed.The dies on the crimp tool come with 3 different-sized openings for different wire gauges. The size of the crimper opening to be used depends on the size of the wire. The wire gauge only depends on the diameter of metal portion of the wire, the insulation and its thickness is ignored. The 3 openings on the tool are marked with metric area ranges (which are proportional to the wire diameter). The crimper die’s wire area markings are (the equivalent American Wire Gauge sizes are in parenthesis):0.25-0.5mm2 (24-to-22AWG)0.75-1.0mm2 (20-to-18AWG)1.50-2.5mm2 (16-to-14AWG)Perhaps the easiest way to determine the wire gauge that you have is through the use of a good quality pair of wire strippers which are marked with wire gauge sizes. The holes formed when the stripper jaws are closed are marked with wire gauges and will just clear the marked gauge. If you do not yet own such a pair of wire strippers, this same kit of parts can be ordered under the number B0BDK8SFQ2 and it includes a set of strippers that will help in determining a wires gauge. To properly strip a wire, you need to select a stripper hole that will just cut through the insulation of the wire without cutting the strands of the wire. To this end, try larger holes on the stripper first and if they do not bite into and pull off the insulation, then try the next smaller hole until the insulation is removed while leaving all the copper strands intact. The hole that accomplishes a proper strip will be marked with the wire gauge that can then be used to determine the correct section of the crimp die to be used when crimping the terminal.3) Wire preparation:Prior to inserting the crimp terminal into the tool, first prepare the wire to fit the selected terminal. Wire preparation consist of cutting the end of the wire square and then stripping off a short length of insulation from the end of the wire. The length of wire to be exposed should be very slightly longer (~1mm) than the width of the shorter pair of prongs of the crimp terminal. You should be able to check the wire for fit to the terminal by temporarily laying it onto a terminal with the stripped portion of the wire centered on the shorter prongs. There will be a slight amount of bare copper extending into the gap between the short and long prongs as well as a short bit of exposed copper extending beyond the short prongs toward the mating end of the terminal. If the stripped portion of the copper is too short, strip off more of the insulation. If the stripped portion of the copper is too long, trim off the ends of the copper strands. The photos of crimped terminals on Amazon that accompany this kit show how a good crimped connection should appear.After stripping, the copper strands should be bright clean metal free of any contamination (oil, grease, solder, undue oxidation, insulation, …) and they should remain tightly arrayed together. If necessary, to get to clean metal, trim back and strip the wire again. If the strands are not tightly grouped together, twist them together.4) Positioning the crimp terminal within the crimperSelect the appropriate opening in the crimp dies based on the wire size.Insert both the crimp terminal’s longer prongs into the upper left-side crimp die. You may need to squeeze the tips of the longer prongs together a bit to have them fit up into the mouth of the left-side upper die opening. The “mating portion” of the crimp terminal should extend out the right side of the crimp die. The gap on the crimp terminal between the longer and shorter prongs needs to be centered on the line separating the left and right sides of the upper crimp die. With the terminal properly inserted and located within the upper crimp die slowly squeeze the crimper handles closed until one click (only) of the ratchet is heard. The crimp terminal will now be held in place.5) Position the wire into the terminalInsert the stripped end of the wire into the left-side opening formed by the crimp die and the longer prongs of the terminal. Do not let any strands of copper escape from this opening and fold back/out of the opening while inserting the end of the wire. The proper depth of insertion of the wire should be such that the end of the wire strands extend very slightly beyond the inboard edges of the shorter prongs as seen through the right-side opening of the crimp die. This will place the cut edge of the wire’s insulation approximately in line with the dividing line between the left and right dies.6) Crimp the wire into the terminalWhile holding the wire in the proper position (insertion depth) in the left side of the crimp terminal and die, fully squeeze together the handles of the crimper until the ratcheting mechanism fully cycles and releases. At this point you should be able to pop the crimped terminal/wire free of the upper dieI noted that the first terminal that I crimped with this tool required a bit of effort to pop the terminal free from the upper die. Subsequent crimps of terminals have been easier to release.I do wish Amazon, down in the related-items sections, included links to refill kits for the various terminals in the kit rather than making us find them on our own. I also wish that the manufacturer was more clear about the alloy used in the making of the terminals; they certainly are not pure copper.
L**A
Nice strong crimps
Works well for smaller connectors like those supplied. Makes good strong crimps that do not pull apart.
A**T
The Value Crimper
I think it's a very good product for the price. The tool is not the best out there but absolutely gets the job done. The connectors appear to be of decent quality. The sizing of the connectors seem to be on par with the standard.
Trustpilot
2 weeks ago
1 day ago


