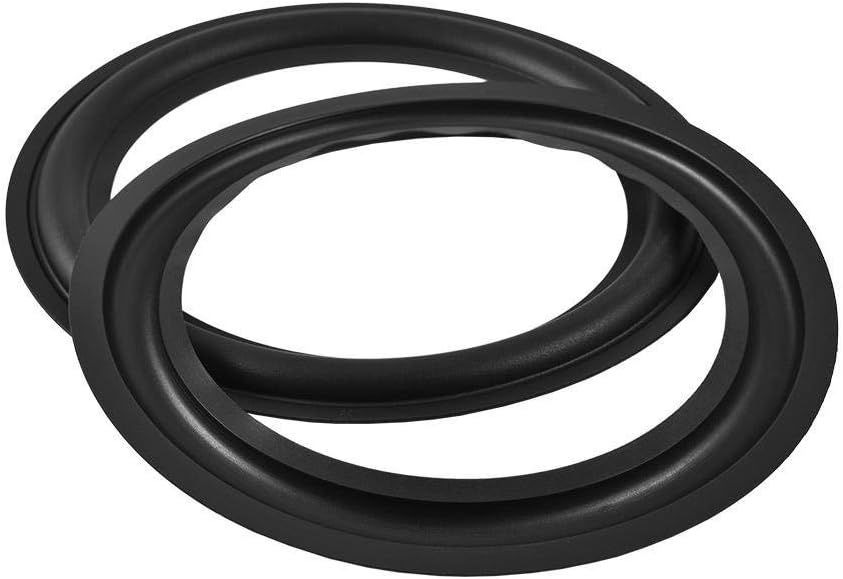
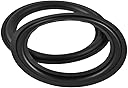


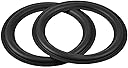

8" Speaker Foam Surround Repair Kit, 2Pcs 8inch Perforated Rubber Speaker Foam Surround Rings Replacement Parts for Speaker Repair or DIY (Black)
Product ID: 79920100
⏳anti-aging durable rubber
🔊8-inch precision fit
🛠️DIY-friendly repair kit
Buy anything from 5,000+ international stores. One checkout price. No surprise fees. Join 2M+ shoppers on Desertcart.
Desertcart purchases this item on your behalf and handles shipping, customs, and support to Vietnam.
🔧 Revive your sound, reclaim your vibe!
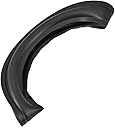
This 8-inch speaker foam surround repair kit includes two high-quality, perforated rubber rings designed for easy DIY replacement. Made from durable, anti-aging rubber, these surrounds restore speaker performance by providing a precise fit and enhanced sound clarity, extending the life of your audio equipment.
| Best Sellers Rank | #6 in Speaker Repair Products |
| Customer Reviews | 4.6 out of 5 stars 217 Reviews |
J**S
2001 Suburban Woofer Repair
Take your time and watch a few Youtube videos. 3 methods and many glue types recommended. I chose Aleene's Tacky glue. I used 91% Isopropyl Alcohol to clean off the paper and the cage. I used Q-tips and a cotton cloth to remove the residue from the paper. I did not remove the dust cover or use shims. I did not use a Sine generator app. After gluing the center to the paper cone, I used a 1.5 V AA battery to lift the cone. While lifted added a 1/8 bead of glue on the cage then disconnected the battery and used medium paper clamps to hold the surround in four places. Gently patted the unclamped areas to adhere the surround. Then carefully shifted the clamps 45 degrees and patted down the clamped areas and let dry. Worked like a charm. I glued back on the carboard and protective screen. Screwed back in the speaker and was good to go. If you have a Suburban with the real shallow box, there appears to be only one woofer that is a direct fit. The Polk shallow 8" woofer looks like it might fit with a spacer. Someone has a 3D printed spacer they designed but I had trouble finding time to print it. (On Printables) I decided to go with the replacement foam surround and I'm glad I did. (I don't think there were any instructions in the package?)
M**E
High quality surround
Thicker and more dense foam rubber that's closer to a rubber than the thin foam you get with some other surrounds. This is only the second speaker I've ever re-foamed and it's easy once you get the cone and basket clean. This is a perfect replacement for the JBL subwoofer in a 4th generation 4Runner. Replacing the foam is preferable to the other drop in replacement to this obsolete subwoofer. I'll take $7 and some glue over a $150 or $200 shallow mount subwoofer where I'm using the stock amplification and don't need to try to get 500+ watts into the tiny stock enclosure. The outer diameter could have been larger, but was sufficient and the inner diameter was small enough to make installation easy. It held it's shape which minimized the adjustment to make adhesion easy.
R**E
Easy to install.
They fit my small Infinity speakers.
L**E
Works Great...Would Recommend!
Easy to use. Would highly recommend!
C**L
Best Surrounds I Have Ever Installed
Best surround installation I have ever done. Adheres well using Aileens original tacky glue but you need to let it set overnight. No glue or instructions included. I recommend taking the dust cap off and using shims to center the voice coil which were not included. This is way better than a foam surround and very easy to use. Highly recommended. See parts express video on line for instructions. To do this right you will need shims, glue, dust caps and instructions none of which were included.
P**O
Foam rongs
Not a perfect fit but glueable
M**N
Effective and inexpensive
Worked perfectly to repair some Boston Acoustic speakers a neighbor threw away. Cheap and does what it says on the tin. Love it!
N**O
Just buy it
More of a rubber than a foam. Seems very durable. Would take photos of the installation but i am no expert so my finished product looks terrible. Haha but it works.
M**Y
Speaker edge surround replacement and install instructions
These are not foam, they are rubber. That's good! Won't need to be re-edged in a few years, plus the rubber replacement may weigh more than the original, be less stiff, and will enhance the bass output. Understand this, you are altering the dynamics of the driver from it's original sound to a new sound - probably an improvement anyway. These are good but are not specialty edges for weird driver design or musical instrument speakers (unless this is what was original) - they are standard and simple to install: The task really is simple, but the process should be followed. No skipping steps. I assume you have a work-space with a newspaper to catch the mess you're about to make with black foam waste. You will need: a garbage can, chisel, old kitchen paring knife, small paint brush, white glue, maybe alcohol. Step 1: Using a small sharp paring knife remove the dust cap by gently prying and cutting between the edges of the dust cap along the face of the cone - don't wreck it, you're going to re-use this dust cap, unless you bought a new one. DO NOT cut through the speaker cone, you're just separating the glue holding the cap on. You're removing the dust cap to get at the speaker voice coil wrapped around a cardboard tube which moves up and down around the magnet. DO NOT fuss with this - avoid wanting to push up and down. Chances are you won't hurt it, but you could. The only thing holding the cone aligned now is the fabric-like material underneath, holding the bottom of the cone and voice coil to the speaker frame. If the dynamics of this alignment change, you have bigger troubles - so leave the cone alone. You'll get a chance in a moment anyway. Step 2: Fashion/make/acquire, buy some very thin shims. These shims are going to be inserted between the magnet and the speaker coil cardboard tube (on the inside of the tube). Since this is a very small gap, a shim about as thick as 2 pieces of paper - or very thin plastic would be best. I use 3 pieces of plastic about 1/2" wide by 2" long by maybe 2 pieces of printer paper thick. Insert 1, then a stack of 2, then 3 pieces of paper as a feeler gauge to find out how much room you have to slip a thin item into the gap. Maybe 3 small pieces of cover stock. It doesn't have to be too accurate because you are going to slip these shims between the magnet and the cardboard tube at 12 o'clock, 4 o'clock, and 8 o'clock, to hold everything rigid. Each shim must be the same thickness. Once in place the shims will immobilize the cone and keep the coil at the same distance from the magnet. The cone will become less stable once you take the old foam off. Step 3: Remove the old foam from the metal at the top rim of the speaker. Pick at, lift off, peel away, rub and roll, or any way you want, remove the old foam. Try carefully scraping with a knife, but an old dull chisel works best. I used to apply alcohol to loosen and turn the foam to a messy goo, and then scrape off, but I found that step to be unnecessary and messier than just scraping. The old foam will scrape off easily anyway. Once it's gone, wipe the metal with alcohol to remove most signs of glue and foam. Pick up the speaker and carefully shake out the fallen foam residue into a waste bin. Avoid getting anything in the cone or voice coil gap. Make sure the shims don't fall out - they should be snug enough not to. Step 4: Remove the old foam from the speaker cone. It comes off fairly easily, rub with fingers while carefully supporting the speaker cone with the other hand. Avoid moving or flexing the cone too much. This is where rubbing alcohol might be of use. The cone is immobilized by the shims at this point and you'll be glad you did that first, but you can push the cone down and it will move a bit. This will come in handy when applying the new surround. Step 5: Glue the surround to the speaker cone FIRST. I've used different glues before, like expensive speaker glues but found that white carpenters glue works too - and I have a lot of that around - so that's what I used and it seems fine. Set the dry surround on top of the speaker/cone and dry-adjust for fit, to see where you are going to glue it. There might be some old glue or discolouring to indicate where the old edge was. Align and observe, make a mark if it helps. Here's the delicate part. You get to push the speaker cone, and apply some glue. Using a few fingers from both hands push the cone down evenly and gently until it slips downward. See what it feels like? Now using the same fingers, pull the cone upward from underneath about as much as you pushed down. This should put the top edge of the cone even or slightly proud of the metal glue edge. Doing this helps hold the surround in position while the glue sets. The shims will hold the cone in place, So ... use a small paint brush to apply a thin layer of glue to the face of the cone where the surround edge will stick, (just where the surround will stick, not all over) then, also apply a coat on the underside of the surround where it will mate with the cone. Do not let them come in contact yet. Don't worry about glue spillover, it will go transparent when dry. Let the glue dry for maybe 12 -15 mins. about when it gets tacky and transparent. Then, pick up the surround and visually align the speaker mounting holes with the cut-outs on the surround and carefully lower the surround onto the glue you applied to the cone. Very gently with 2 fingers, press and pinch the surround to the cone at 12, 6, 3 and 9, and then go all the way around in the same manner to affix the surround to the cone. Alignment is important now. Let the glue dry for at least an hour. Drink a coffee. Step 6: Glue the surround to the metal edge of the speaker. With the surround now glued to the cone and the cone assembly still in the up position, lift the outer edge of the surround and apply glue to each mating surface all the way around. Avoid letting the wet surfaces touch each other. This may not be possible given the design of the speaker. But it may not matter anyway. So do your least messy best. Once the glue becomes tacky, push downward evenly on the cone a bit to move the glue covered faces together and be easier to affix. Gently touch at 12, 6, 3, 9, o'clock and then touch all the way around to complete and let dry for a while. The hard part is complete. Alignment was critical up to now. If you did this right you will not hear scratching when you remove the shims and push the cone to check for free movement. Step 7: Remove the shims and affix the dust cap. Pull the shims out and blow out any dirt or particles. Since the cone is now free moving, up and down, you can check that you did a good job or not. Gently push the cone down repeatedly while listening for a scratching sound. No sound? You did it right. Scratching? Odd rubbing? try again if you want. To complete the job, apply glue to the cone where the original dust cap was and also apply glue along the edge of the dust cap - just a bit, not a lot. You might have to do this all again. Place the dust cap in position and push down in the center of the dust cap enough to hold 'em together. Let it all dry and you're done. Keep these instructions until you've done a few. Years ago I screwed up my very first one with the scratchies, and so can you!
E**R
Servicio rápido y excelente producto
Excelente
J**I
Works great on Paradigm PDR Subwoofer
Had the original subwoofer foam rot on my PDR 8 Subwoofer.. Instead of buying one of the kits on eBay I figured I'd give this a go. I've never tinkered with speakers before and If I can do it, anyone can. I pulled up a few video guides on youtube, used aleene's tacky glue and after 24hr its back to thumping away with no rattles. 5/5 product.
M**E
Satisfait
C'est ce que je m'attendais ,très satisfait!
R**E
sub is back !
couldn't justify buying glue for these that was more than the item so I used M1 [ roofers will know what that is ] happy there was 2 as the finicky [ correct ]glue I spent 12 $ on made a mess of the first one.
Trustpilot
1 month ago
2 months ago