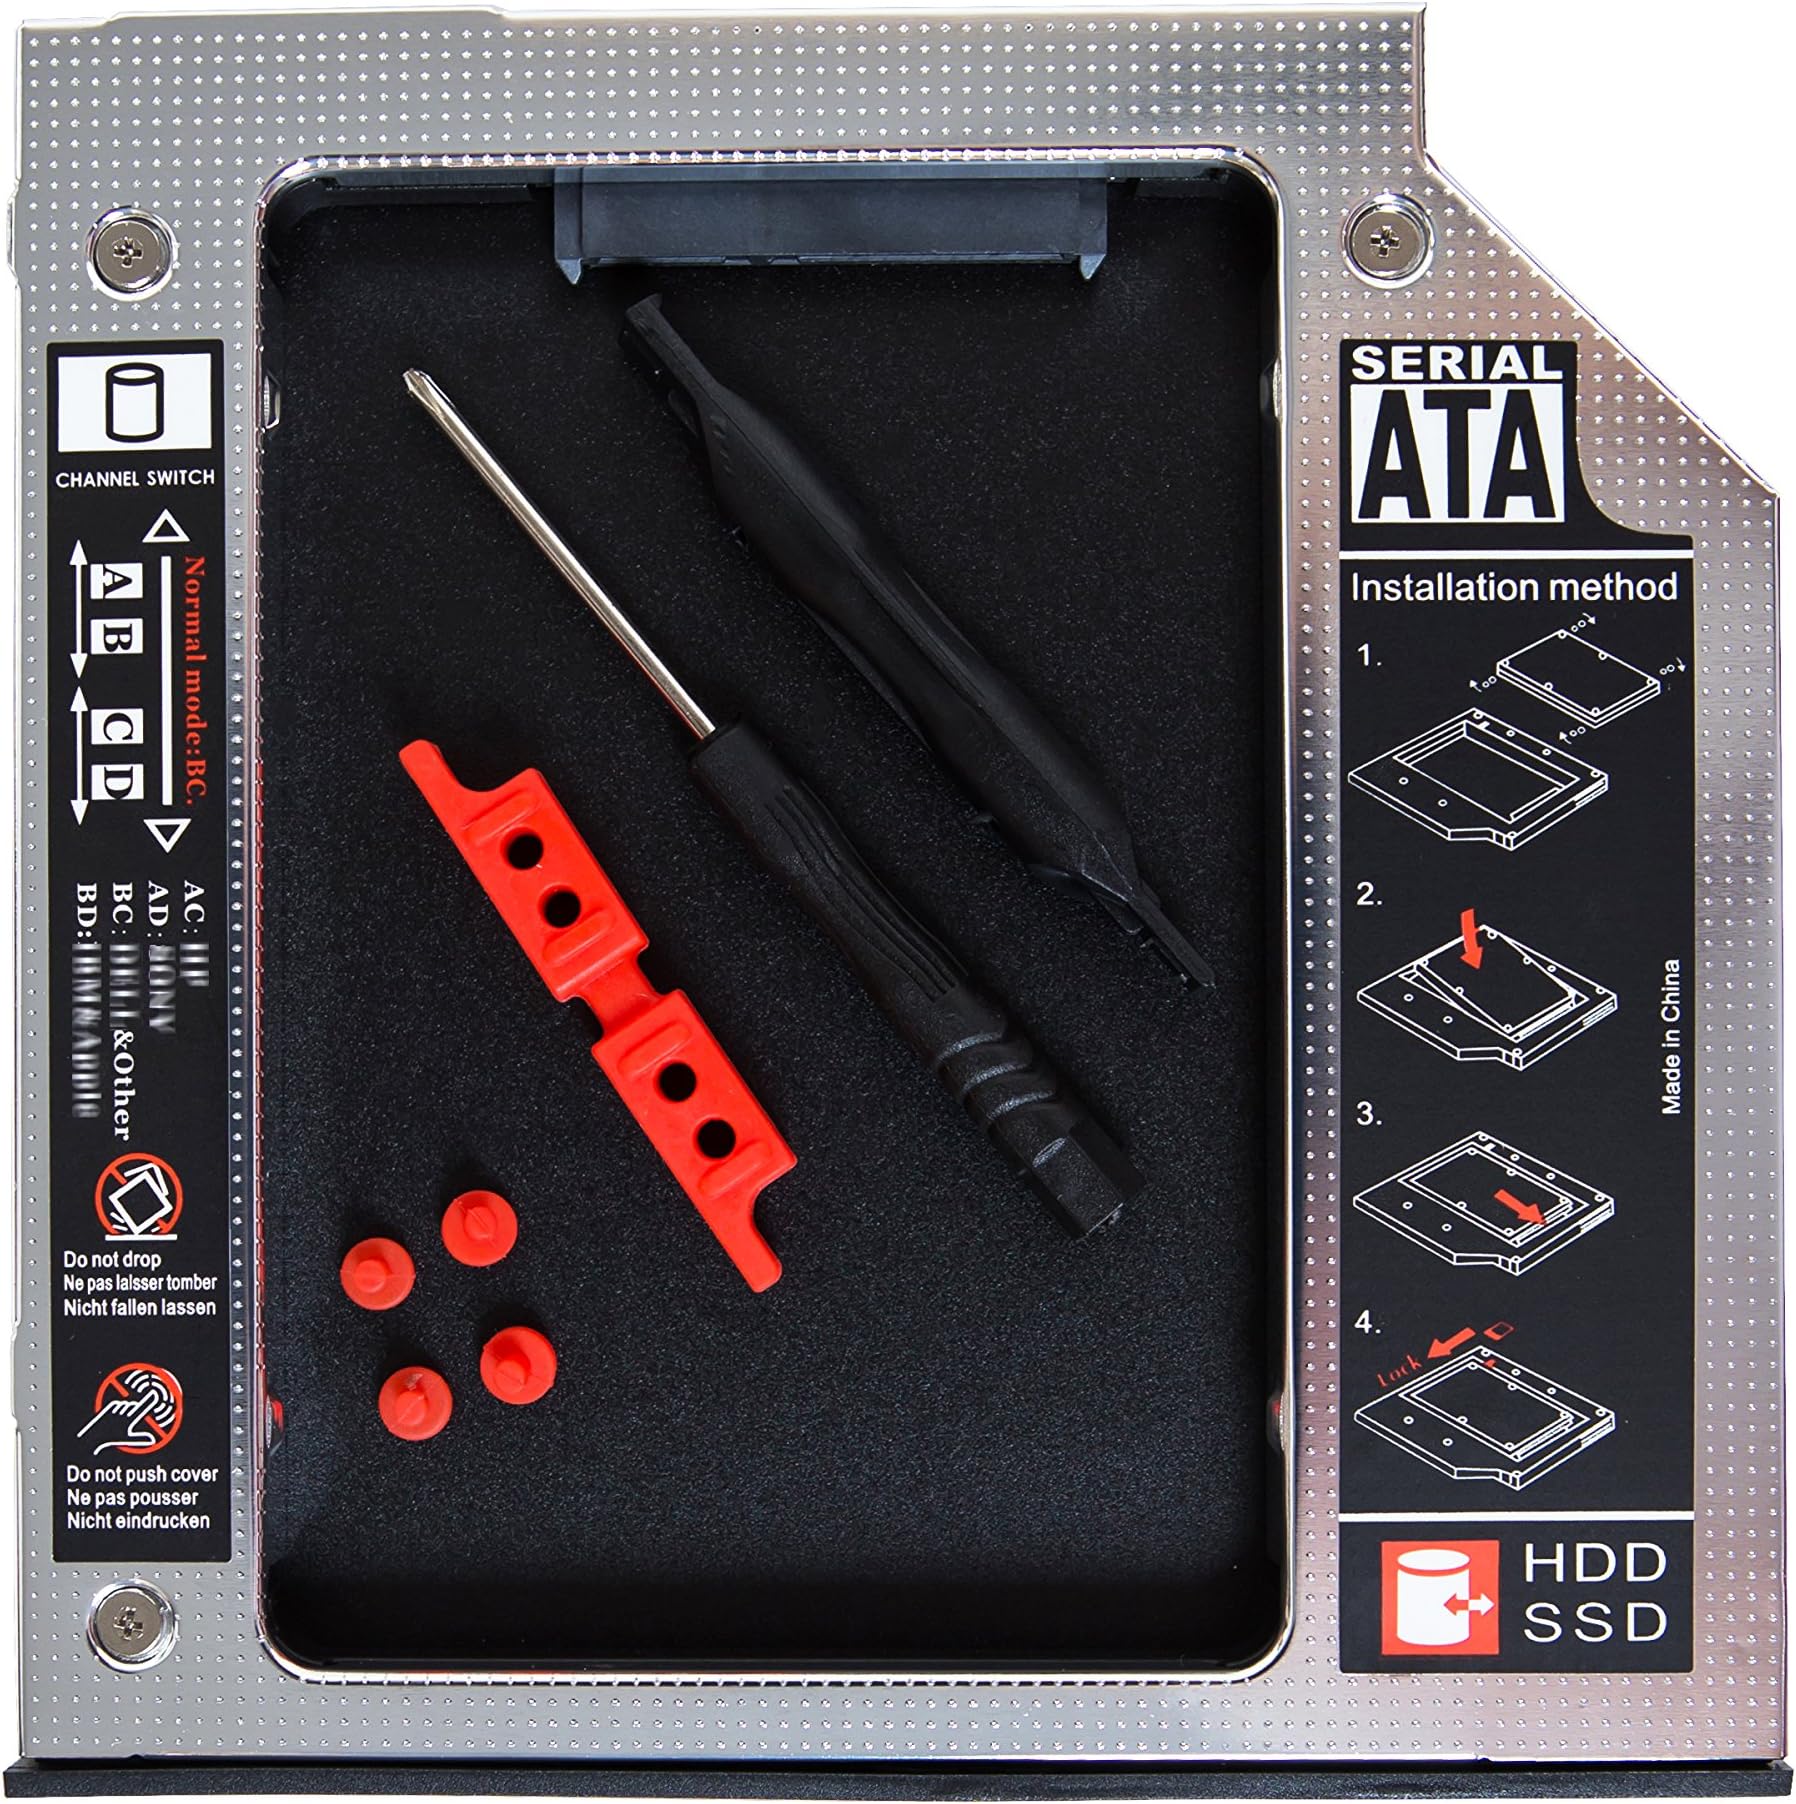
I recently added an SSD to my HP Envy m7-k211dx by replacing the optical drive (DVD) and using this caddy for installation of the new SSD in place of it, cloning the HDD to the SSD for a new system/boot drive. It worked so well that I did the same to my HP Pavilion 17-f233CL. Before this upgrade, the HP Envy was almost unusable. Its boot times were ridiculously slow. It was constantly exhibiting stalls because of either 100% disk usage or 100% CPU usage. I was about to the point of discarding the thing and swearing off HP for good. Both laptops use Windows 10. These two versions of the HP laptop are notorious for being exceptionally difficult to disassemble in order to replace the HDD or just to add an SSD internally. That is why I opted to use the optical drive bay for the SSD and keep the original HDD in place. I researched online how to go about making this swap, but every source left out a step or two that were crucial to the success of the transplant. I learned this fact by having my first attempt fail. In the following, I will attempt to tell you how I succeeded, twice, with both of my HP laptops. Your mileage may vary, but I hope not. All references below are to these two HP laptops, but there are equivalent steps for any Windows 10 laptop with an optical drive, I suppose. Components I used: • SAMSUNG 870 EVO 1TB 2.5 Inch SATA III Internal SSD (MZ-77E1T0B/AM) • 9.5mm Universal Hard Drive Caddy Tray Enclosure (SATA to SATA 2nd SSD HDD) for HP DELL Lenovo IBM ACER Gateway ASUS Sony Samsung MSI Laptop (Brand: Andesireone; https://www.amazon.com/gp/product/B07FL3MKV1/ref=ppx_yo_dt_b_search_asin_title?ie=UTF8&psc=1 • Unitek SATA to USB 3.0, SATA III Cable Hard Drive Adapter Converter for Universal 2.5/3.5 SATA HDD/SSD Hard Drive Disk and SATA Optical Drive, with 12V/2A Power Adapter. (https://www.amazon.com/gp/product/B06WWLCYC3/ref=ppx_yo_dt_b_search_asin_title?ie=UTF8&psc=1) Prepare the laptop for upgrade. Allow any pending Windows updates. (I also updated the BIOS. It was Insyde F.42 of 3/18/2015; updated to Insyde F.57 of 11/9/2018.) Perform a scan of the HDD for errors and fix them using this method: at Command (run as administrator) prompt, run “CHKDSK /r” to check and fix any HDD errors. (This command line process may take quite a while to run.) When scanning for and fixing HDD errors is complete, proceed to the next step. Go to https://www.samsung.com/semiconductor/minisite/ssd/download/tools/ to download and install Samsung Magician Software for Consumer SSD and Samsung Data Migration Software for Consumer SSD. Use Unitek SATA to USB 3.0, SATA III Cable Hard Drive Adapter to plug in the new SSD into a USB 3.0 port in the laptop. The new SSD will come unformatted; therefore, File Manager will not see it. So, in Windows Control Panel, search for “Disk Management.” Using Windows Disk Management, you should see that the new drive is shown as a blank row. With the cursor in that row, right click and, on the subsequent window, click on New Simple Volume. Click Next. Accept the default size as the maximum by clicking Next. Assign a drive letter for the SSD and hit Next. On the subsequent screen, choose NTFS as the file system, and make sure “Quick Format” is checked. Click Next. Then click Finish. Allow time for formatting process to complete. After formatting process concludes and while SSD is still connected to the laptop by the Unitek USB adapter, check to be sure that the SSD is OK by viewing with File Explorer and Samsung Magician. If OK, proceed. NOTE: I did not perform the cloning via the USB adapter. Instead, I performed the cloning after installing the SSD in the optical drawer and the laptop recognized and mounted the SSD. I think that doing the cloning this way makes sense. Use File Explorer or the Windows USB control to eject the USB-connected SSD. BEFORE POWERING OFF, open the laptop’s optical drive and, THEN power off. Disconnect from the power supply and remove the laptop battery. Remove optical drive after removing the single screw on underside of HP Envy and Pavilion that holds the drive drawer in. From the removed optical drive, carefully take off the outside edge cover, which will be transferred to the new SSD caddy. Install the SSD into the caddy. Transfer the receiver guide from the optical drive to the caddy, as well as the outside edge cover of the optical drive to the caddy. Install the SSD/caddy into the laptop and secure with the screw previously removed. Reinstall the laptop’s battery and plug in its power supply. Turn on and boot laptop as usual. HDD will still be primary and still hold the boot volume. The SSD will be offline, so that must be changed first: in the Windows 10 tray (or in Control Panel), again search for and use Windows Disk Management to change SSD status to “online.” Afterwards, again check to be sure that the SSD is OK by viewing it with File Explorer and Samsung Magician. If OK, proceed to the cloning process, next. VERY IMPORTANT: Before cloning, put laptop in airplane mode. Close running programs. Use Task Manager to end all processes that might try to write to the HDD, such as iCloud, Dropbox, OneDrive, and so forth. Use Samsung Data Migration Software for Consumer SSD to clone system (C-drive) HDD to SSD. SELECT ALL PARTITIONS ON HDD BY CLICKING ON EACH ONE FOR CLONING—ALL AT ONE TIME—TO SSD. Start the cloning process, which may take an hour. After cloning, again, the SSD will be offline. In the Windows 10 tray (or in Control Panel), search for and use Windows “Disk Management” to change SSD status to “online.” Then, one more time, check to be sure that the SSD is OK by viewing with File Explorer and Samsung Magician. SSD MUST have the same partitions as the HDD: it must have a Windows partition and a “Recovery” partition. If OK, proceed. If not, cloning didn’t work correctly. Try again. After cloning, you should find that the SSD is named exactly same as C-drive (“Windows”). However, until you change things in the next steps, the HDD will still be your primary, bootable C-drive, and its “Recovery” is D-drive, just as before. But now, Windows will have given the new SSD the next available drive letters for the SSD-based Windows and Recovery. That’s what you should see using File Explorer. If not, something failed. If successful, proceed. Power off. Wait ten seconds, then enter BIOS by quickly beginning to tap ESC button immediately after pressing the Power button. Once in BIOS, the Function Keys—which, on these HP laptops, are combined during normal Windows operation—will have priority over any other functions combined with them; therefore, you don’t use the fn key while in BIOS. FIRST: Use F10 to get to “System Configuration” in BIOS. Use arrow-down key to navigate under “UEFI Boot Order,” where, once selected, it should have a white triangle beside the “OS boot Manager,” indicating that, if you hit <Enter>, you should see listed all bootable drives. Use the up or down arrow to highlight the SSD. If it is not on top, use F6 to move it to the top. Hit F10 to save permanently the change of boot priority to the SSD. (If the SSD is not listed in the BIOS, perhaps you failed to change its status to “online” by using Windows Disk Management in Control Panel See above.) Next, hit F10, again, then “Yes” to exit BIOS with Save Changes. Laptop should then automatically boot from SSD. If boot time and program load times noticeably improve, that is evidence that the new SSD is active as your system boot disk. The difference in boot-time and other performance elements should be dramatic. (Later, you may want to use Samsung Magician & run benchmark tests on both HDD and SSD to prove just how much faster the SSD is over the HDD.) Drive letters for the two physical disks (SSD & HDD) should have been swapped by Windows after this final reboot. Use File Explorer to be certain of this change. Now you may use File Explorer to change the name of the HDD’s “Windows” partition and its “Recovery” partition. If everything is OK, you may confidently run a quick format on the HDD—of both its main and its Recovery partition—to free up all available storage space on the HDD.