We remain fully operational. Our teams are working around the clock to ensure your deliveries continue safely.

DOWNLOAD THE APP


Copyright © 2025 Desertcart Holdings Limited
DOWNLOAD THE APP
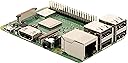
![V-Kits Raspberry Pi 3 Model B+ (B Plus) Retro Arcade Gaming Kit with 2 Classic USB Gamepads [2018 Model]](https://m.media-amazon.com/images/I/61n0-oATVpL._AC_SL3840_.jpg)


🕹️ Level up your nostalgia game with the ultimate Raspberry Pi retro arcade kit!
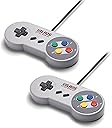
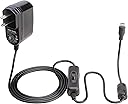
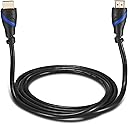
The V-Kits Raspberry Pi 3 Model B+ Retro Arcade Gaming Kit combines a powerful 1.4 GHz 64-bit Broadcom processor with upgraded WiFi/Bluetooth and classic USB gamepads, all housed in a stylish retro case. Preloaded with NOOBS and RetroPie on a 32GB Class 10 microSD card, plus an 8GB flash drive for easy ROM transfers, this kit offers a plug-and-play gateway to thousands of classic games. Perfect for millennial pros craving authentic arcade vibes, it includes premium accessories like heatsinks, HDMI cable, and a 2.5A power supply, backed by a 1-year warranty and comprehensive setup guide.


| ASIN | B07CC86PR3 |
| Brand | Vilros |
| Built-In Media | Raspberry Pi 3 Model B+, 2 USB gamepads, retro gaming user guide, Raspberry Pi retro gaming enclosure case, 32GB Class 10 Micro SD Card preloaded with NOOBS & RETROPIE, SD card adapter, 8GB Flash Drive preloaded with properly named folders for ROM uploads, UL certified 2.5A Micro USB Power Supply, high-quality HDMI cable, and 2 heat sinks for Raspberry Pi |
| CPU Model | Cortex |
| Compatible Devices | PC |
| Connectivity Technology | USB |
| Customer Reviews | 4.6 4.6 out of 5 stars (890) |
| Global Trade Identification Number | 00700381989375 |
| Manufacturer | Vilros |
| Memory Storage Capacity | 8 GB |
| Mfr Part Number | Pi3+ Retro Kit |
| Model Name | Raspberry Pi 3 Model B+ (B Plus) |
| Operating System | Linux |
| Processor Brand | Broadcom |
| Processor Count | 1 |
| Processor Speed | 1.4 GHz |
| RAM Memory Installed | 1 GB |
| RAM Memory Technology | LPDDR4 |
| Total Usb Ports | 4 |
| UPC | 700381989375 |
| Wireless Compability | Bluetooth |
M**.
Definitely the way to go if you want to Retro game!
I've been wanting a Retro console for a LONG time. I originally had a full sized arcade cabinet, but it only had 17 games on it and just wasn't worth taking up the space, so I sold it. So then I started looking at building a bar top kit using RetroPie. The thought of having a bar top with real arcade style joysticks and buttons was very promising but it was still a VERY pricy option, and the task of getting all the emulation software up and running seemed like a risky and daunting project for someone who knows just enough about programming to be dangerous. I finally discovered this kit and for the price point, the pre-loaded Retropie and emulators on the SD disk and the already formatted thumb drive for game transfers thi seemed like the perfect jumping in point for me, and boy was I right! This kit is a bargain for what you can do with it. It was pretty much plug and play. All I needed to do to assemble was install the heat sink, which simply meant I had to place a piece of plastic in the right space and fasten it to the Pi computer. I put in the SD card, put the Pi computer in the mini SNES case, connected the included gamepad, a mouse and keyboard, booted it up and the rest took care of itself. In minutes I was staring at the RetroPie Emulation Station UI and ready to go. All I had to do manually was map the buttons to the controller (which I was prompted for) and go into settings and set up my location in order to set up a WiFi connection which is needed to perform updates among other things. Out of the box, some emulators were already installed (MAME, FBALPHA, SNES, PC Engine, Atari, Sega Genesis) so once I found some games, I copied them to the correct folders on the thumb drive, plugged the thumb drive into the Pi computer (it does the transfer automatically) and PRESTO. A quick restart of the EmulationStation and the menus for the games appeared on the UI. You could end right there and just play your games. But, for the more advanced, there is a wonderful Wiki for RetroPie that basically covers everything you could possibly want to do to make your Retro Console awesome. The first thing I discovered were the scraper programs. These programs go out and find information about your games and even grab screen shots, the original arcade game marquee sign, or the console game box covers. Unfortunately, I ran into bad time as the Scraper program built into Emulationstation literally just stopped working a few days ago because they swtiched over to a new server, so I had to go install one that you run from the command line. It works great, but now the option to just update 1 title is currently not working. Hopefully a future patch will address this. Then I started looking at what other emulator packages were available but not installed. These take a bit of know how to get up and running. In addition to installing them, you may have to find BIOS files online that are compatible with the emulator. Again, the Wiki guides you through the process and I got an emulator for Intellivision and Colecovision games up and running. You will be in and out of the RetroPie command line to get this stuff going, but I have not used Linux in years and it was all easy once you know how to navigate the file structure and edit configuration files. Pairing an Xbox 360 or PS4 controller is next. Tweaking the UI and getting missing sound samples is up next. But for now, I'm taking a break and enjoying some games. I already have a few high scores on some arcade classics (yes, they save), and catching up on some console games I never played as I kid. (I never owned a Nintendo console until the Wii). So, all in all, I now already have a HUGE gaming collection and still over half of the drive available for more. I poured over literally a few thousand titles, and once you get it all up and running, it is so easy and add and remove titles. This kit is WAY better than any over those pre-loaded units you see at malls or online. Those knock-offs always contain bootleg games, shoddy clones and too much garbage filler. And a lot of them are more expensive than this kit. Obviously, finding games is the hard part, but with the right internet searching you will do just fine. Support is also great - I e-mail a couple of questions and they replied very quickly. Current library Atari 2600 - 258 games (I'll admit, these games don't age well and I haven't really trimmed the list!) Intellivision - 33 games Coin-Op games (MAME) - 258 games Neo-Geo coin-ops (FBALPHA) 30 games Sega Genesis/Mega Drive - 101 games PC Engine (Turbo Grafx) -25 games SNES - 189 games
B**F
An amazing value
Original review: 04/09/19 I haven't had too much time to dig into this yet, but so far, I'm EXTREMELY impressed with this combo pack. I wanted to create a Raspberry Pi media center PC and was originally going to piecemeal everything together, then I saw this package which was a steal. You get everything you need to get going (minus a keyboard and mouse). It's super quick to put together: slap the heatsinks on, plug in the memory card, and screw the motherboard into the cute little NES-looking case. I had no idea that three OSes had their installers already on the memory card. They're all free, but it's a nice gesture to save the time and hassle of downloading them. You get Raspian for regular computer activities, Kodi for a great media center experience, and RetroPi for playing video game ROMs. The two SNES knockoff controllers it comes with feel pretty darn good and I can't wait to start playing some oldschool games on them. If you need a good media center keyboard and mouse to round out this package, check out the iPazzPort mini keyboard and trackpad combo. Update: 04/18/19 Messed around with Raspbian and watched some movies and it's really no different than many other Linux distros, just pared down a bit for the Pi. Haven't done much with Kodi yet. RetroPi is nice and simple and the included controllers are nice. Not quite as responsive as a real SNES controller, but this is probably the closest you'll get to the real thing in 2019 without hitting up eBay. Update: 04/26/19 Watching streaming videos in Raspbian gave me an issue where the video would stutter about every few minutes, but the audio would keep playing. I upped the VRAM to 256 and it seemed to fix the issue (it may stutter once in the first minute but seems fine after that). I also went into the underscan settings in Raspbian to make sure I didn't have a black border on my TV. KODI's underscan settings are so much nicer. After some hunting, pecking, and then rebooting several times, I got a setting that worked.
Trustpilot
4 days ago
2 weeks ago