


Portable Mini Alcohol Stove for Backpacking Lightweight Brass Spirit Burner with Aluminium Stand for Outdoor Hiking Camping Camp Survival - Gray
Product ID: 61310757
Buy anything from 5,000+ international stores. One checkout price. No surprise fees. Join 2M+ shoppers on Desertcart.
Desertcart purchases this item on your behalf and handles shipping, customs, and support to Vietnam.
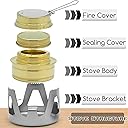
Product description Feature Color: Gray/Copper/Gold/Green; Size: Approx 3.8"(D)x2.5"(H) (97x64mm); Base Material: Aluminum; Alcohol Stove Material: Brass; Burning time: 60 min/100ml (Alcohol); Net Weight: Approx 5.1 OZ (145g); Purpose: Backpacking, Hiking, Camping, Survival. Package Included 1× Alcohol Stove 1× Stove Bracket 1× Velvet Bag Operating Steps Notes Do not add the alcohol into the stove in the combustion process; Use on a horizontal plane,slowly add the alcohol to avoid overflow; Not leave the stove alone when during use, keep it alway from children. Review: An impressive little stove for hiking and camping and roadside coffee - During the 2020 COVID Summer, I started getting interested in mini camping stoves of all sorts, and then after a bunch of research settled on trying and researching mini camping stoves that run on readily available fuel like alcohol, drygas (like HEET), etc. versus propane or butane, or whatever. These are tiny stoves just large enough for a small pan, cooking pot, heatable coffee mug or cup; weigh very little and can be packed easily into a backpack or even a small bag. An important safety note - if you use drygas/HEET (in the yellow bottle) or isopropyl alcohol or rubbing alcohol that is 99% alcohol then you have to be extra, super careful, and aware as you will likely not be able to see a flame whatsoever. It is invisible. Totally. My nephew, who works with cars and has been around those who race, was a bit horrified that I used alcohol in this stove as so many people get burned while running it in performance racing cars because spilled fuel can be on fire and no one sees the flame. If you search desertcart and other sites you’ll find many many identical models or similar models sold by various companies, I picked on this one – the Famgee Portable/Camping Alcohol Stove Stove. The stove comes in six parts. A little instruction sheet, a nice little drawstring bag that you can carry everything in, the aluminum stand, the brass stove, a sealed cap with an o-ring (allowing you to store fuel in it without leaking, more about this later), and a little extinguishing/simmer cover that pops on over the cap for storage. It’s all about 145 grams or 5 ounces with a diameter of 97 mm (3.8 inches) and a height of 64 mm (2.5 inches); so it is very small and light. Using it is simple as putting the stove in the stand, pouring some fuel in, lighting it (again, keeping in mind if you are using something like 99% alcohol that the flame may be invisible), letting it warm/re-heat a bit, and then setting your pot, mug, or cookset on it. The stand itself is quite interesting. At first glance, it may look like the stove sits into it in a certain way but there are many configurations. The stove has two indented areas in a ring around it which fits into the stand’s tabs. With the stand’s arms pointing upward the tabs on the inside of it can fit into the upper or lower indented areas in the stove, depending on how close you want it to what you are heating and how much air you need/want. You may have to adjust these protruding tabs on the stand a bit to hold the stove securely, and you may want to adjust these tabs after the stove is started but you really need to extinguish the stove and make sure it is cool before adjusting these. Or adjust them before starting the stove, ideally. The upright arms on the stand may also need to be adjusted, depending on what you are heating normally. You can see in my photo that the legs on the cooking stand need to be bent inward a bit to fit this cup, though I could have also turned the stand upside down alternately. The stand can also be used with the arms pointing downward and your cooking pot or mug sitting on the circular part, this gives you a surface with more area. In this configuration, you can either put the stove right on the ground with the stand over it or slide the indentation rings into the three protruding tabs on the inside of the stand. So in total, the stand gives you five different positions and configurations, with varying positions of how near or far the flame/heat is from what you are heating, and if you need a lower heat you can use the simmer ring piece – which works in any stand orientation (though you need to slide the handle through the triangular hole in the stand when the stand arms are pointing down). The combo extinguisher and simmer ring have a little cover with a pop-out handle so you can make sure you are not going to burn your fingers when you use it, basically you pop the handle out and set this cover over the top of the stove when it is lit to extinguish the flame. It works great and perfectly, almost instantly snuffing out the flame. As I mentioned above though – high percentages of alcohol can burn invisibly so be aware of this. Even if it looks like it is out after using the cover to extinguish the flame keep in mind that it may still be burning and you can’t see the flame. Once the flame is out the outside of the stove cools quickly, allowing you to stick it in your backpack fairly quickly. As mentioned this extinguishing cover also acts as a simmer ring. You gently pop up at the silver tab that the handle hinge is connected to then rotate the silver part to the side and open, rotating it around the riveted part at the opposite end from the handle hinge. Pop-out the handle and adjust how open or closed the silver part is to decrease the amount of heat allowed through it (it also decreases the amount of air getting to the stove too) by carefully setting this over the top of the stove. Good for simmering and lower heat and warmups. The fuel space holds a small amount of fuel, enough for maybe a couple of medium mugs of coffee. I don’t trust storing fuel in this stove, despite the nice o-ringed sealed cover. I experimented with storing some fuel in it a few times while I knew that the stove was going to be held fully upright and I detected a faint amount of leakage a few times when it did get joggled to the side at an angle, and other times no leakage. Your results may vary here, you may want to store only a small amount of fuel in it to minimize the chance of leakage or not at all, or seal it in a bag. I prefer to store fuel, like the dry gas, in the plastic container it comes in which has a tight pop-top and then I put the storage container in a zip lock freezer bag just to be sure. I also decided to get a windscreen after the experiments and various makeshift windscreens, so I went with a fold-up 9-Plate windscreen, you can find a ton of these on desertcart that are similar to each other and work well. The windscreen is important as the stove is quite small with a small (though hot) flame so any sort of wind can diminish it significantly. Also, the windscreen helps to hold the heat in and reflect it back (specifically this is referring to windscreens that are reflective of course). While mountain biking along a beach the wind was so intense that experimenting with trying to keep the stove lit without the windscreen showed that it would quickly blow it out before it could preheat – but that was under pretty extreme conditions. The stove ran just fine with the windscreen around it. The windscreen really seems to help the stove’s efficiency. This is important for efficiency in wind or extreme cold BUT – you do need to be careful about reaching down and grabbing the cooking pot or mug or coffee pot as there can be a lot of heat gathered inside the windscreen area, and you do have to reach down a bit depending on cookware. And remember here – the flame when using high percentages of alcohol is invisible. A simple silicone oven glove or small silicone trivet can help out here, or a hiking glove. I first tried the Famgee Portable/Camping Alcohol Stove Stove under somewhat cool conditions and with the standard cooking materials that I would use with it – mid 40’s temperatures and low winds, a metal cup filled with approximately 18 ounces of cool but almost room temp water, 91% alcohol (rubbing alcohol), and the windscreen. With very little pre-heating (usually a good idea to preheat but testing it I fudged a bit) it took approximately ten minutes to make hot water. When I say ‘hot water’ that means a bit hotter than I can drink but not boiling hot. Around twelve minutes for the beginning of a boil and fourteen to fifteen for the full-fledged rolling boil. I had filled the stove up to approximately halfway in the inner fuel section and in total it heated two cups of water (one for coffee and one for instant soup) and had about a third or less of the fuel in the stove reservoir left over. This was with no cover on the cooking pot/mug. A note about the fuel left in the reservoir. Some people say that if you are planning on using the stove again and trust storing it in the built-in reservoir then you can leave this fuel in the stove (or have another container to store this fuel in separate from the one you poured new fuel from) but otherwise you want to discard it and not put it back into the original container from whatever you poured it out of. I’m not sure about this as there seem to be a lot of varying opinions. The fuel seems to be fine to pour back into the original container, and I have yet to find any issues with that. Why waste it? (As long as you aren’t planning on using it for anything else.) An additional note here too – be aware when cooking anything that you may need something to protect your fingers and hands when accessing the mug or pot. Sometimes this can be the very thing you forget – ending up with burned fingers. A simple silicone oven glove or small silicone trivet is pretty easy to carry and can help you out when you are cooking on a full-blown camping fire too. At the very least be aware of the heat these stoves can put out and how hot things can be that are on or near them and use a mit, a pad, your gloves, or a bit of cloth if you are not sure. A few more notes from experimenting – with a cover on the amount of time it takes to heat significantly decreases, and also pre-heating can really help it to get up to a cooking temperature. If you are impatient or in a hurry you can certainly put your cooking materials right on top but with colder temps you really need to give it lots of air, and it helps to preheat rather than struggling to get to that point and possibly having it go out. In warmer temperatures this is less of an issue but it still benefits from preheating, very similar to using a regular stove. A few other practical tests included using it at a picnic, for coffee on an unseasonably warm Fall day as well as carrying it on my mountain bike for a relaxing coffee stop partly through a ride while on the beach. On the warmer day it heated quickly, making two mugs of hot water in a short time. For mountain biking the Famgee stove fits nicely in an extendable seat bag or other moderately-sized bag or pack, along with fuel, lighter, mug, water, and coffee as well as the regular seat bag tools and such. I have been testing the stove on and off for a while and my last test was in more extreme conditions, as I gave it a try out in below-freezing temps. In the very cold – in my case heading toward single digits – it took quite a bit more time, and I had to turn the stand upside down with the stove sitting directly on the ground and the cooking pot/mug at the highest position that it could go as it really required lots of extra air circulation. It also required longer pre-heating as it tended to go out if I put the pot on top before it was up to cooking temperatures. Frankly, it probably isn’t suited for near single-digit temperature conditions unless you have extra time for pre-heating, babysitting and monitoring it to make sure the flame doesn’t go out, and the time it takes to heat anything in those extreme temperatures is a lot longer. In these very cold conditions it took well over 15 minutes to heat water to even just warm. Still fairly reasonable though the time needed watching it and heating and fidgeting with it makes it much less attractive as a cold-weather stove. And a bit problematic to keep running in the extreme cold AND windy conditions unless you have a good shelter. And of course for sterilizing water from a stream or river or snow it is going to need to be a good rolling boil for at least one minute or more, more time if you are at higher altitudes. On a side note – it was so cold that my camera locked up while trying to video a video review so that was in fairly extreme conditions. The extinguisher part works nicely, easily and immediately extinguishing the flame. The extinguisher cover also doubles as a simmer ring in that you can adjust the sliding cover to decrease the heat, as explained above. I briefly tested this and it worked well, but you do have to make sure it cools before you can slide the cover back into place to re-use it as the extinguisher. The brass stove cools quickly, within minutes usually and is cooled and ready to be stowed in a reasonable amount of time. As I mentioned above the stove has a nice little bag to carry it in and is small enough to carry in a small backpack or even a waist bag or shoulder bag of a small size, for hiking. You really want to make sure that no matter what kind of fuel you use it is stored securely and has no chance of leakage. You can put whatever sealed fuel container you have in a separate sealed plastic bag as a backup bit of protection. Old soda bottles are pretty well sealed if you don’t trust the top of whatever fuel storage container that you are using, of course you want to test whatever bottle you use by standing it upside down for a bit to check for leakage. Unlike with petroleum-based fuels, alcohol won’t eat through a plastic bag but the bag does have to be sealed well. Whatever fuel you use is going to have some toxicity, and probably a lot of smell – so you don’t want that contaminating anything else; whether it is food or clothes or your backpack or whatever you are carrying it inside of. The good thing about alcohol fuel is that it does evaporate quickly, but it and any the additives can leave behind a smell. So for fuel you can buy 99% rubbing alcohol, which is what dry gas in the HEET yellow container would be – both of which work great. There are also other dry gas types, some of which may have a lower alcohol percentage. You can also use stuff like 91% rubbing alcohol, which is cheap as hell (though HEET and 99% alcohol is damn cheap anyway) but takes a little longer to heat and gives you a visual flame. With the 91% alcohol, it will be sooty on the cup/pan and around the top of the stove and the stove may or may not get hot enough to bloom from the burner holes but burns from the middle – which works just fine otherwise. With lower percentages, it can be VERY black and sooty. Like with 71% alcohol (it’s not going to burn with percentages that much lower than this anyway) you can get a good flame but lots of blackness on your stuff, which you really need to clean off before stowing anything as it will get all over your bag or whatever you are carrying it in. 91% burns much less sooty or not at all, and 99% alcohol or the HEET in the yellow container or other dry gas burns very cleanly (another kind of dry gas may have a lower percentage of alcohol). But the higher percentage of the alcohol burns invisibly so keep this in mind, especially when starting the stove and putting it out as you can’t tell that it is running. I also have been experimenting with an approximately 50/50 mixture of 91% alcohol and the yellow container HEET drygas – it seems to burn very efficiently and also is very visible. Also, with a good but short preheat the stove begins to ‘bloom’ (the tiny holes around the side shoot a small ring of pressurized flames out around it instead of the flame coming from just the middle) – this seems to create a very stable, very hot and uniform heat versus just having the flame burning from the middle. I don’t really know about the science behind this but it seems to be a desirable thing to have happen with this sort of stove and from my own informal testing it seemed to be the best thing to have happen – and with 99% alcohol it is too invisible to tell. In some of my photos you can see here is an example of the bloom (excuse the bad lighting). The downside to the Famgee Portable/Camping Alcohol Stove Stove is that when using it with high percentages of alcohol fuel content it does make the flame totally invisible and possibly dangerous for those who are not paying attention, and it could conceivably be knocked over and spread invisibly burning fuel across the ground. It’s small so it has a very low profile so I don’t believe that this is a major issue but being aware of the invisible flame is something of concern for sure. And being small it is prone to having wind affect its performance, so using it with a windscreen is almost essential for a lot of conditions. But otherwise, I have to say that I am wildly absolutely impressed with the simplicity and efficiency as well as the tiny size of this stove, stowing almost anywhere. And the fact that fuel is cheap and so readily available. The system heats quickly and is versatile in use and does its job and does it well. It’s really hard to complain about it, at least for the single pot/mug/cup use. For larger cooking purposes you of course would want a larger stove. I believe it is well worth the price and is great for those times when you need a small single burner stove. Review: Works, but uses a lot of fuel - I love this little stove. It's dead simple and very compact. The stand is nice too (altho I had to bend it a smidge to get it to properly support the stove. I like how the fuel is non-toxic (well, it's toxic, but nothing you have to be concerned about getting on your hands) and one really doesn't have to worry about spills -- it just evaporates away The one thing about it tho, is that alcohol doesn't have a huge energy density. One filling of the stove will heat a medium camp pot of water, but that's about it. If you're cooking for a large group, expect to refill the stove over and over (which is a bit of a trick if it's still hot from just having run out). You have to plan for this when you carry fuel too. I just got back from a 5-night camping trip and went thru two quarts of fuel cooking for a group of 5. So, the stove is great, but there are downsides.


| ASIN | B078MJM4NG |
| Best Sellers Rank | #63,564 in Sports & Outdoors ( See Top 100 in Sports & Outdoors ) #25 in Camping Backpacking Stoves |
| Brand | Famgee |
| Brand Name | Famgee |
| Customer Reviews | 4.5 out of 5 stars 310 Reviews |
| Fuel Type | Alcohol |
| Item Dimensions L x W x H | 3.8"L x 3.8"W x 2.5"H |
| Item Weight | 5.1 Ounces |
| Manufacturer | Famgee |
| Material | Aluminum, Brass |
| Part Number | FG-AS001 |
| Power Source | Alcohol |
| Product Dimensions | 3.8"L x 3.8"W x 2.5"H |
| UPC | 711639813205 |
L**E
An impressive little stove for hiking and camping and roadside coffee
During the 2020 COVID Summer, I started getting interested in mini camping stoves of all sorts, and then after a bunch of research settled on trying and researching mini camping stoves that run on readily available fuel like alcohol, drygas (like HEET), etc. versus propane or butane, or whatever. These are tiny stoves just large enough for a small pan, cooking pot, heatable coffee mug or cup; weigh very little and can be packed easily into a backpack or even a small bag. An important safety note - if you use drygas/HEET (in the yellow bottle) or isopropyl alcohol or rubbing alcohol that is 99% alcohol then you have to be extra, super careful, and aware as you will likely not be able to see a flame whatsoever. It is invisible. Totally. My nephew, who works with cars and has been around those who race, was a bit horrified that I used alcohol in this stove as so many people get burned while running it in performance racing cars because spilled fuel can be on fire and no one sees the flame. If you search Amazon and other sites you’ll find many many identical models or similar models sold by various companies, I picked on this one – the Famgee Portable/Camping Alcohol Stove Stove. The stove comes in six parts. A little instruction sheet, a nice little drawstring bag that you can carry everything in, the aluminum stand, the brass stove, a sealed cap with an o-ring (allowing you to store fuel in it without leaking, more about this later), and a little extinguishing/simmer cover that pops on over the cap for storage. It’s all about 145 grams or 5 ounces with a diameter of 97 mm (3.8 inches) and a height of 64 mm (2.5 inches); so it is very small and light. Using it is simple as putting the stove in the stand, pouring some fuel in, lighting it (again, keeping in mind if you are using something like 99% alcohol that the flame may be invisible), letting it warm/re-heat a bit, and then setting your pot, mug, or cookset on it. The stand itself is quite interesting. At first glance, it may look like the stove sits into it in a certain way but there are many configurations. The stove has two indented areas in a ring around it which fits into the stand’s tabs. With the stand’s arms pointing upward the tabs on the inside of it can fit into the upper or lower indented areas in the stove, depending on how close you want it to what you are heating and how much air you need/want. You may have to adjust these protruding tabs on the stand a bit to hold the stove securely, and you may want to adjust these tabs after the stove is started but you really need to extinguish the stove and make sure it is cool before adjusting these. Or adjust them before starting the stove, ideally. The upright arms on the stand may also need to be adjusted, depending on what you are heating normally. You can see in my photo that the legs on the cooking stand need to be bent inward a bit to fit this cup, though I could have also turned the stand upside down alternately. The stand can also be used with the arms pointing downward and your cooking pot or mug sitting on the circular part, this gives you a surface with more area. In this configuration, you can either put the stove right on the ground with the stand over it or slide the indentation rings into the three protruding tabs on the inside of the stand. So in total, the stand gives you five different positions and configurations, with varying positions of how near or far the flame/heat is from what you are heating, and if you need a lower heat you can use the simmer ring piece – which works in any stand orientation (though you need to slide the handle through the triangular hole in the stand when the stand arms are pointing down). The combo extinguisher and simmer ring have a little cover with a pop-out handle so you can make sure you are not going to burn your fingers when you use it, basically you pop the handle out and set this cover over the top of the stove when it is lit to extinguish the flame. It works great and perfectly, almost instantly snuffing out the flame. As I mentioned above though – high percentages of alcohol can burn invisibly so be aware of this. Even if it looks like it is out after using the cover to extinguish the flame keep in mind that it may still be burning and you can’t see the flame. Once the flame is out the outside of the stove cools quickly, allowing you to stick it in your backpack fairly quickly. As mentioned this extinguishing cover also acts as a simmer ring. You gently pop up at the silver tab that the handle hinge is connected to then rotate the silver part to the side and open, rotating it around the riveted part at the opposite end from the handle hinge. Pop-out the handle and adjust how open or closed the silver part is to decrease the amount of heat allowed through it (it also decreases the amount of air getting to the stove too) by carefully setting this over the top of the stove. Good for simmering and lower heat and warmups. The fuel space holds a small amount of fuel, enough for maybe a couple of medium mugs of coffee. I don’t trust storing fuel in this stove, despite the nice o-ringed sealed cover. I experimented with storing some fuel in it a few times while I knew that the stove was going to be held fully upright and I detected a faint amount of leakage a few times when it did get joggled to the side at an angle, and other times no leakage. Your results may vary here, you may want to store only a small amount of fuel in it to minimize the chance of leakage or not at all, or seal it in a bag. I prefer to store fuel, like the dry gas, in the plastic container it comes in which has a tight pop-top and then I put the storage container in a zip lock freezer bag just to be sure. I also decided to get a windscreen after the experiments and various makeshift windscreens, so I went with a fold-up 9-Plate windscreen, you can find a ton of these on Amazon that are similar to each other and work well. The windscreen is important as the stove is quite small with a small (though hot) flame so any sort of wind can diminish it significantly. Also, the windscreen helps to hold the heat in and reflect it back (specifically this is referring to windscreens that are reflective of course). While mountain biking along a beach the wind was so intense that experimenting with trying to keep the stove lit without the windscreen showed that it would quickly blow it out before it could preheat – but that was under pretty extreme conditions. The stove ran just fine with the windscreen around it. The windscreen really seems to help the stove’s efficiency. This is important for efficiency in wind or extreme cold BUT – you do need to be careful about reaching down and grabbing the cooking pot or mug or coffee pot as there can be a lot of heat gathered inside the windscreen area, and you do have to reach down a bit depending on cookware. And remember here – the flame when using high percentages of alcohol is invisible. A simple silicone oven glove or small silicone trivet can help out here, or a hiking glove. I first tried the Famgee Portable/Camping Alcohol Stove Stove under somewhat cool conditions and with the standard cooking materials that I would use with it – mid 40’s temperatures and low winds, a metal cup filled with approximately 18 ounces of cool but almost room temp water, 91% alcohol (rubbing alcohol), and the windscreen. With very little pre-heating (usually a good idea to preheat but testing it I fudged a bit) it took approximately ten minutes to make hot water. When I say ‘hot water’ that means a bit hotter than I can drink but not boiling hot. Around twelve minutes for the beginning of a boil and fourteen to fifteen for the full-fledged rolling boil. I had filled the stove up to approximately halfway in the inner fuel section and in total it heated two cups of water (one for coffee and one for instant soup) and had about a third or less of the fuel in the stove reservoir left over. This was with no cover on the cooking pot/mug. A note about the fuel left in the reservoir. Some people say that if you are planning on using the stove again and trust storing it in the built-in reservoir then you can leave this fuel in the stove (or have another container to store this fuel in separate from the one you poured new fuel from) but otherwise you want to discard it and not put it back into the original container from whatever you poured it out of. I’m not sure about this as there seem to be a lot of varying opinions. The fuel seems to be fine to pour back into the original container, and I have yet to find any issues with that. Why waste it? (As long as you aren’t planning on using it for anything else.) An additional note here too – be aware when cooking anything that you may need something to protect your fingers and hands when accessing the mug or pot. Sometimes this can be the very thing you forget – ending up with burned fingers. A simple silicone oven glove or small silicone trivet is pretty easy to carry and can help you out when you are cooking on a full-blown camping fire too. At the very least be aware of the heat these stoves can put out and how hot things can be that are on or near them and use a mit, a pad, your gloves, or a bit of cloth if you are not sure. A few more notes from experimenting – with a cover on the amount of time it takes to heat significantly decreases, and also pre-heating can really help it to get up to a cooking temperature. If you are impatient or in a hurry you can certainly put your cooking materials right on top but with colder temps you really need to give it lots of air, and it helps to preheat rather than struggling to get to that point and possibly having it go out. In warmer temperatures this is less of an issue but it still benefits from preheating, very similar to using a regular stove. A few other practical tests included using it at a picnic, for coffee on an unseasonably warm Fall day as well as carrying it on my mountain bike for a relaxing coffee stop partly through a ride while on the beach. On the warmer day it heated quickly, making two mugs of hot water in a short time. For mountain biking the Famgee stove fits nicely in an extendable seat bag or other moderately-sized bag or pack, along with fuel, lighter, mug, water, and coffee as well as the regular seat bag tools and such. I have been testing the stove on and off for a while and my last test was in more extreme conditions, as I gave it a try out in below-freezing temps. In the very cold – in my case heading toward single digits – it took quite a bit more time, and I had to turn the stand upside down with the stove sitting directly on the ground and the cooking pot/mug at the highest position that it could go as it really required lots of extra air circulation. It also required longer pre-heating as it tended to go out if I put the pot on top before it was up to cooking temperatures. Frankly, it probably isn’t suited for near single-digit temperature conditions unless you have extra time for pre-heating, babysitting and monitoring it to make sure the flame doesn’t go out, and the time it takes to heat anything in those extreme temperatures is a lot longer. In these very cold conditions it took well over 15 minutes to heat water to even just warm. Still fairly reasonable though the time needed watching it and heating and fidgeting with it makes it much less attractive as a cold-weather stove. And a bit problematic to keep running in the extreme cold AND windy conditions unless you have a good shelter. And of course for sterilizing water from a stream or river or snow it is going to need to be a good rolling boil for at least one minute or more, more time if you are at higher altitudes. On a side note – it was so cold that my camera locked up while trying to video a video review so that was in fairly extreme conditions. The extinguisher part works nicely, easily and immediately extinguishing the flame. The extinguisher cover also doubles as a simmer ring in that you can adjust the sliding cover to decrease the heat, as explained above. I briefly tested this and it worked well, but you do have to make sure it cools before you can slide the cover back into place to re-use it as the extinguisher. The brass stove cools quickly, within minutes usually and is cooled and ready to be stowed in a reasonable amount of time. As I mentioned above the stove has a nice little bag to carry it in and is small enough to carry in a small backpack or even a waist bag or shoulder bag of a small size, for hiking. You really want to make sure that no matter what kind of fuel you use it is stored securely and has no chance of leakage. You can put whatever sealed fuel container you have in a separate sealed plastic bag as a backup bit of protection. Old soda bottles are pretty well sealed if you don’t trust the top of whatever fuel storage container that you are using, of course you want to test whatever bottle you use by standing it upside down for a bit to check for leakage. Unlike with petroleum-based fuels, alcohol won’t eat through a plastic bag but the bag does have to be sealed well. Whatever fuel you use is going to have some toxicity, and probably a lot of smell – so you don’t want that contaminating anything else; whether it is food or clothes or your backpack or whatever you are carrying it inside of. The good thing about alcohol fuel is that it does evaporate quickly, but it and any the additives can leave behind a smell. So for fuel you can buy 99% rubbing alcohol, which is what dry gas in the HEET yellow container would be – both of which work great. There are also other dry gas types, some of which may have a lower alcohol percentage. You can also use stuff like 91% rubbing alcohol, which is cheap as hell (though HEET and 99% alcohol is damn cheap anyway) but takes a little longer to heat and gives you a visual flame. With the 91% alcohol, it will be sooty on the cup/pan and around the top of the stove and the stove may or may not get hot enough to bloom from the burner holes but burns from the middle – which works just fine otherwise. With lower percentages, it can be VERY black and sooty. Like with 71% alcohol (it’s not going to burn with percentages that much lower than this anyway) you can get a good flame but lots of blackness on your stuff, which you really need to clean off before stowing anything as it will get all over your bag or whatever you are carrying it in. 91% burns much less sooty or not at all, and 99% alcohol or the HEET in the yellow container or other dry gas burns very cleanly (another kind of dry gas may have a lower percentage of alcohol). But the higher percentage of the alcohol burns invisibly so keep this in mind, especially when starting the stove and putting it out as you can’t tell that it is running. I also have been experimenting with an approximately 50/50 mixture of 91% alcohol and the yellow container HEET drygas – it seems to burn very efficiently and also is very visible. Also, with a good but short preheat the stove begins to ‘bloom’ (the tiny holes around the side shoot a small ring of pressurized flames out around it instead of the flame coming from just the middle) – this seems to create a very stable, very hot and uniform heat versus just having the flame burning from the middle. I don’t really know about the science behind this but it seems to be a desirable thing to have happen with this sort of stove and from my own informal testing it seemed to be the best thing to have happen – and with 99% alcohol it is too invisible to tell. In some of my photos you can see here is an example of the bloom (excuse the bad lighting). The downside to the Famgee Portable/Camping Alcohol Stove Stove is that when using it with high percentages of alcohol fuel content it does make the flame totally invisible and possibly dangerous for those who are not paying attention, and it could conceivably be knocked over and spread invisibly burning fuel across the ground. It’s small so it has a very low profile so I don’t believe that this is a major issue but being aware of the invisible flame is something of concern for sure. And being small it is prone to having wind affect its performance, so using it with a windscreen is almost essential for a lot of conditions. But otherwise, I have to say that I am wildly absolutely impressed with the simplicity and efficiency as well as the tiny size of this stove, stowing almost anywhere. And the fact that fuel is cheap and so readily available. The system heats quickly and is versatile in use and does its job and does it well. It’s really hard to complain about it, at least for the single pot/mug/cup use. For larger cooking purposes you of course would want a larger stove. I believe it is well worth the price and is great for those times when you need a small single burner stove.
T**E
Works, but uses a lot of fuel
I love this little stove. It's dead simple and very compact. The stand is nice too (altho I had to bend it a smidge to get it to properly support the stove. I like how the fuel is non-toxic (well, it's toxic, but nothing you have to be concerned about getting on your hands) and one really doesn't have to worry about spills -- it just evaporates away The one thing about it tho, is that alcohol doesn't have a huge energy density. One filling of the stove will heat a medium camp pot of water, but that's about it. If you're cooking for a large group, expect to refill the stove over and over (which is a bit of a trick if it's still hot from just having run out). You have to plan for this when you carry fuel too. I just got back from a 5-night camping trip and went thru two quarts of fuel cooking for a group of 5. So, the stove is great, but there are downsides.
D**T
Great little cheap stove.
I tried it out on trail today. It worked quite well. I was pleased. My 450 ml toaks pot doesn't quite fit on top. I have a stand for sn esbit stove that worked quite well to adapt it for the toaks pot. It didn't bring the water to a full boil, which is fine. At just a simmer it was plenty hot enough to cook a mountain house meal. I couldn't see the flame, but that's not a big deal either. You can hear it and feel the heat. Overall a nice stove fir the money.
B**B
Great little kit!
This is incredible for the price! I have a name brand one that is thicker metal but this one is nice. It comes with everything you would need to camp or cook small meals during a power outage. I would buy again. I might get a few as stocking stuffers.
M**�
my first experience on alcohol burner
This is my first alcohol burner. The product itself works great. It just doesnt produce alot of heat. I learned that you need a high percentage of alcohol so that it catches on fire instantly. Instead of having a flame over it for 2 minutes waiting to catch on fire. 91% alcohol is what i now use and it works like a charm. The main reason why i bought this was for out door use to cook food. You know, boil up water, heat canned goods. One night i boiled up some water using this to heat up on a small pot(3 inches deep, 5 inches wide) that fit perfectly on top of this burner. For one, it took like 10 minutes to get the water to be hot. I dont really remember if it was ever on a boiling state. Secondly, which is the worst part, the alcohol flame contaminated the water with a horrible fume flavor! This isnt the burners fault, its just science i guess. So now this item is useless for what i had it planned for. All i see it can be used for now, is maybe a mini camp fire to keep warm around. And use it to make other things catch on fire. 4 stars because the item itself works great. It just didnt boil up the pot that i bought specifically for this burner because i thought it will be able to boil the amount of water the small pot can hold. After my experience, now I just wont use it for anything that you plan to heat up for consumption.
T**W
I had been real pleased with these stoves until I tipped mine and spilled burning fuel on dry leaves
I went on a 4 day hike and was using this nice light, cheap, cute, good cooking stove and was very pleased with it until on the last day as I was putting out the fire I accidentally knocked it over and poured burning fuel onto the wooden table and it spilled burning onto dry leaves under the table. I was blessed to be able to get the fire out before it spread very far but I lost all my affection for these easy to use stoves.. I recommend only using it on the ground in a cleared space so that if it gets tipped over you only have fire in the dirt. Only then can I once again enjoy using this very small and convenient stove
K**.
Great Camp / Emergency Stove
It took few seconds to get to the "cooking" flame. Heated up soup or beef stew (3 cup serving size) in only 3 minutes. Fast & efficient👍 I teach Field-craft & survival -- I'll be buying more for students. The directions could definitely be written a lot better. Fortunately, I'm very familiar with these stoves.
W**T
Great stove
What a great stove to have in your backpack. Lightweight, and efficient. Use denatured alcohol, no wicks. Very hot heat source.
A**S
Excelente producto. muy versatil y ligero.
Excelente producto. muy versatil y ligero.
M**D
Not Trangia but real close
Looks like a Trangia burner....same brass material, solid construction, has a gasketed screw on lid with no leaks and a simmer ring/snuffer with a folding handle making it easy to drop over an open flame....same dimensions so it will fit in anything a Trangia burner will......but does it have Trangia performance??? As soon as I got this I rushed outside to the picnic table to test it. Sets up in the pot stand quickly.....susceptible to wind so I used a folding windshield (you must get one for these for it to work efficiently)....one ounce. of Methyl alcohol burned 16 min......the burner "blooms" almost immediately and comes to a full cooking bloom in under a minute (Proves this burner has the same "internal wick" to the jets that Trangia does)....at 0 Degrees Celsius it brought 2 cups of water to boil in just over 5 min. This burner, like the Trangia, a has a "break in" period before it gives its best performance....after break in, in warm weather and the thermal feedback from a larger pot, I expect even better results. THIS IS THE NEXT BEST THING TO A TRANGIA without the extra cost....it's a great piece of gear.
W**R
Compact unit but unstable when in use
Nice little unit but caused a fire when it tipped over after placing a small pot on top using a wider carefully centred grilling mesh which should have aided stability plus we used it on a level table. Using as is wasn't safe or advisable. Cooker tipped over, pouring methanol over the table while burning. What fun! A little dangerous for placing a pot on top as is. No doubt we will only use this using a couple of bricks between which we will place our small cooking pot on the metal mesh grill. Hope this makes sense. Keep well away from children and pets too. Be safe! Have fun!
S**E
BEST PREP EVER !
Absolutely love this survival prep for cooking and heat ... Perfect for emergency in car or home when and if SHTF...Bought one for ...beautiful.... me one for my sister next my son .... the perfect gift... so well made screw top lid for no alcohol spills... Will buy another just in case cause two can be one and one none..
E**R
Pas étanche
Fait le travail mais n'est pas du tout étanche malgré le o ring en cahoutchouc
Trustpilot
1 month ago
1 month ago