

Buy anything from 5,000+ international stores. One checkout price. No surprise fees. Join 2M+ shoppers on Desertcart.
Desertcart purchases this item on your behalf and handles shipping, customs, and support to Vietnam.
💅 Elevate your DIY manicure game—because your nails deserve the VIP treatment!
The Beetles Gel Nail Kit Etch-X offers 500 pre-etched medium almond nail tips with a matte finish that require no filing, paired with a 9-in-1 multifunctional nail glue gel and a USB-powered UV/LED mini lamp. Designed for easy, professional-quality home manicures, this kit delivers durable, break-resistant nails lasting over 28 days and is compatible with all gel polish brands. Perfect for millennials seeking salon results with minimal effort and maximum style.


| ASIN | B0BN11S5JM |
| Best Sellers Rank | #2,739 in Beauty & Personal Care ( See Top 100 in Beauty & Personal Care ) #14 in False Nail Tips |
| Brand | beetles Gel Polish |
| Brand Name | beetles Gel Polish |
| Color | 0-Medium Almond 500pcs(etch-x kit) |
| Coverage | Full Well Tips |
| Customer Reviews | 4.4 out of 5 stars 46,785 Reviews |
| Finish Types | Matte |
| Included Components | Gel Nail, Nail Lamp |
| Item Form | Medium Almond Nail Tips |
| Item Shape | Ballerina |
| Manufacturer | Gelab cosmetics LLC |
| Manufacturer Part Number | BT-FN096CA |
| Material | Gel |
| Material Type | Gel |
| Number of Items | 1 |
| Number of Pieces | 500 |
| Pattern | 1-2 Medium Almond 500pcs (Etch-X Kit) |
| Product Style | French |
| Size | 503 Piece Set |
| Special Features | Etch X Nail Tips |
| Style | French |
| Unit Count | 1.0 Fluid Ounces |
C**E
I am a former nail professional and cosmetologist
UPDATE: The last two pictures were taken 2 weeks later and almost time for a fill. No lifting. No problems. No kidding. This review is from a professional cosmetologist with more than 45 years nail experience. I have experience with just about every type of nail treatment there is. I’m proficient in acrylic, hard gel, poly gel, etc. sculpting from scratch, using overlay or tips. You name it and I’ve used it on a client or myself. After years of also working in an office behind a computer & a keyboard, my hands are toast. I need to have surgery as my carpal tunnel is so bad. So, I can no longer take clients. I also cannot do my own nails. It’s just too painful. Even with an E-drill. It’s just too much fine work. I recently discovered the soft gel system. This is a game changer. I did both hands in under an hour with salon quality results at home. There is a bit of a learning curve, but just keep practicing. The biggest hurdle is making sure you don’t have any air bubbles so you have to press the nail down hard during the flash cure. I started with my regular nail prep. Push back your cuticles and remove any excess. Next, a gentle buff to remove the shine. Clean your nail bed with alcohol on a lint free wipe, or I prefer to use a soft bristle toothbrush for this. Make sure you have the correct nail sizes picked out beforehand. I also have a special tip primer that I use (underneath where the tip adheres to your nail bed only). Next double prime your nail beds (one hand at a time). A side note about the little UV light that’s included, this is only supposed to be used as a flash cure, it’s not meant to do your final cure. You should have a full size UV light for your finished treatment (Not included. But there are several cost efficient options available on Amazon). My final cure Under a full-size lamp is 60-90 seconds. After your double prime, use the Beetles nail glue gel and do a thin coat on your nail bed and do a quick flash cure for about 10 to 15 seconds. Then get your tip ready, apply the gel to the tip over your primer. This is the part that takes a little practice, but you will get used to it. Don’t use too much gel. Apply the tip back at your cuticle area first, pressing/rocking forward (use a lot of pressure to get rid of any air pockets). Flash cure under the light for 10 seconds. Once you feel the gel grab, let go and finish flash curing. My light turned off automatically at about 60 seconds or so. During the learning curve, I ended up with a little bit of excess gel on my side walls and/or underneath. But this is easily taken care of. With practice it will become less and less. That’s it. Then follow the directions included by the manufacturer. I always put another layer of gel over the top for increased strength as I’m very hard on my nails. You can either wear them natural or polish. Make sure you use a good cuticle oil to keep your nails and cuticles healthy. Then you can polish and do any nail art you would like. I’m very impressed with this little kit and I will keep using it at home. For a longer lasting treatment, make sure to use gloves when doing the dishes, etc. Anytime you get your nails wet, they expand and contract, and it puts stress on your manicure. Also, remember every time you use a UV light, the gel just keep getting harder. Even on a previously cured set. If you over cure, they can get brittle. These can also be filled like a full set of sculpted acrylic, or gel nails. If they haven’t lifted, you don’t need to take them off and re-apply from scratch. Just use the Beetles gel to fill them after using the same prep, as mentioned above. Happy manicuring everybody. I’m truly happy with this product and I will continue to use this as it is an extremely affordable and easy option for me.
A**R
5 star!
These are the best nails I’ve used to date! Super easy to put on and really do last! Photo is day 10, not one loose and I just repainted for derby tonight! It comes with a small uv light…but yes I used my old large one for painting my entire hand. You’ll want to use the small one to cure glue on each finger but 10/10 recommend these nails and their gel glue.
T**T
LIFE CHANGING TRICKS
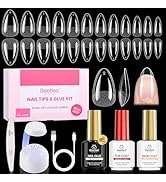
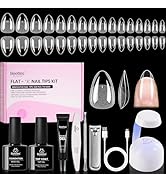
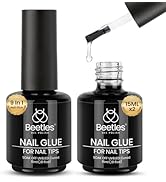
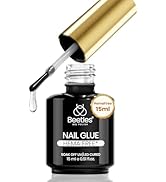
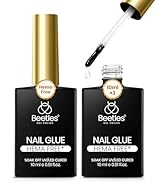
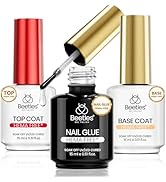
The are my favorite nails by far. If you want to read about why, skip to the end. If you care about the glue and making these last way longer, like crazy super forever long, that’s first. MAJOR TIPS SO THEY CAN LAST 2 weeks - a month: 1. The Beetle’s glue is the best, hands down. I’ve tried all the major ones, even super glue, and the UV/LED Beetle’s is Queen. Lasts 2 weeksish for me, but with the occasional pop off. I’ve never used a glue that didn’t have that issue. That said… 2. All nail glue sucks. There’s no way around it. Sorry. My issue is how hard it is to not get the stuff all over my fingers, nail beds, and the nail itself. It’s impossible for me to get the nail on straight without adjusting, especially if you don’t use mega long nails. SO, there’s ALWAYS bubbles for me with any glue, making me the years long mayor of Popoff City. Maybe it’s me, but since all glue is liquidy, I can never hold the nails in straight in place, at the right angle and pressure until they’re cured enough to stick on their own. MEGA MESS EVERY TIME. The devil always wins. 3. …UNTIL I FOUND THE MIRACLE. Works every time. How did I not know about this??? Ok, so if you have to get glue, bet Beetle’s. If you want your nails to last pretty much forever… like, long enough to require an infill, easily 2, 3, 4 weeks with NO POPOFFS, chipping, or breaking, I’m about to rock your world. Baby, POLYGEL is the new glue. 4. Ever heard of the Lazy Girl Method? That’s cool, I’m down, but it still requires meticulous drilling and filing underneath the nail extension so it isn’t unnaturally thick an blobby. Sometimes psh who’s for time for even that? Thus, I present to you… 5. ⭐️THE SUUUPER LAZY LAZY GIRL METHOD⭐️ Like the OG LGM, this requires clear full cover press on false nail tips so the lamp can cure the adhesive. So my adaptation is this- use polygel as glue. That’s enough, but don’t worry, there’s more. For me, a Major Game Changer.. Just a lil 1 - 1.5 carat blob scooped from the tube with the base of the nail you’re applying. Or, you can use a polygel brush and isopropyl alcohol as slip to do an even hearty coat to either nail. Either way, the natural nail should be fully coated once the nail is on. Apply the same principles you’d use for nail glue. Not no much, apply the nail at an angle and roll the nail on to evenly distribute the polygel without bubbles. My favorite part? The nail STICKS WHERE YOU PUT IT, so adjustments are NO PROBLEM and you basically don’t even have to hold the nail in place with your other hand under the lamp. As long as you don’t pick the nail up off your finger and instead gently rock it for bubble control, you’re golden. If you apply too much polygel or too much pressure, it’ll ooze out the sides and under the fingertip, just like glue. So don’t. But with the thick, sticky polygel, you have WAY more control and can easily scrape off oozing excess with a cuticle pushed or whatever, and a wipe with isopropyl alcohol will remove the residue from your nail or skin. ✨BONUS TIPS✨ *I find the BY FAR the easiest way to apply the nail with this method is to simply place the nail on, no pressure AT ALL, and wait a minute with your hand still. This lets the nail gently settle itself onto the gelled nail bed without oozing out the sides. *if you still have problems with spillage at the fingertip under the nail: dude, less gel and less pressure. If it’s too late for that, you can flash cure the nail while COVERING your fingertip from the light so that part doesn’t cure. Then, when the nail stays on, scrape out and clean up the underside of nail before you finish curing. *You can encapsulate glitter this way! May want to do a thin layer on the other nail too, so it adheres just as strong without glitter gaps. *USE BUILDER IN A BOTTLE ON TOP and that thing will never chip and be rock solid and GLASSY.. A thin layer is all you need. If you painted the nails and the surface isn’t perfectly smooth, use a second thicker layer and hold your hand flat upside down for 20 seconds before curing. It SELF LEVELS, so any wonkiness disappears. Magic. You can also apply gems ‘n stuff with it. * You can paint a French tip or whatever UNDERNEATH the nail before applying (just not the base). That way the surface stays perfectly smooth and you don’t need to struggle for greatness worth left-handed painting. *Wherever there’s wet alcohol, the nail will slip around and not adhere properly. So try to be sparing, and let it dry for 30 seconds or whatever before curing if you used any with the poly gel. If you use alcohol to clean up any extra around the applied nail before curing, try not to let it drip around the edges or *gasp* underneath the nail. ‘Twill fork up adhesion and the nail won’t last as long. *The polygel surface will stay sticky after it’s cured, that’s normal. Just wipe with isopropyl alcohol 70-99% and it’ll remove the tacky residue. This is NOT the same as nail polish remover!!! Make sure you do that before filing or drilling if you are shaping the nail or removing wayward polygel on the surface of the nail. It’ll gunk up your file is you let it stay sticky. *You can use any color poly gel, but my go tos are clear and natural pinky nude, like you’d use for a French tip. Opaques do take longer to cure. *If it grows out super long, you can easily infill with the same polygel. ABOUT THE NAILS THEMSELVES I got medium almond, and Grrl, they’re looong. But I’m not mad, for a few reasons. 1st, of all the nails I’ve bought on Amazon (Una Gella, Gootrades, Sally H, etc) these are the best, imo. They’re most similar to Markhartt’s press on full coverage nail tips. Thick and STRONG, but still a bit flexiblish unless you crease them down the middle. To compare, Markhartt’s short “ballerina/coffin” nails are basically as long as the Beetle’s medium “almond,” just with the coffin tip cut out. Markhartt’s have this funny fluted shape thing going on that just makes my nails look… well, kinda fat (not phat). It may be my own fault for having an unfortunate nail shape- spatulate/triangular with like 2x wider nail tip than base. Theirs make me look like the nails are too big and bubbled sideways where my finger ends- even if the size is too small🤷🏼♀️. Beetle’s are flatter, and Markhartt’s have more of an apex built in. I *thought that would be great because nail techs are ALL about that apex, but for me, it was problematic. I find Markhartt’s REALLY difficult to shape or trim, I guess because of the weird fluted shape and apex. I’ve tried a million times, but if I try to narrow the sides into a shorter stilettos or whatev, they’re always too convex and fat looking, or too concave and cat claw looking, but never straight. Basically, they look weird unless I trim Markhartt’s straight across to top horizontally, effectively just making them square, not my fave. I guess the apex makes it that way? 🤔
A**N
Love the results so far but a little long
I’ve used Beetles products for about two years now and have always loved them. I don’t have very strong nails, they’re constantly breaking so the Gel extensions were super intriguing. I also don’t want to pay to keep my nails done constantly so I figured I’d give it a shot. I do have a background in cosmetology and I watched a lot of YouTube videos of the Gel X process to get an idea of the process and gather tips and tricks. I don’t own a nail drill so I did all of this with files and buffer blocks. Overall, I’m super happy with the results. It was a fairly easy process and took me just over an hour from start to finish. There’s definitely room for improvement as far as my technique but they look pretty darn close to salon quality. I don’t know about longevity yet since I’ve only had them on for about two days but they feel really secure and strong. Couple of tips: -Make sure you have a stronger UV light than the little one it comes with. That is strictly just for flash curing. - it helps to invest in a nail dehydrator and nail primer. I bought a duo on amazon. - the “short almond” style is still really long in my opinion. I cut them down and filed back into shape. I took off one star for this reason. Already placed an order for “extra short almond” to compare. - I’m a stay at home mom so I bought a pair of gloves for the never ending dish washing to hopefully extend the life of my nails 😂 I finished them off with a Beetles polish and I bought some chrome powder as well and I love the finished look. Definitely worth a try if you have even a sliver nail knowledge and some patience!
S**E
Shockingly Good Nail Kit for At-Home Manicures
I wasn’t expecting much from this set, but it ended up being one of the easiest and most complete nail kits I’ve used at home. The tips come in a full range of sizes, and they’re all clearly labeled, which made it simple to find the right fit for each nail. The material is lightweight but strong—once applied, they feel secure without that overly thick, fake-nail look. The standout for me is the glue gel. It’s more like a builder gel in texture, so you get control without it running all over the place. It cured quickly under my UV lamp, and once set, the nails did NOT budge. I’m pretty hard on my hands, and these lasted a solid two weeks without lifting. The included tools are basic but genuinely useful: the mini file actually shapes well, and the little clipper is perfect for trimming the tips down before shaping. The only thing to be aware of is that removal takes patience—soak them properly and don’t rush, or they will resist. Pros: • Easy to size and apply • Glue gel is strong and cures fast • Nails feel lightweight but durable • Includes everything needed for a full application • Great for beginners or quick at-home manicures Cons: • Removal is a bit slow (typical for strong gel systems) Overall, this kit is perfect for anyone who wants salon-looking nails without the appointment. I’ll definitely be reordering.
M**S
Salon Style Nails at Home Made Easy
This kit is such a fun and practical way to do nails at home without needing a salon visit. The nail tips are pre shaped and easy to work with, and the variety in sizes makes it simple to find a good fit. The clear full cover design also gives a clean base for polish or designs, which makes everything look more polished overall. The UV LED lamp and 5 in 1 glue make the application process straightforward, even if you are not experienced. Once applied, the nails feel secure and hold up well with normal daily activities. Overall it is a great DIY kit for achieving a salon like manicure at home in a more convenient and budget friendly way.
S**A
Easy to apply, Worth the price
This kit was a great purchase. The kit comes with more than enough nails and the instructions are very clear and easy to apply. The nails last 2 weeks easily and they were only removed due to a fill in being needed. Paired with the Beatles gel polish I’ll probably never return to a nail salon. Life saver!
B**M
Great retention
Obsessed. Nothing stays on my nails but these have lasted so long. there’s a learning curve with the gel glue but other than that the retention is really good and it’s super easy to paint over
N**N
DO NOT BUY !!
I was so excited to do my own nails at home rather than having to spend so much money at home, and for 3-4 uses, it was going okay. Until I tried it for the 5th time. Once I had the gel nails on, my fingers started to itch very badly, and they became red and looked like a rash. I had to go to the emergency to find out what was happening to my finger... It turns out I have contact dermatitis, and I'm just letting you know... there is NO CURE for this... As a result, I am not able to wear Gel Polish ever again, which honestly sucks.
I**E
Facile d’utilisation
Bon rapport qualité prix
J**N
Beetles products are such a steal!
I've been using this kit and it has saved me so much $$$. The nail extensions are so strong and easy to use since it's pre filed and shaped.
V**A
Very good
Worth the money. Very easy to use. Comes with a lot of tips, but only downside is once you find your size..the rest of the tips kinda become useless.. I used the extra tips to practice designs. Other than that the lamp was not the same in the picture but it still worked.
A**A
♥️
amazing
Trustpilot
2 months ago
2 weeks ago