


Buy anything from 5,000+ international stores. One checkout price. No surprise fees. Join 2M+ shoppers on Desertcart.
Desertcart purchases this item on your behalf and handles shipping, customs, and support to Vietnam.
🎞️ Digitize your past, own your memories today!
The Kodak SCANZA RODFS35 is a versatile film scanner designed for quick conversion of 35mm, 126, 110, Super 8, and 8mm negatives and slides into high-quality JPEG digital files. Featuring a powerful 14MP sensor with optional interpolation up to 22MP, a bright 3.5” tilt LCD for easy preview and editing, and multiple film adapters for broad compatibility, it streamlines the digitization of vintage film archives. The device includes all necessary cables and a cleaning brush, supports SD cards up to 128GB, and offers an intuitive interface for on-the-fly image adjustments, making it an ideal tool for professionals and enthusiasts eager to preserve and share their analog memories with modern clarity.


| ASIN | B00O2BU8PK |
| Best Sellers Rank | #38,989 in Office Products ( See Top 100 in Office Products ) #16 in Slide & Negative Scanners |
| Brand | KODAK |
| Color Depth | 24 bpp |
| Connection Type | HDMI, USB |
| Connectivity Technology | HDMI , USB |
| Customer Reviews | 4.2 out of 5 stars 11,644 Reviews |
| Global Trade Identification Number | 00840102192780 |
| Item Dimensions D x W x H | 4.7"D x 4.7"W x 5"H |
| Item Weight | 1 Pounds |
| Light Source Type | CCD |
| Manufacturer | Kodak |
| Media Type | Negatives, Slide |
| Minimum System Requirements | Windows 7 |
| Model Name | SCANZA |
| Optical Sensor Technology | CCD |
| Product Dimensions | 4.7"D x 4.7"W x 5"H |
| Resolution | 7200 |
| Scanner Type | Film |
| Standard Sheet Capacity | 35 |
| UPC | 840102192780 |
| Unit Count | 1.0 Count |
| Wattage | 250 watts |
M**Z
Great unit, great price
I bought this unit not expecting much, but was pleasantly very surprised with the way slides scanned and looked on my 55" television. For slides with good exposure, contrast, dye color retention, and focus the results were great and exceeded my expectations. It should be noted that slides may degrade over time and have severe color shifts if not stored correctly. I had many slides with a blue/cyan cast that were not stored correctly, and many that were outright destroyed by wet basement storage. But if your slides are good you should get very pleasing results. If your slides are in metal frames from a previous projector be sure to check for rust deposits. If deposits are visible scrape clean with a utility knife and blow off slides with a squeeze bulb puffer. I fed a few slides with rust deposits into scanner and scans became very dirty. I found unit was very easy to clean but I DID NOT use the little scrub brush supplied, I was worried hard rust particles might scratch the scanner lens. So I decided to try my squeeze bulb air puffer in the slide slot; one or two quick puffs and all dust and debris were gone! People also complained slides are a bit tricky to load, which is true. I found my slides had bowing from being stored in the metal projector frames, and that if I manually bent them straighter they fed MUCH better. All I have done so far is to scan slides, but scanner is worth every penny to me. Scans are captured very quickly, and all I had to do was use default settings, a breeze to use. I think the editing scanner settings might help some in getting better scans, but I think you can do much better with computer software after capture. I purchased my Scanza from DBROTH and it arrived quickly, but unit was packed very poorly, loose, rattling around in a bigger box with no padding. I was lucky, unit was not damaged, but I would not buy from this source again. See sample scans
R**Y
Great Way to Convert Slides and Negatives to Digital Files
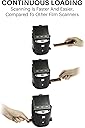
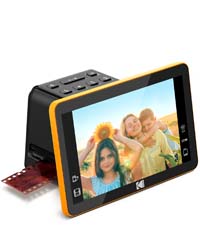
I inherited my father's voluminous collection of color 35mm slides which sat in the basement for 70 years. Reaching back to the early 1950's only a few years after my father returned from the war, he took up photography in the Army as part of the Signal Corps and then continued informally when he returned home. The problem? I have no slide projector to see any of these, and never really relished the idea of purchasing one (I do all my photography in digital). Thus, these pictures, with all the memories they hold, have stayed in the dark without anyone seeing them. That's where this handy little device comes in. I wanted to easily digitize these slides so at the very least I could look them over, and possibly even find some gems that I could print and share. The thought of the work involved in doing such a task kept me off from doing it for two decades until I ran into this little Kodak device. Yes, it still takes time, and will indeed take time, but once you learn how to do it, you can rip through slide digitization at a pretty good clip. You plug the device in, hinge the screen so it is at the correct angle for viewing, and pop in an SDXC card into the back slot. Turn it on, set a couple of quick settings to tell the machine what type of media you are using (35mm slides, film negatives, etc.) and you are ready to go. The unit comes with a number of plastic holders that you slip into the side of the unit and then you simply slide your slides or negatives into the device. When the image shows up on the screen correctly centered, you press one button and either a 14 or 22mp screen capture (depending on your settings) is made and automatically stored on the SDXC card. You just continue this process until you are finished or are ready for a break, etc. The image scan is pretty good and while I would not pretend to say this is a high-end professional scanner, it does a more than adequate job for tasks like I've described above. There are adjustments for color, sharpness, etc. if you wish to make them. The real benefit to this unit is the ease in which it allows you to conduct the conversion process, turning an unpleasant and lengthy task into something much easier. When you are done, you simply eject the SDXC card and insert it into your computer and copy off the scans. From there you can use any photo editing software to adjust the image (images are saved as jpg files). The quality of the device itself seems good and sturdy, and I don't expect to see any problems with its use over time. The unit makes no noise and does not seem to get warm during use (probably uses an LCD-based light for scanning) and looks nice enough that you can leave it off on the back of a shelf without it looking obnoxious. I'm glad I found the device and can easily give it five stars! Note: If you are in a situation like me, your slides or negatives will be dusty and dirty from years of sitting around. Do some online research on the correct way to clean slides and negatives because you will want to clean these before you scan. If you scan the slides in a dirty condition, all the dirt and dust will show up on your photos.
W**Y
Fast and Easy to Use. Acceptable Quality
OK, it says it right in the Product Description: "NOTE: this is not a flatbed scanner, ... if you are looking for HIGH quality scans please look for a flatbed scanner, this device is designed to quickly scan through old memories with good quality." I agree completely. This device is easy to use and is fast. The image quality is acceptable, although there is a fair amount of JPG compression applied. As a result, distant trees tend to look like a green smear, while signs, text, cars, houses, etc. tend to remain fairly crisp, at least up to a reasonable amount of magnification. My use case is taking hundreds of slides from the 70s and on that would otherwise never be seen again and getting a chance to look at and enjoy them and relive the memories. This is a perfect device for that use. If I find a few slides that I really want a better copy of I can always send them out for professional copying. I use Adobe Lightroom and Photoshop for my digital photography, so here is the workflow that I'm using. 1. Brush every slide with a lens brush to remove lint. (Even though they're stored in "Slidecubes" they're still linty.) 2. Scan to SD card. 3. Insert card into computer and batch change the file date to the current date. (The scanner defaults to June 2017 and can't be changed.) 4. Import into Lightroom, Apply Auto white balance and Auto tone settings to the batch. 5. Maybe crop to eliminate traces of the slide frame along the edges. (Probably more work than it's worth.) 6. Sort into Collections based on location and date. I think for this type of device and process you can figure on the following: "Fast, Inexpensive, and High Quality Output -- Pick any two." This device is fast and inexpensive, and the quality is adequate for my use.
A**R
Quick setup, Easy Interface, Great Scans
This scanner works well scanning old 35mm slides. Since I purchased it, I have scanned several thousand slides into good quality JPEG images. The images are large and clear, with good color retention. This is not a professional production scanner, but it has provided me with images better than I expected and it has help me to salvage and archive all of the old family slides. Scanning requires moving slides through the scanner using a guide. Once a slide is lined up sufficiently in the viewer, you simply press the capture button and wait a few seconds and move to the next. It is reasonably fast (under 20 seconds per slide) as they are passed thru the guide. The viewing screen is large enough to see the image sufficiently and the user menu and interface display is easy to understand and follow. The scanner requires the use of a SD memory card (Not Included). All files are stored onto that card until transferred onto a PC hard drive or other storage device via a USB cable. I am using a 64gb SD card and I am able to store just over 6000 scanned images to the card. This scanner will operate as a stand alone scanner with the USB power cable provided or it can be powered from a PC via the USB cable. It has the ability to display images to a TV or Monitor directly from the scanners SD memory card, and a HDMI to USB video cable is provided an well as a RCA type video cable. Numerous types of guides are provided for different types of film media, negatives (110, 35, etc.) slides, 8mm film and super 8mm. There are different types of guides for different thickness of slides provided also. I have not used it to scan any other type of media (negatives, 8mm, etc.) but I am sure it would scan that media just as well. I am very pleased with this scanner.
A**C
Photos seen in this review were *heavily* refined from scanning
I really want to like this scanner. Because of its cost, primarily, and because of its size and ease of use. But the in-device settings are very simplistic and the JPGs produced do not look like what the screen shows when you make adjustments for your final output. Perhaps because the lightbox provides a 'boost' to the images or something. But, it is greatly limited by being 14 megapixels despite saying it can go to 22 (which is just upsampling and not native resolution, much like simply changing the size of an image in Windows Photo Edit. Think zooming in on an iPhone picture and how it looks more like a painting than a sharp photo. I'd say I could print *maybe* 8x10s from these scans but far better quality if I go lower like 4x6. These photos attached to the review are all from Velvia 50 slide film and so are initially very high quality. I've scanned them before with a laser scanner (quite destructive unfortunately) and the quality output allowed me to make a 12x18 print no problem, looking quite perfect. So I am not really impressed with the Scanza despite its cost. I'd say "value" is lacking, therefore. I put at least an hour of Photoshop and Luminar Neo processing into each of these and at least I could get the colors right but the details are very coarse / blotchy. Oh well, I will not ever do a laser scanner again due to their destructive processing, but I may get an Epson V600 flatbed scanner as has been suggested by other reviewers due to the 2x higher quality than what this device can provide. With the Scanza, you can post to Instagram or Facebook only.. but some are still pixel peepers and will notice the low quality.
M**R
Excellent slide scanner for casual archiving. Easy to use.
I had trouble finding a good, inexpensive scanner to archive thousands of slides dating back to the 1970s. I finally came across this product, and it was the perfect purchase for my needs. Mind you, yes, this is not a *professional* slide archiver. However, unless your parents / grandparents were photographer pros themselves, you'll just be capturing mediocre slides in higher detail. You may be able to use some fancy post-processing photo-doctoring software to fix the bad lighting, bad color, etc, but honestly... being able to see and share photos that have eluded viewing for decades, without taking up countless hours of your time -- isn't that what you are really after? The sensor is 14MP, which means each photo comes out to about 1.4MB. There is a 22MP option, but it is *software interpolation* only, so I don't even bother. Again, what is the point of upgrading something that isn't high-quality to begin with? It's like putting VHS onto Blu-Ray. The setup is very easy. There are menu-driven buttons to select slide type (it won't auto-detect), and a couple of other options. Mostly, you'll be spending your time scanning on to a standard SD Card. It seems to handle almost any type SD Card, from UHS-II speeds to 256GB capacities. You insert the guide tray into the bottom of the unit, and then start feeding it slides. The *ONLY* drawback here is that you end up one behind in terms of finishing a group of slides. I ended up having to create two "dummy" slides so that I could clear the queue. You'll see what I mean when you use it. I wish there were a less clumsy way, but it's very minor. Simply put, I've scanned thousands of slides in a short amount of time. If the shot was good when originally taken, it is captured quite well by this unit and is now digitized for enjoyment by family and friends. For the price, I don't think you'll find a better product out there that combines simplicity, quality, and just-enough functionality. P.S. This scans some types of camera film as well. I never used the feature, but it is a whole added layer of capabilities to the slide scanner component!
G**S
This is a Waste of your Time and Money
The Kodak Scanza arrived well packaged and in an undamaged box, so I didn't anticipate a problem. I scanned several old 35mm slides and soon discovered that the method provided for capturing mounted slides is marginally useless. You can try to pry apart a plastic tray which is in turn inserted in the scanner (one up), or you can try to feed them in from the end of the mounted tray to minimize handling. Of course, the latter method works, assuming the paper slide holders are in pristine condition. I don't know about your 40 year old 35mm slides, but mine have gone through a number or Kodak carousel traumas and are anything but planar. Guess what. Every one hangs up on the tray requiring removal of the tray and starting from step 1. I figured I'd give this thing a chance (for the bucks) so I thought I'd try to view a captured image on my 60" wall mounted Sony via the HDMI interface. But to my dismay, the HDMI port on the back of the Scanza sported a miniature version of the standard connector I'd liberated from my Roku to view the scanned slides. So Kodak not only doesn't supply the required SanDisk memory card (I'd scrounged one up) but they don't supply a convenient adapter for the more common HDMI interface. Did I mention that my TV is wall mounted and weighs 100 lbs, obviating the use of the included adapter cable? But wait, there's more! While in the process of trying to give this cheap plastic contraption a fair chance, I couldn't help noticing that its power would wink out at random intervals. Being curious, I finally determined that the tiny USB connector on the back of the Scanza would only supply power reliably if I applied upward pressure. I'm sorry, Kodak, but this is beyond the pale. I have returned the Scanza (who the hell named this thing anyway, the same brilliant VP that runs the QC department?) and subsequently spent $25 more on an Epson Perfection V600, which is a flatbed scanner with good specs that will hopefully serve as a great general purpose scanner long after I've digitized my old slides. There were a couple of other options in the same price range on Amazon. So there it is, for what it's worth. Don't waste your time or your money.
N**E
Deceptively Great!
This is an amazing little item. I brought this to digitize negatives dating back to the 1940s. There have been a lot of pictures taken in my family over the decades. In the days before digital cameras, my mom would go through 12-30 rolls of film in a calendar year. So there are lots of negatives around. The machine is lightweight and compact but well constructed. I totally reccomend using the provided cords to plug this thing into a TV. Really makes the work so much easier. You will eventually get into a groove in making the color balance adjustments. I did not ever think I would be doing that as much as I do, but I make adjustments for nearly every picture. That just happens with film decades old...esp since in those days yeah you turn on the flash and whatever but really you clicked and hoped for the best...no deleting right away and retaking if it didn't turn out as you liked. Now, I'm a person that's a lil pickier so if I have to make diff adjustments on each picture, then I would say that a roll of film would take me at least a half hour do do on this device. If I can just scan the pics without having to make an adjustment each time, it goes a lot quicker. Two main tips: 1) Have some canned air handy. It works a lot better than the provided brush is getting whatever winds up on the lamp off of the lamp. 2) This part is a lil hard to believe until you actually see it...but for the most part, when you see the image from the negative on the screen it does look fairly pixelated. You're not looking at the image direct, it's coming out the screen (even using the HDMI to a TV). However, when you put the memory stick on the computer or you print out the pictures, it DOES have the proper clarity. I had my doubts until I did both. Now I'm just like "OK...they'll turn out good." Well worth the purchase. Just hope you won't have to do as many pictures as I do 🤣🤣🤣
H**S
Je oude foto`s en dia's kun je goed digitaal maken. Bewerken met foto programma`s
Je oude dia's kun je digitaal maken en bewerken met je programma bv. Luminair of Photoshop of Inpixo
C**E
Scanned functioned as advertised.
Easy to use. However, The color of the slides is slightly washed out no matter how much I tried to adjust the color.
G**.
Facile da usare per convertire foto, veloce e risultato soddisfacente
Ho comprato il Kodak Scanza per convertire delle vecchie diapositive in formato più moderno. È facile da usare, all'interno della scatola sono presenti tutti gli inserti per convertire vecchi formati (compreso il Super8). Una volta presa la mano il processo è semplice, mettendo anche una diapositiva una dietro l'altra e premendo il tasto per catturare l'immagine su schermo. Il risultato è soddisfacente e di qualità buona. IMPORTANTE: Per salvare le fotografie convertite, è obbligatorio utilizzare una microSD. L'entrata USB presente, infatti serve soltanto per collegare il Kodak alla corrente e non può essere utilizzata per mettere una penna USB o simili.
D**.
Decent, pretty much what I expected.
• I had read many reviews before buying so I had a fair idea of what to expect. • As noted elsewhere, the Scanza is not a scanner. It makes a digital image of the slide. • Note that I've used it only with 35 mm slides. • It took a few seconds to figure out how to assemble the power adapter. There are outlet configurations for what I assume are various international outlets. • Other than that set up was very simple. Set it up, plug it in, and start using. • You do need an SD card. 32GB is more than enough for me. • The USB cable connects to power, or to a computer to upload pictures. When connected to a computer you cannot scan new images. You can also transfer images via the SD card. • Other reviews say the process crops the slides. I don’t see much, if any, cropping. • Quality is not great. There are colour adjustments and brightness controls, but I found it easier to tweak in the pictures Photoshop elements. With that I get adequate results. I’m making pictures to share with family, not for an art show. • I love the quick push-slides-through process. • I had a flatbed scanner with a slide adapter but it stopped working with a Windows upgrade. I like that this is independent of Windows. • To connect to a TV or monitor, it seems to work best to connect, then then power on the Scanza. • As noted in other reviews, I see no benefit to using the 22 MP format as opposed to the 14. • If you delete all the slides on the SD card, the numbering does start again at one. If you leave one image with the highest number so far, then the next scan would be that number +1.
G**L
A high resolution scanner for 35mm slides, which is quick and easy to use.
This is mid-range Kodak scanner, but it produces good quality, high resolution images from old style 35mm slides. The purpose of this type of scanner is to convert 35mm analogue slides into digital files for easier viewing. I had found a large pile of slides originally taken by my late father, and this was objective for this scanner. This was a daunting batch, but needed to be converted just to view the images on modern equipment. This scanner has proved ideal for this task. It is easy to use, and scans into digital files within a few seconds. The lengthy part of the cycle time is loading individual slides, which need to be accurately mounted in a sliding frame. Like similar tasks the loading becomes easier with experience, but accuracy is important to avoid scanning the edges of the frames. There is also a range of frames to cover differing types of film size. The range is fully explained in the product descriptions, but I have only used the 35mm slide frame. The slide frame for 35mm is hinged, and clamps hold on each slide to hold the frame, and ensure it falls within the fixed focal length, so that each image accurately reflects the quality of the original slide. Don't expect it to work miracles if the original slide is out of focus or blurred by movement. However, there is a limited range of editing on the scanner, so some exposure errors can be corrected before the image is scanned. In my experience most modern software offers a wider range of editing for the image once secured to your laptop, etc. The scanner must have an SD memory card inserted, because all the scanned images are saved to the memory card. This means that you can transfer the SD card and the new files to your preferred location for saving. I have not found a method as yet to link to the computer to transfer the files without moving the SD card, but I expect that this is feasible, I have only to extend my practice. Overall I feel confident to recommend this kit, and I have been pleased with the results, which have secured my late father's photography for future generations.
Trustpilot
1 month ago
1 month ago