We remain fully operational. Our teams are working around the clock to ensure your deliveries continue safely.

DOWNLOAD THE APP


Copyright © 2025 Desertcart Holdings Limited
DOWNLOAD THE APP
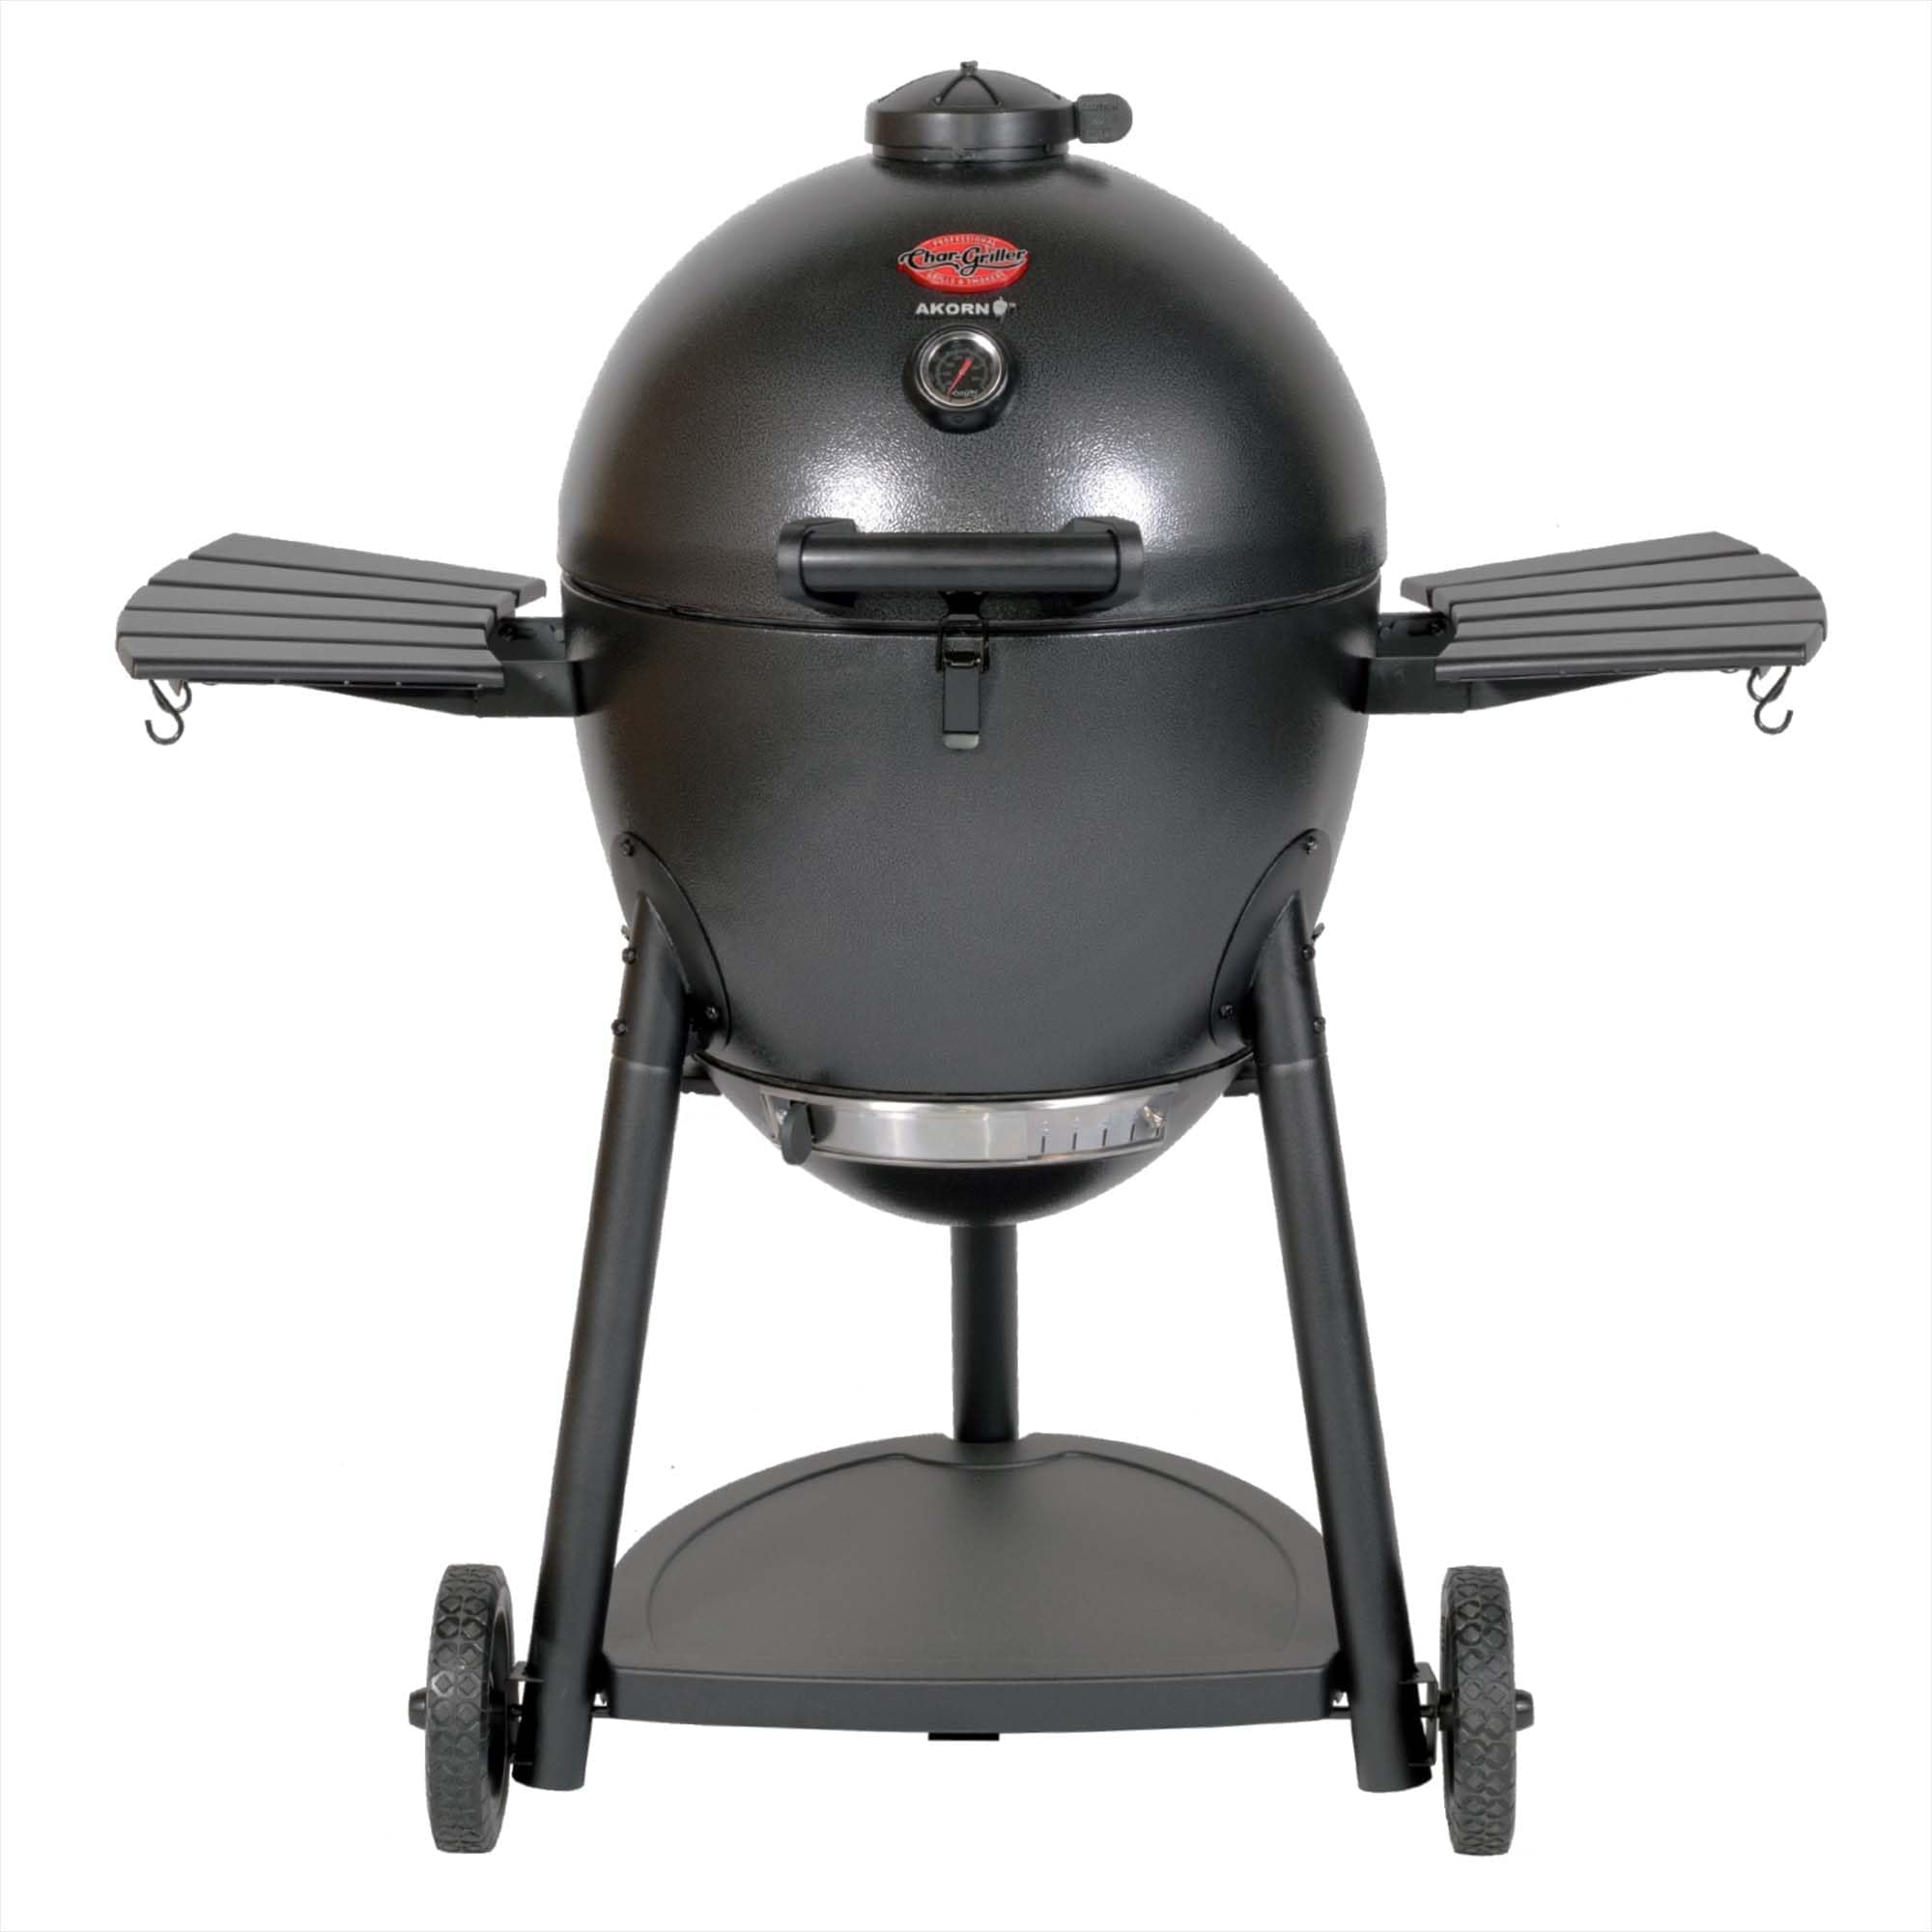


🔥 Elevate your backyard BBQ game with precision, power, and style!
The Char-Griller AKORN Kamado Charcoal Grill & Smoker offers a premium triple-walled steel insulated design with cast iron grates and a locking lid, delivering 447 sq. in. of versatile cooking space. Engineered for both high-heat searing and low-and-slow smoking, it features dual adjustable dampers, an easy-dump ash pan, and locking caster wheels for convenience and control. Perfect for grill masters seeking professional-grade performance without the premium price tag.


| ASIN | B00GJEPTJS |
| Best Sellers Rank | #25,927 in Patio, Lawn & Garden ( See Top 100 in Patio, Lawn & Garden ) #23 in Charcoal Grills |
| Brand | Char-Griller |
| Brand Name | Char-Griller |
| Color | Graphite |
| Cooking Surface Area | 445 Square Inches |
| Cooking System | Kamado |
| Customer Reviews | 4.6 out of 5 stars 3,822 Reviews |
| Finish Types | Powder Coated |
| Frame Material | Alloy Steel |
| Fuel Type | Charcoal |
| Global Trade Identification Number | 00789792166209 |
| Grill Configuration | Cart |
| Handle Material | Stainless Steel |
| Included Components | User Manual |
| Indoor Outdoor Usage | Outdoor |
| Installation Type | Free Standing |
| Item Dimensions | 17.72 x 12.2 x 18.5 inches |
| Item Dimensions D x W x H | 45"D x 31"W x 47"H |
| Item Type Name | Charcoal Grill |
| Item Weight | 97 Pounds |
| Main Burner Count | 1 |
| Manufacturer | Char-Griller |
| Manufacturer Part Number | 16620 |
| Material Type | Alloy Steel |
| Model Name | AKORN Kamado |
| Model Number | E16620 |
| Number Of Racks | 1 |
| Number of Heating Elements | 2 |
| Other Special Features of the Product | Warming Rack |
| Product Dimensions | 45"D x 31"W x 47"H |
| Recommended Uses For Product | Outdoor |
| Required Assembly | Yes |
| Special Feature | Warming Rack |
| UPC | 789792166209 |
| Unit Count | 1.0 Count |
| Warranty Description | Repair or replace for a period of 1 year |
M**Y
Best Grill/Smoker you can buy!
We absolutely love this grill!! It’s versatile and easy to maintain. My husband who was never a cook has become quite a marvel since getting this grill and he smokes a lot of meats and with the Acorn it takes all the guesswork out because of how it maintains its temperature, etc.,while smoking meat for hours to perfection. Easy to follow instructions and if anything is missing or damaged the timing on receiving it from them is prompt. We highly recommend this to anyone and it does not not have all the computer parts that are in so many new items that go wrong. That makes the Acorn worth the money and it doesn’t cost anywhere near the Green Egg.
L**N
Latest version of grill solves air leaks
I got my new grill last week, and spent the weekend learning to use it. First I should mention the previously mentioned air leak issue. In the current version of the grill, there is no air leak issue. The new cast iron top vent is designed to stop all air, except what you have dialed in to pass through the vent. If you turn it off, it will stop the air flow, and extinguish the fire. It has a high-temperature o-ring made of a silicone rubber, and has a nice tight feel to it. The lower vent seems to be fit good enough to do what it needs to do. But with two dampers (top and bottom) the airflow is controlled by the most closed of the two. Since the top one closes enough to kill the fire, any small leaks in the bottom one don't really matter. So I think the air-leak problem is in the past, the manufacturer really stepped up and addressed the issue. They are listening! The grill I got should have been black, but instead it has a nice hammered two-tone finish. It is black on grey for the main shell, and black for the legs. It looks like a nice finish that should hold up well. My goal is to learn to properly regulate the temperature, for low-slow cooking. One thing I learned is that even at a low temperature, the radiant heat from the fire will tend to overcook anything that gets direct heat if you are doing a long cook, so the first accessory that is a must have is some kind of heat deflector, such as a pizza stone. I used a sheet of foil with a drip pan on top, that worked too. As for temperature regulation, learning that will require some patience and understanding. In a test cook, I was trying to get a temp in the 225 range. It turns out the vent setting for that temp is around .5 to .75 on the upper vent. Not knowing that in advance, I started on a setting of 2... The fire quickly started getting really hot, so I turned the vent down to 1, and waited a half hour. The temp was still high. So I turned it down to .5, and waited another half hour... it dropped to 350. So I set the vent lower, barely cracked... Half an hour later, it was at 300. The vent was almost closed so I decided to wait a bit longer to see if it cooled more... half an hour later it was at 275, so I decided to go ahead and put the meat on (a pork rump). I figured it would keep slowly dropping. What I didn't know was that the fire was out, it was the insulation that was holding the heat in. So my first lesson on what not to do... Head the warnings about starting low, once the temperature is too high, it is difficult to get it back down without extinguishing the fire and starting over. One of the tricks is not to have too much fire to begin with. Make a pyramid of cold charcoal lumps, and only light a small section of the coals. For a low-slow cook, you will want the fire to slowly burn across your fuel load, so lighting one edge of the stack is better than dumping a load of pre-lit coals in. If you start with a full fire, you will never get the low temperature right. A good stack lit from one edge will give the fire an order with which to burn in, so that you don't go cold with unused fuel. Since most of the fuel is cold to start with, making sure it is all in a tight pile will insure the fire eventually is able to consume all of the coals. The idea of using a propane torch to light the stack in one spot is a good way to go, thanks to the reviewer who suggested that. A propane torch on a hose is best for that, so you don't hold the bottle upside down. Since your fire will be burning from one edge of your pile to the other, having a heat deflector will prevent the uneven heat from causing a problem. The fire will gradually move across the pile, and a deflector will keep the heat even regardless of where the fire is. I found that I was able to hold a low-slow temp quite well, but it would change temperature slightly so I was tweaking the top vent every hour or so. I think my next project is to make a thermostat, and figure out a way to motorize the damper. But so much for my learning to control the fire. I still have more to learn obviously. I also tried some ribs, both pork and beef. The pork ribs were good, the beef ribs were excellent. As soon as I get my pizza stone, I will do a brisket. After a couple of meals featuring too much meat, I did a cook with a load of veggies, potatoes, corn on the cob, mushrooms, assorted peppers, and cherry tomatoes... It all came out very good, but veggies are easy and don't take long to get right. The grill is well made, and the parts all fit as they should. The only problem I had during assembly was trying to use a wrench on the hex bolts. The bolts are chamfered, and so are my wrenches. well before the bolts are starting to get tight, the wrench looses the ability to turn them because of the chamfer causing them to just slip past each other. They are slotted for a Phillips screw driver, and as it turns out my big #3 driver could put more than enough torque on them, so I was happy once I put the wrench away. The chamfered bolt heads are actually nice in that they make a smoother surface... Just don't use a wrench. My old stainless grill had bad rust problems. Turns out that there were places for water to collect inside of non-stainless parts. In particular the legs. I was happy to see that on this grill, two of the legs are not closed at the bottom, so no place for water to collect. The back leg with the caster-wheel looks closed at the bottom, so at some point I'll pull the caster off, and drill a small hole for water to drain out from. Older cars had this problem, rusting out from the inside... Car makers learned that lesson a few years back, and started putting drain holes in places water can collect, and as a result cars stopped rusting out from the inside (as long as some idiot didn't cover the drain holes with undercoating. The only other potential water collection point is the ash pan. I don't think I want a drain hole, so instead I may store the bottom inside the grill upside down... I'll be thinking about that for a while. I did buy a cover from Walmart that fits really good, for under $6. It should last at least 6 months while I find a better one... In summary, I really like this grill. The price is right compared to something like a Green Egg, I just need to keep on-top of the potential for rust, and if I can do that it will last a long time. EDIT-- The ash pan is a big water collector. Because it is insulated, there are two steel walls in the ash pan, and both collect water. A very small hole through both should fix it, at the cost of a small air leak (should be ok if the hole is small enough). Also I have added a fan from Auber instruments (6.5cfm I think) that can be connected to any common PID. The fan fits perfectly without any adapters, and does an excellent job controlling the temperature. I can get 30+ hours of cook time from a single load of lump charcoal when I cook at a low temperature (like around 220f). Once I can control the temperature accurately, I get flawless fall-apart brisket every time!
R**Y
Four Days of Grill Master Heaven
UPDATE --- After almost a year of use... This is hands down the best grill I've ever had. I's say it's the best purchase I've ever made period, but I'm sure I'd be leaving out something really important like a house or a vacation to Australia or an engagement ring or something. But when it comes to food and cooking... forget about it. This thing is awesome. Here's why... everything you cook on it comes out good. Literally it seems impossible to mess-up. Get the grill too hot, the food just gets done quicker, but it still rocks. Dont' add enough coals and it's not warm enough... just give it more time or add coals right mid-cook... no problem... it comes out right. It's also very spacious; room for tons of food when you're cooking a week's worth in advance or having a few people over. I just love it. Some people say the Big Green one is better. I can't imagine how it could be. It's also held up very well in my harsh salt-water environment. So far it's pretty much like-new, or it would be if I'd clean it real good. ORIGINAL REVIEW BELOW ---> It's been four days since the Big Red Egg arrived. Possibly the best four days of my life? That might be an exaggeration but hey, that's how this grill makes me feel. Obviously I love it. My real concern when buying a grill online was that I would be displeased with either the quality of construction and/or materials and/or that the cooking area would be too small. Neither is the case. The construction is top quality and the cooking area is huge. Everything I read in the other reviews here pretty much turned out to be true. It cooks fast if you want it to, slow if that's what you want. I haven't had any trouble keeping a low temp as long as I start with a very small pile of charcoal, like maybe what would fit in the bottom half of a 2-liter drink bottle. More than that and it does get tough to stay below 300F. In four days I've smoked mullet, cooked two london broils, done some amazing chicken breasts in record time, and slow cooked a Boston Butt. Oh, and I also used it to season a cast iron skillet... why I've never done that on the grill I'll never know. It was much nicer than filling the house with smoke and the skillet seams seasoned better than ever. Maybe because I was able to recoat it with oil a couple of times during the process. The warming rack is awesome and the main cooking area is huge (20" diameter). I took the advice of another review and purchased the wireless thermometer which shows both the grill temp and the meat temp. That was nice. I used it for making some of the best baked potatos ever (forgot to list them above) 222 degrees for a great baked potato. I'm going to order the pizza stone and I'll try to remember to come back and update as more time passes. Assembly was easy and took about an hour. I bought the red one and it looks great. The metal side shelves are sturdy and the wheels seem sturdy as well. So far, I couldn't be happier. Regarding the title... I know you probably thought YOU were the Grill Master... sorry. Maybe before, but now that I have my Big Red Egg, I'm unstoppable.
C**R
Fantastic grill at reasonable cost
Having used this for four years now, I can easily give this five stars. I use it several times a week summer and winter. There's several qualifiers though. I have three smokers and a gas grill and I've smoking and grilling foods for almost 50 years. The acorn requires some experience though because it can get very hot. That works for some things but with a little monitoring and some accessories the temp is very controllable. Two essential accessories are ; the smoking stone, and pitmaster 101 control unit. Alton Brown uses this in his Weber and they have a model for the acorn. With this and stone you can do controlled smoke down to 150. Is very efficient at burning charcoal. I use a good lump charcoal and I keep the ash pan at least half full so it can hold coals. I haven't smoked a brisket yet but have done pork shoulders. Try ring of fire method. There's plenty of YouTube videos on that. I get great bark. Sometimes I use a water pan under grate. As for high heat, I've never seen anything better. Thirty years ago a friend had a Korean komodo and it worked great. I considered a green egg but couldn't justify the cost. Getting it very hot is easy. I butterfly chickens and at about six hundred degrees I out them on we have juicy chicken with crispy skin. Also steaks at six hundred degrees cook fantastic. I have several pics on Pinterest if you want to see. I have done tomahawk steaks too. I put large chunk of whatever hardwood I want to use and I get great smoke penetration. I've done turkeys too. If there's a drawback it's limited surface area but I have other grills to use as well. But so far the acorn has been enough. With the savings you could get a gas flattop to compliment it. I'll be using my acorn today to grill some salmon. So far this has exceeded my expectations. But it's not start and ignore. Oh also I use a Bluetooth temp gauge as the one mounted has limitations and once I have everything going I can monitor remotely. I'll update this again but I would buy another one. May 2023. I just posted a picture of what I am using my acorn Komodo to cook. I have a pork shoulder, brined pork belly for bacon and a few country style ribs that I'm smoking with hickory. Paired with pitmaster 101 controller works fantastic. I have seen that char broil has a new egg that incorporates a controller. If looking to buy a new one I'd definitely check that out. I've used this a long time. I use it all year, even during winter and it's cold here. It always works great! In addition to smoking I use this to cook chicken. I split the chicken into halves and when the egg is about 450-500 I put it on. Everyone says this is the best chicken they've had. Crispy skin, and very juicy. In six years it has made fantastic meals. I can buy at least 3 of these for price of Green egg. Or this plus a flattop grill. So check it out. Oh also if the grill gets cruddy just open the lower vent and top vent and it'll burn everything off. Next day I just brush the dust off and use Canola spray to re- season the grill. The smoke stone is vital to operation. I use the accessory grill that's provided also. An excellent value. Makes superior smoked turkey also. My kids won't let me cook turkey in oven anymore.
S**E
Almost a Home Run
I don't think I'm quite ready to give this a 5-star review, because this isn't a perfect grill, but I do love this grill. I've always enjoyed grilling, but I'd say I've always been probably what you'd classify as "amateur". I've never been one to keep track of temps of the fire on my old grills... I'd tend to throw chicken or burgers on without much in the way of really understanding vents. I'd have issues with fires being too hot, or not hot enough before my impatience would kick in and I'd go ahead and put meat on the grill while thinking "the fire will warm up eventually." The vast majority of times, the meat would all be fine. And occasionally you'd have a blackened chicken skin (but who doesn't love those?). All that being said.... those were my grilling experiences up to owning the Akorn - decent griller; not a connoisseur. So yeah... this grill does come with some steep learning curves. I knew I wanted to do a lot of slow and low cooking, but I didn't want to pay the thousand dollar crunch to get a BGE. The first things I bought in addition to the grill were the Char-Griller brand plate that allows you to do indirect cooking, Therma-Pro wireless probes to monitor grill and meat temps, and a set of grilling accessories that included heat resistant gloves and "bear claws" for shredding meat. After my first couple of cooks, I bought a few other items after my first experiences. First couple of experiences... labor day weekend I cooked ribs one evening and picnic ham the next. I'd bought hardwood charcoal to use and did my traditional pyramid stack. I was experimenting with the vents and trying to figure out how they would affect the temperature of the fire. The ribs cooked in 2 or 3 hours (I forget the exact time) at around 250 to 300 if I remember correctly. I'd used soaked apple-wood chips, which added a nice smokey flavor to the ribs. BUT! I found I had difficulty controlling the temps, which can mostly be chocked up to inexperience. For the next cook, I did a ton of research into slow and low grilling hams for BBQ. I bought lump charcoal, and started the grill around 8pm that Saturday night. Still learning how the vents would/could affect the temps (because the manual doesn't explain it AT ALL), I was up until around 2am going out every 20 or 30 minutes trying to get the temps down from 300 to 225 and THEN trying to get it back up after it went below 200, and THEN relighting the charcoal because the fire died, and so on and so on. Around 7am I woke up, checked the Therma-Pro monitor, and saw the temps were down around the 170s.... because of course the fire had died again. So I pulled the grill racks off, pulled out the indirect heat stone, added more charcoal, and put the meat back on for another 2 hours to cook. I do want to stress this though... what I just said wasn't any fault of the grill necessarily, it was my inexperience (again, only my second grilling session on this) with slow and low cooking and how to maintain temps. I would say that the manual SHOULD have done a much better job of indicating how to position the vents. The BBQ, despite the sleepless night and stress and frustration, turned out INCREDIBLE! So it was kinda worth it... I just did my third grill with the Akorn yesterday, and it was my second slow and low grill session, and it did immensely better this time around, though a lot of it I can chalk up to some additions I made to the grill. So here we get into some of the frustrations and misgivings with the grill: 1. I'm assuming I received a newer model of the grill - when a lot of forum posts speak of controlling temps through the vents, they often mention "set your top vent to 1/2", or 2, or 4, etc etc etc.My top vent is completely smooth... there are no numerical indications that dictate that you're setting the top vent to the "One" position or whatever. So it really is a guessing game in that aspect trying to interpret how open to set this vent. I have seen videos of guys cooking on the Akorn and their top vent DOES show numbers on it. So either they bought an aftermarket top vent or I received a model which doesn't have it. 2. The grill leaks. Yesterday it leaked a loooooooot from where I had the wires of the thermometer probes going into the grill. I had previously bought some of the fiber gasket tape that is used for resealing a BGE, and I used it to further seal the botton vent. I'm thinking I'll probably put some on the inner lid lip and see if that helps seal better where those probe wires are coming out. The wires aren't even that big, so I'm curious why it was leaking so bad. 3. I really wish the manual had been more user friendly in how to control the vents and temps of the grill. Thank God for Google, YouTube, and various grill forums! They were really instrumental in helping me figure out how to make the grill do what I wanted it to. So here are some helpful additions that I really think will help anyone when it comes to controlling the temperature inside your grill.... 1. Buy some of the gasket tape and use it to further seal your grill!!! 2. If you, like me, didn't want to risk another sleepless and frustrating night of checking temperatures on your grill, OR if you just didn't have the patience to learn proper vent control (like me), the PartyQ BBQ temperature control PartyQ BBQ Temperature Controller for Char-Griller Akorn King Griller Cooker Adaptor is incredible! Once it got temperatures to where I wanted them, it was able to maintain the temp pretty consistently. Even when I thought guests were going to be here earlier than I thought so I kicked the temp up to 300 to cook the boston butt faster, and then found out that they were coming much later, I was able to decrease the temps back down to a cooler temperature without much hassle. The supplied batteries did get me through an 8-hour cook before giving me the low-battery sign, but still, totally worth it and I don't regret that purchase at all. A person was asked if using that was "cheating" and the response was "about as much as using the temp knob on your oven." This is a great addition for much better control over the fire. 3. Not a product, so much as a technique. Instead of using the traditional pyramid charcoal pile like I've always done, I used a technique called "ring of fire" this time and it worked wonderfully. Google it. It's perfect for slow and low grilling. You won't be sorry. So to sum it up... the Akorn is a great grill, but unless you already have a firm grasp on how to naturally control grill temperatures, I really think, like me, you need to invest another $150-200 into this grill to get it into tip-top shape. And still, even at $500 for the grill and those accessories like the PartyQ that I mentioned, you're still have the price of a BGE and capable of performing just as well! I'm excited to do more grilling with this beast!
N**M
80% of a true ceramic Kamado's benefits at fraction of the price. Porcelain coating still not the same as Ceramic. Read on...
This is my first Kamado gril and I'm about to wax poetic about it, so let me get the one criticism I have out of the way. The Akorn is a porcelain lined steel kamado and does not feature a thick ceramic lining like it's pricier counterparts. Ceramic being a highly refractive material, absorbs and radiates heat utilizing the full energy of the charcoal and imparts heat to your food in a way that porcelain, however well insulated, just cannot. Given that the cheapest ceramic kamado is almost double the price of the Akorn and heavier to boot, the Akorn is a perfect starter kamado with 80% of the benefits at 30% - 50% the price of comparable ceramic kamados. So what's not to love? What I really love about this grill - *I cook more often with charcoal now and with much more satisfying results than my previous charcoal kettle grills* And that is really the bottom line with the Akorn Kamado because as a self-contained unit, starting a fire, controlling temperature for both high heat and slow cooks, and handling food have become much much more hassle free. No more messing around with having to dump out charcoal chimneys with the risk of embers everywhere on your wood deck or feet. When turning my food on the grill, not having to place a hot lid to the side where it can accidently singe someone but instead a having an insulated, hinged lid that traps in the heat and flavors makes a remarkable difference to everyday use. I find myself encouraged to cook more often on the grill and experiment than I have ever before with charcoal and the family loves the results! *It is built well, feels sturdy, has a bunch of good design features and looks good on my patio.* Really the quality of the materials, fit and finish seem very nice for it's price. As other reviewers have pointed out, the design features just work. Especially the removable bottom ash collector - this is a feature not found on many pricier ceramic models. The folding side tables are perfect and having wheels with a locking mechanism makes it so much more portable around the backyard. Even a small detail such as including a cast iron grate removal tool and the removable center piece of the grate for adding more coal is so well though out. *Economical with charcoal and performs well for both high heat and low heat cooking* The Akorn is extremely economical with charcoal, which is going to be a constant running cost of any charcoal grill. Being triple insulated bottom and top, and with the ability to extinguish a fire closing both vents and thus preserving any unused coal makes it so good on my pocket. Now I spend my money on quality lump charcoal, and of course, meat. It seems to hold low temps so well for hours on end on a minimal amount of coal and with a diffuser/pizza stone, performs the job of a smoker as well as it performs for 650 degree open flame sears. My suggestions if you're going to buy this Kamado (which I strongly recommend if you haven't owned a Kamado before): - Buy the cover. Really. It's worth the investment to protect your kamado for years of service. - Get the pizza stone not just for pizza but to act as a diffuser for low and slow cooks. I put a pan with water on top of the stone to catch the drippings and add moisture and the results are spectacular. - Youtube is your friend. There are a ton of videos on just about every aspect of Kamado cooking on the web right from how to start a fire without a starter to cooking techniques and user mods. I learn something new everyday. - Spend the money you saved on not buying a pricier kamado on good tools/accessories, marinades, and of course meat. My suggestion if money is not a concern and you are already fairly experienced cooking with charcoal: - Go ahead and get yourself a ceramic kamado. I've had the opportunity to cook on a ceramic one, and the difference is appreciable. Whether you want the high temps of a real clay oven to do stuff like tandoori and steaks, or fall-off-the-bone low/slow BBQ, ceramic just can't be beat.
J**R
Working Good So Far.
Very nice little kamado. I just finished seasoning it outside. It was 0n;y 2 degrees out with the windchill. I put one layer of lump charcoal on the grate. This little grill got up to 400 internal easily. I made sure there were no leaks by wrapping electrical tape our the center of the wire levers to ensure a tight fit. Otherwise it would have allowed air into cooking chamber. With any kamado, you want it air tight at all times. So this morning I will try to smoke a 17lb Turkey (if it fits) The smallest I could find. It will be -0 with the windchill. I already have the indirect stainless steel divider for smoking and some apple wood chunks. I will use cotton balls soaked in 91% alcohol as my charcoal lighters. I had a larger kamado until it tipped over and shattered, so I decided to go with the Acorn Jr since it's just my wife and I now. Large ceramic kamados are expensive anyway, but grilling on a kamado is absolutely unbeatable. Cut a 17lb turkey in half. Smoked it for 1 1/2 hours at 300. Came out perfect. Very juicy and moist. Just as good as my old broken kamado!
B**S
The best way to get into Kamado grilling.
I'm impressed with the quality of this grill, and it's bigger than I expected. If you're on the fence about ceramic-style grills, don't hesitate—these are awesome. This is actually my second one. My first was a Brinkmann, which was great and lasted five years, but it wasn't built to the same standard as the Akorn. I highly recommend watching some videos before you get started. There's a learning curve, but it's not difficult—just different from a standard grill. What I love most is how well these hold heat. Even at 30 degrees outside, they maintain temperature beautifully. They also use very little charcoal, and you can cook for hours without adding more. Another big advantage is moisture retention. These grills keep your meat incredibly moist. If you love smoked chicken, this will produce the best you've ever had. These are a great alternative to expensive ceramic kamado grills at a fraction of the cost. Plus, ceramic grills are extremely heavy. If you ever need to move it, this one is much more portable.
Trustpilot
5 days ago
1 month ago