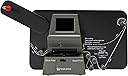
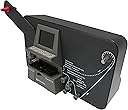


🎥 Turn your vintage reels into digital gold—before your memories fade!
The Wolverine MovieMaker Pro MM100PRO is a standalone, fully automated film scanner that digitizes 8mm and Super 8 reels into high-quality 1080P MP4 videos. It requires no computer or software, saving footage directly to SD/SDHC cards (up to 32GB). Compatible with all major OS platforms and includes a TV cable for immediate playback, it’s the perfect tool for millennials eager to preserve and share nostalgic home movies with effortless, professional-grade results.


| ASIN | B0785H3FGN |
| Best Sellers Rank | #612 in Video Converters |
| Customer Reviews | 4.2 4.2 out of 5 stars (2,054) |
| Date First Available | November 13, 2017 |
| Is Discontinued By Manufacturer | No |
| Item Weight | 3 pounds |
| Item model number | MM100PRO |
| Manufacturer | Wolverine Data |
| Product Dimensions | 12 x 3 x 7 inches |
T**!
Does a great job.
This is a review for the Wolverine Pro 8mm/Super 8mm film scanner. A lot has been written by others about the product. A couple of people did a very good job listing many of its pros and cons. But some of the cons and suggestions to remedy are a little unreasonable. It is important to remember this is a consumer quality product meant to let the average person digitize movie film, not a commercial quality product that is used in labs. So yes, the product could be improved, but that would also mean increasing the price, and at approximately $400 I think the price is right for the average person wanting to transfer old home movies, or hobbyist that digitizes movies for fun or artistic endeavors. For me, I had a bunch of old movies I wanted to digitize. I originally thought about having them done professionally by a lab. But considering the amount of films I had, and the cost to have them done commercially, it made more sense to buy this unit than to spend a thousand dollars or more to have it done by a lab. I did a lot of research and was worried by comments I read such as...it takes forever to do a film, you need to babysit the machine because it can get stuck, it splits film, etc. But I decided to take the plunge anyway. And I am glad I did! Like I said earlier, this is a consumer level quality machine, but it is packed with enough features to allow you to make nice transfers of you films. You can tweak a number of items such as sharpness, exposure, and frame adjustment. It took me a while to find an ideal set of settings for my films, but once I did, I rarely had to readjust. And when you are done, you can always make changes and enhance your copies in software. I use VSDC Free Video Editing Software, and it does a terrific job. It allows me to add music, and voice overs, etc. turning my old silent movies into talkies. The types of movies I am transferring are old 8mm home movies from the 1950s. Typical family films that were spliced together onto 5 and 7 inch reels. I am also transferring Super 8mm films I made in the 1970s as a hobbiest...stop action movies, mini silent films, and travelog movies I made, which had accompanying sound on reel-to-reel tape (which would always fall out of sync after about ten minutes). In fact, since the Wolverine does not come with anything other than a 4-3/4 inch take-up reel, I use an old 7 inch tape recorder reel as a take-up reel for my larger movies. My films have a lot of splices. Some were nice and neatly done, but others were horrible-thick and wide. In fact, some of the splices were done with scotch tape many years ago. Considering the age of the films, amount of splices and the quality of the splices, my films have been going through the unit with very little problems. As I write this, the unit is next to me transferring a film I shot in 1978. It is on a 7 inch reel, and has been running for about three hours (it is nearly done). If I were to guess, it has at least a hundred splice points if not more, and it hung only three time during the transfer...one time because the splice was too wide (overlapped both sides of the film), and the other splices were very thick (I have a feeling those were done with scotch tape). Other than that, I had no problems. I had some other films that did jump, and went out of alignment, but that was due to the film, not the unit. The film's sprocket holes were ripped and/or stretched from years of play and abuse in a variety of old projectors. This unit is not perfect, but it doesn't cost an arm and a leg. And it certainly isn't as bad as others may lead you to believe. If you are like me, and have a lot of movies you want to digitize and post online for family and/or friends to see on Youtube (hidden link only they will know about) this will do the job. In fact, if you don't want to use post production software, Youtube has tools you can use to add sound and enhance you transfer.
T**R
Blown away with the results, but don't expect miracles.
These are my initial thoughts on the Wolverine Digital MovieMaker Pro. I've only had it for 1 day and run about 4 movies through it, so my opinion (and review) may change over time. ***Update*** See bottom for an updated review. Set up was fairly easy. The things you need to know are: The cord is short (4 ft), you'll need an extension cord unless you're within very close to an outlet. The converter must have a memory card inserted to power on. I ordered the SanDisk 32G SD card as recommended when I bought the converter. The converter nor my PC would recognize this card. There were a number of reviews with the same issue. I'd say avoid that card. Fortunately, I had another spare card I was able to use. When mounting the film, sprocket holes should be on the inside away from you. Film will loop from under the reel. You'll need to utilize the RED reel adapter on the left side when recording Super 8. When rewinding, you'll put the GRAY adapter on the right side. The film must go under the 3 tabs under the flap door. If you don't get the film under all of them, the film will jump when reccording. If you have old eyes like mine, it's difficult to see if you have the film under the tabs. If you have trouble handling small parts, it will be difficult to get the film under those tabs (see photo). Look closely, because it may look like it's under that back tab when it isn't (if the film is aligned just right, you can see the tab through a sprocket hole giving this illusion). Through the menu, you can adjust the frame window ("Frame Adj": how much of the film frame is recorded and the alignment within the window), the "Sharpness", "Exposure" and a few others you aren't likely to use. Using "Frame Adj" you can maximize the amount of the film frame that gets recorded..to a certain extent. I saw comments about being able to capture the full frame including sprocket holes which allows you to capture the full film image that gets cropped when showing through traditional projectors. The only way to accomplish this is if you also record the upper and lower portion of the previous and post frames (see photo). As for "Sharpness", just go with "Low". Default is "Medium" and even that is too grainy for me. I haven't had a need to adjust the "Exposure" yet, but when I do, I'll update. It's important to note that in order to change these settings, you should be on a good sample exposure of the film so you can make decisions based on the way it will look. Unfortunately, this means locking yourself into that film position (more on that later). There is a setting under the menu for rewind. You have to swap the reels (use the GRAY adapter on the right side) Use the Rewind setting, not the normal Record setting, otherwise you end up with a recording of white light and it's slower. So far, I've only converted 3-inch reels. When I record my larger reels, I won't be using the converter rewind, but more likely a regular projector or editor as it would take too long and might be too much wear on the converter motor. As mentioned earlier, when making adjustments to frame, you'll need to be on a good sample of the film so you can see what position the frame is in. Unfortunately, once you've put the film into those 3 tabs, it's pretty much impossible to pull it back out without risking damaging the film. There's no provided way to rewind to the opposite side as that reel is free spinning (no motor) and you don't want to risk damaging the right side reel motor by pulling it the opposite direction. The only way I've been able to re-spool the film without committing to running all the way through is to remove the reel from the right side and manually rewind the left side, pulling the film through the gate (and clips). Overall, so far I'm satisified, but not blown away. I'll add more updates as my experience with the converter increases. ***Updated Review*** Now that I've had this a converter for a couple weeks and ran a variety of films both Super 8 and 8mm through it, I feel the need to update my previous review. I've increased my overall rating from 4 to 5 stars and changed my "Headline". I've gotten over the things I previously knocked it for. Once you use it for a few films, you start to get a feel for it. I will stick by my recommendation to find a setting you like and just stick with it. I still recommend staying with the lowest setting for "Sharpness". I don't see a difference with the various "Exposure" settings and just leave it at 0. I've reconverted some family home movies that were previously done professionally and the quality of the Wolverine converter is far past the professional quality. I've included a few photos for comparison. The professional footage is on the left, Wolverine on the right. You'll see the clarity, contrast, color and brightness are far better with the Wolverine conversion. I'm seeing details in my family's home movies I've never seen before including from regular projection. Overall, I'd say I'm very impressed and satisified, just don't expect miracles. 8mm film is extremely small. You're never going to get hi-def images, but compared to a past professional transfer I had done, it's far superior.
G**S
Este digitalizador cumple muy bien con la función para la que fue diseñado. La calidad del archivo de video dependerá de la calidad de la película original. Se pueden hacer algunos ajustes como encuadre (casi todas las películas lo requieren) y otros antes de digitalizar pero también se puede usar algún software de edición como Adobe Premier para mejorar colores, saturación o iluminación sobre todo. Su uso es bastante sencillo aunque es necesario estar pendiente de cuando termine de digitalizar la película ya que no se detiene automáticamente. Una película de 3 minutos se digitaliza en aproximadamente 30 minutos. Es una muy buena inversión si se cuenta con muchas películas 8 o super 8.
G**.
Sto usando questo apparecchio ormai da un paio di anni (quasi un centinaio di bobine riversate) e mi sono trovato bene. Se uno ha molti film da riversare è senz'altro molto più conveniente rispetto a far fare il lavoro da un professionista. La qualità è buona anche se non a livello super professionale, ma per i vecchi film di mio nonno, di mio padre e miei va benissimo e mi riporta indietro nel tempo. Ovviamente il processo è lento e bisogna armarsi di santa pazienza, ma il risultato è buono.
F**E
Easy to use. Meets expectations
C**R
very pleased,the detail on my 8mm films are best ever .my memories live again.thank you cliff
キ**ー
大きなリールが使用可能なこと。 性能の割にコンパクトなことがあけられます。ただ惜しむらくは 日本語の取説が付属してないこと。設定の際に困り果ててしまいました。どうやったかは別として、快適に使用しています。
Trustpilot
3 days ago
2 months ago