Desert Online General Trading LLC
Dubai, United Arab Emirates
Desert Online General Trading LLC
Dubai, United Arab Emirates


✨ Elevate Your Entertainment Experience! ✨
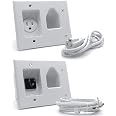
The DATA COMM Electronics In Wall Cable Management Kit offers a comprehensive solution for concealing low voltage cables behind your wall-mounted TV. Designed for easy DIY installation, this kit ensures a neat and organized setup while adhering to safety standards. With its durable construction and efficient cable management capabilities, it’s the perfect addition to any home theater.
| Installation Type | Screw-In |
| Material Type | Plastic |
| Style | Kit with Single Power Solution |
| Color | White |
S**E
Great product
I’ve used and purchased several of these over the years. Very durable and easy to install. Gives a clean and professional look and provides very easy cable management. Great value for what you get. If you want great cable organization and easy functionality, then don’t hesitate to purchase
A**I
Worked perfectly, get it!
This kit worked perfectly. I was pleased that it had romex for inside the wall and a regular extension cord for outside the wall. You can't run an extension cord inside the wall (its against national electric code), so the romex (NMC) was appropriate. The kit had everything needed for the install, minus the tools needed to put it in the wall, of course. It made a clean install and looks great. I will be buying again for other TV's in my house.
P**S
Jeez...it actually works!
I've had this kit sitting next to the TV for a week and finally decided to get going and get the TV set mounted today before the wife got home. She was tickled when she saw the nice results.Like the other reviewers I found the kit easy to install and the internet video provided a great walk-through. I would however offer the following tips:1. Before you begin you should test all cables that will be going behind the wall and ensure that they working perfectly. Don't wait till the end and hope everything works out. You should also carefully measure for the needed lengths of the cables that will be hidden. It's frustrating to almost get to the finish line only to realize that your HDMI cable is 2' short. Add a foot or two to your measurements; you can always tuck any excess into the wall.2. The kit supplied power connector (the upper one that your TV's power cord plugs into) is rather stiff. I found it useful to plug and unplug the TV's power cord into it six or seven times before mounting it, and that payed off with a smoother connection at the end of the installation.3. A pair of needle-nose pliers is very useful for bending wire ends into "hooks" for the screw-down connections to the upper power connector, as the supplied electrical wire is very rigid.4. The product installation video shows the "Wings" of the electrical boxes and plates as being secured with a turn or two of the supplied screws. This gave me the impression that the screws for the wings just needed a couple of turns and then the wings would then pop into position and lock the box or plate into place. My experience was that the screws have to be continuously tightened until the wings at last are snug against the drywall and the plate or box is locked into place. This might be a no-brainer to some but I thought I'd point it out for the rest of us.5. Take your time and measure and mark the locations of your cut-outs carefully so that both plates line up neatly. You get bonus points if you use a small bubble level when tracing your cut-outs so that both are nice and plumb. I mean, why not do the job right? Yep, you are doing this job yourself to save money, but don't let anyone looking at your work think, "Hmm...a pro would STILL have done a much nicer job!"6. If this is your first time mounting a TV on a wall you might be tempted to try and finish the job by hefting the TV into place by yourself (if working alone). Unless your TV is very small this is a mistake. Mounting this 40" TV by myself was a real pain and a bit foolish.Bonus Tool: An oscillating multi-tool makes beautiful clean cuts in drywall like a hot knife through butter. They can be had for as little as $40.00 bucks these days. Amazon sells them at a good price. Not necessary, but quite useful for a number of household projects. I love mine and it made this job all the easier.When you are all finished, have a sip of your favorite drink and pat yourself on the back for the hundreds of dollars in TV installation and electrician costs that you just saved!
T**E
Good Product, Easy to Install
Installation Tips:!With Power Off!1. Work Top Down2. Cut holes3. Run wires (through both wall and plastic pieces < both the boxes and their white inserts)4. Connect wires - to connectors5. Fix top box (the electrical and white one) into wall < make sure the connectors for your TV/Monitor are easy to get at.6. Connect your TV/Monitor (including tv plug) and mount it to wall < I assume you have a bracket already there7. Push (or pull from below gently) any excess cable into the wall behind your TV.8. Mount / connect (NOT THE POWER CORD!) the bottom box - leave excess cable sticking out (i.e.) HDMI/Coax) alone.9. Connect HDMI etc, to devices, move furniture back and push any excess cable back into the wall at the bottom end.10. Plug in the power cord to the wall socket, test and you're done!
N**Y
Works well and Easy to Install
After never doing an in-wall installation before, I was just a little intimidated by this kit. But, I was working in my gym and really didn't care about screwing things up, so I went ahead and took the shot.This kit worked out really well. The instructions were pretty simple, perhaps requiring a bit of assumption to fully comprehend, but I was able to work out what they meant well enough. Note that when it says "designed to be installed between studs," it means that there are no stud mounting points for the in-wall electrical boxes, so you want to keep a bit of distance between them and the studs.Based on some reviews, I cut out the provided template just a tad small and really used it just to establish the corners. Wanting things level, I used a large level to draw the final square on the drywall where I wanted the plates to go. Then, I drilled some initial guide holes in the corners and used my drywall saw to cut out the wall. Once I had the holes, I roughed in the plates to check fit and level, and then refined the cut a bit to get everything right. Note, though, that the plates use little "flappers" that tighten against the inside of the wall when you screw the plate in to hold it in place. The top flapper extends just a bit outside of the square when set in the initial vertical direction, so I had to notch the wall a bit on the upper right-hand corner of the square to set the plate on the wall.Next, I installed the electrical boxes. Easy enough using the same "flapper" hold system as the plate. The instructions are not really explicit that the boxes are for covering up the left-hand side of the plate that holds the power, plate only has screw holes on that side for mounting the plate to the box. The boxes secured to the wall easily. I then checked for plate fit one more time and filed the wall a bit more in the necessary places. Another thing not explicitly stated in the instructions is that you need to punch out holes in the back of the box to allow the wire through. Easy enough to do, but I suggest doing it before you install the box.When it came to the wiring, it was fairly easy to manage if you have a good wire cutter. The outer sheath is very strong and the wire seems to be good quality. I ran the wire through the wall first with a wire pull rod, put it through the punched out holes of the electrical boxes, and then did the stripping. The instructions were then perfect for matching the wires and wiring up the power sockets. Then, I ran an in-wall rated HDMI cable through the wall and then through the plates. After that, I secured the plates. Everything is tight and level.A couple of notes that cut a star off of the rating. First, I was disappointed that the low-voltage ports on both plates are pointed in the "down" direction. I would have preferred the lower plate (the one you generally put power to) were pointed in the "up" direction to more easily facilitate future cable runs. You could always flip the plate, but then the power would be upside-down. More cosmetic than anything. Also, the power cable sticks a good bit out of the wall. I would have preferred the end to be a bit smaller to put the bend a little more flush with the plate.
Trustpilot
3 weeks ago
2 months ago