
DOWNLOAD THE APP


Customer Services
Copyright © 2025 Desertcart Holdings Limited
DOWNLOAD THE APP


🔌 Seal the deal with every connection — no slip, no drip, just pure power!
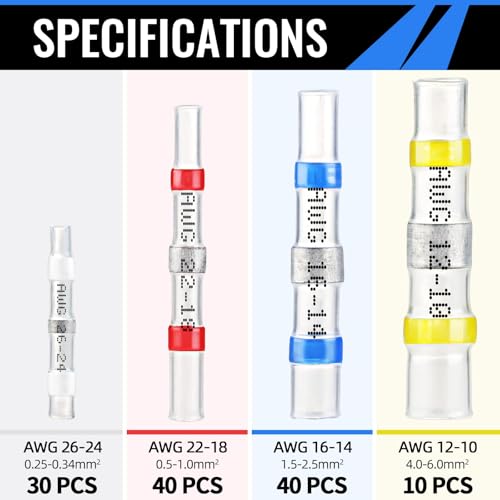
The Sopoby 120PCS Solder Seal Wire Connectors kit features heat shrink tubing with integrated solder rings that melt to create waterproof, corrosion-resistant, and mechanically strong wire connections. Designed for professional-grade automotive, marine, and DIY electrical projects, this no-crimp solution offers transparent sleeves for easy wire inspection and color-coded tubing for quick gauge identification. Certified to international quality standards, it supports up to 600V and includes 120 connectors in four sizes, making it the ultimate all-in-one wiring kit.


| ASIN | B07S62KYSL |
| Item model number | Sopoby334 |
| Manufacturer | Sopoby |
| Package Dimensions | 19 x 10.9 x 1.6 cm; 100 g |
M**I
legendary product
You can buy it with peace of mind of very good quality. Seller ships fast thanks seller
K**R
I've never used this type of wire connector before, but I connected wires with four of them without any issues. they work as expected. I also bought this heat gun, B0CHVDL25P, because of another review suggesting using a reflector, which I didnt have. My only negative opinion of them is wishing they had more solder or some type of indicator when the joint is secure because I was unable to see the solder melt and just guessed when it was complete.
R**A
I have used several of these connectors for different projects, including adding accessories to my RZR and fixing various appliances around the house. One of the standout features of this kit is its ease of use. The solder seal connectors create a strong, waterproof bond without the need for complicated crimping tools, making my work faster and more efficient. These connectors provide a secure connection that holds up well, even in tough conditions. I was particularly impressed with how well they performed when used on my RZR, where they faced exposure to vibrations, dirt, and moisture—yet the connections remained intact and reliable. For appliance repairs, the heat shrink design ensures a tight, insulated seal that has given me peace of mind knowing that the electrical work is protected. Overall, this kit has proven to be an invaluable addition to my toolkit. Whether for automotive, marine, or household electrical projects, these connectors have consistently delivered quality results. If you need dependable, high-quality wire terminals that are waterproof and easy to use, I highly recommend giving this product a try.
A**R
These little connectors are great! It says to use a heat gun but you can use a lighter at a distance just don’t hold it in one spot go back and forth it works fine
C**C
I only use these for light electronics so far, such as splicing in a case fan to a power supply molex for a computer case. There isn't a lot of expectation of movement or tension on the joint, all I am really doing it for is to keep the connection and prevent any shorts from occurring accidentally. That said, even with my relatively inept skill at this, it does seem to do that job sufficiently. I was a little worried about the reports of people blasting through the plastic and splattering solder all over the place, which would be disastrous inside a computer case which is where this was performed, so I was very cautious and am not even entirely sure I did much more than a shrink wrap on the wires, though I think the solder did get melted onto the wires. It was hard to tell though. I gave it the light tension test of tugging on the wire to see if it seemed to come loose, and it did not, which was good enough for me. If this was expected to come under any real strain on any basis at all, then I would want more proof that it had worked, probably would have cut off the shrink wrap and looked to see that I was sure the solder had melted and it had worked, then cut it and do it all over again. But for my purposes, admittedly extremely light, it worked. I used a heat gun that I set to 400 F for this. I used a set of "helping hands" clips to keep the wires held up for the heat gun and moved the heat gun all around one side, then twisted the wire around in the clips and did the second side. It took a while to shrink wrap the wires, and again I am uncertain if it actually melted the solder, but again, my needs were limited. My lack of confidence in the soldering happening, the reports about solder splattering after melting through shrink wrap fear, and the length of time it took to shrink wrap the wires are why I ticked down overall rating, ease of use, and adhesion.
T**E
I’ve used these Sopoby solder seal connectors across multiple projects—vehicle mods, electronics tweaks, even a few reptile habitat upgrades—and they’ve held up well. The dual-wall design with hot melt adhesive inside gives a strong seal, and the solder ring melts cleanly with a heat gun (skip the lighter unless you like uneven results). Color-coded sleeves make it easy to match wire gauges (AWG 26–10), and the included case keeps everything organized. Once shrunk, the connection is tight, waterproof, and surprisingly durable—even in outdoor or high-humidity setups. Just make sure to heat evenly and rotate the connector for a proper seal. If you want fast, reliable wire joins without crimping tools or messy soldering, this kit delivers. Not fancy, but functional—and that’s what counts.
Trustpilot
5 days ago
1 month ago