Description
🚀 Small Size, Big Impact: Power Your Productivity & Play in 4K
- 4 K ULTRA HD READY - Intel Iris Graphics 540 supports stunning 3840x2160 resolution for immersive media and gaming experiences.
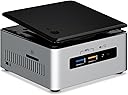
- COMPACT POWERHOUSE - Mini PC footprint smaller than a CD case, delivering desktop-grade performance without the bulk.
- CUSTOMIZABLE STORAGE - Dual storage slots including a high-speed PCIe M.2 SSD option for lightning-fast data transfer and ample media storage.
- SEAMLESS CONNECTIVITY - Equipped with Bluetooth, Wi-Fi 802.11ac, HDMI, and 6 versatile USB ports to connect all your professional gear.
- WHISPER QUIET EFFICIENCY - Advanced cooling design keeps fan noise minimal, perfect for distraction-free work or entertainment.
The Intel BOXNUC6I5SYH is a sleek mini PC kit powered by a 6th Gen Intel Core i5-6260U processor with Turbo Boost up to 2.8 GHz. It features Intel Iris Graphics 540 for brilliant 4K UHD visuals, supports up to 32GB DDR4 RAM, and offers extensive connectivity including Bluetooth, Wi-Fi 802.11ac, HDMI, and six USB ports. Designed for professionals craving desktop power in a compact form, it supports dual M.2 SSD storage for rapid data access and runs whisper-quiet, making it ideal for media streaming, light gaming, and multitasking in modern workspaces.