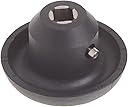
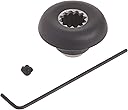
🔧 Keep Your Blend Game Strong!
The Vitamix Drive Socket Kit (Metal - 891) is an essential maintenance tool designed to ensure the optimal performance of your Vitamix blender. This compact kit includes a durable alloy steel socket drive, an Allen wrench for easy installation, and clear instructions for checking and maintaining your socket drive every 3-4 months. With a focus on quality and longevity, this kit is a must-have for any Vitamix owner.
Brand | Vitamix |
Item Length | 2 Inches |
Material | Alloy Steel |
Drive System | gear |
Finish Type | Unfinished |
Number of Pieces | 1 |
UPC | 703113008917 252121000920 885415092273 885277979101 252121000197 003113008918 088087745106 885527867226 885554014389 781147160245 885415754638 |
Global Trade Identification Number | 00703113008917 |
Manufacturer | Vitamix |
Part Number | 891 |
Item Weight | 0.8 ounces |
Country of Origin | USA |
Item model number | 891 |
Is Discontinued By Manufacturer | No |
Size | Pack of 1 |
Color | Metal |
Finish | Unfinished |
Power Source | AC |
Item Package Quantity | 1 |
Compatible Fastener Range | female connection and is stabilized by a a AUEN SET SCREW. Auen wrench is supplied in kit (INCLUSIVE WITH PURCHASE) |
Included Components | Drive Socket Kit |
Batteries Included? | No |
Batteries Required? | No |
Warranty Description | Guaranteed to be free of defects in materials and workmanship |
J**C
Perfect fit
I received an OEM part. Once I got the old drive gear off, installing the new one was very easy. It came with the set screw & an allen wrench. The hard part was getting the old one off. I had to use a drill to open the screw access hole slightly to be able to remove the screw. Then the old drive had to be pried off. After that - just a clean up of debris and install new drive. My vitamix works great now.
M**N
Great.
Worked perfectly. Matched the original perfectly as far as I could tell. Comes with Allen tool and set screw just as shown in picture. Gonna order another so I have a spare since they seem to break every 2 years.
M**N
Works well with model 5200
Works well. It would be helpful if they specify Vitamix models compatible with the item.
T**E
Easy Peezey for installing
Fit perfectly and installed in minutes. Easy peezey
H**E
Perfect replacement part.
If you have a Vita-Mix Blender (mine is a Commercial Grade "VM0115A" T&G (touch and go) 2 Blending Station Part Number 34013) and need a replacement Drive Socket then this is your part! This socket works on all "Commercial" Grade Blenders, except the Food Processor "Vitamix XL". If you have a "Home" Grade (non-Commercial) model then you'll have to call Vitamix at 1-800-848-2649 to see if this is the right part for your Blender. I can find it around $10 at several places on the internet but the shipping charges were so high it's actually cheaper to order it here at Amazon. Especially if you get the Free Shipping option for an order over $25, or have Prime. I bought 2 so I have a spare and got Free Shipping. The Allen wrench comes with the part so there's no other tools needed. Takes 5 minutes to switch out the part. Instructions come with the part too.A word of advice to those that have never replaced these Drive Sockets before: get a second part because it is very easy to over tighten the set screw when initially installing the new part to the shaft. Also note that the alignment (angle) of the screw is slightly tipped upwards so if you are having a hard time getting the Allen wrench to line up to the Allen set screw just make sure this plastic Drive Sockets raised alignment arrow is first lined up to the opening in the blender housing (run your finger over the sockets outer edge if you're having a hard time seeing the arrow). Then very lightly turn the Allen wrench clockwise until it stops. DO NOT CONTINUE TIGHTENING THE SCREW because you can very easily strip out the threads of the plastic socket housing. Once it's stripped out the socket won't stay on the shaft. That's why I buy 2. I don't like the design that allows the part to strip out so easily but I guess that's why so many people need this part.Once it's tight, back off the screw 1/4 counter-clockwise turn and try to hand pull the Drive Socket up off the shaft. If the Socket stays in place then it's tightened correctly. Now turn it on to make sure it doesn't vibrate wildly. If it does vibrate you'll need to loosen up the screw and rotate the socket 90 degrees and retighten it again (don't forget the 1/4 counter-clockwise adjustment). Repeat as necessary. That's it- you're all ready to go. Margarita anyone?Update Nov.9,2014:If your looking for the part number of this socket Vitamix calls it part number 000891 (some places just refer it as "891") which gets you Qty 1.P/N 0155546 will get you Qty 2 (which I highly recommend since these will last about a year before they go bad), and P/N 015547 which will get you 5 pieces.
M**S
Excellent - worked like a charm and very easy to install!
After using my Vitamix 5200 at least once daily for the past 9 years, I began mixing my morning smoothie then the blades just stopped rotating, although the motor was still running. When I took the container off the base and turned the machine back on I noticed the drive socket (didn't know that was the name of the little round thingie in the top middle of the base until just this week) wasn't rotating. With Christmas only a couple weeks away, the thought of purchasing a new machine or sending mine off for weeks to be repaired was repugnant. Reason dictated that the motor itself seemed to be working just fine, so I began researching online to learn what to do and came across the Vitamix Drive Socket Kit here on Amazon.I read the reviews and decided it was certainly cheap enough to order the kit with 1-day shipping (so I could get back to my smoothies sooner - hopefully). As other reviews have stated the instructions were very clear and easy to follow -- plus installing the new drive socket totally corrected the problem!One thing not mentioned in recent reviews is that after the new drive socket is installed, the instructions recommend putting a small bead of silicone over the screw hole used to tighten the new socket. That's not something we keep on hand, however we were very careful when changing out the old drive socket not to destroy the old silicone -- we just gently held it away from the hole -- and were able to then just push it back into place.This kit is worth every penny if you problem is the drive socket! As long as your Vitamix motor is still working when you turn it on, and if the blades in the container have stopped spinning, this is definitely the first thing I would suggest trying!
G**R
Works fine
The day it broke down I freak out because it cost way too much. And then I loook online. And find the way to fix it by simply replacing it. So I ordered and cames two days after which is fast. Despite the part is slightly different from the original in the blender . But it works as it should.
P**C
Original Vitamix Socket
Be sure to read the directions and follow them exactly, even though they don't appear to make sense. If you have done it correctly, the socket will be slightly loose....I am not kidding...
Trustpilot
2 weeks ago
1 month ago